• Blog
  • Recipes
  • Lifestyle
  • Safer Skincare
  • About
  • Contact
Menu

Kate's Healthy Cupboard

Street Address
City, State, Zip
Phone Number
Healthy Lifestyle, Healthy Grain Free Recipes

Your Custom Text Here

Kate's Healthy Cupboard

  • Blog
  • Recipes
  • Lifestyle
  • Safer Skincare
  • About
  • Contact

Cinnamon Apple Granola

November 27, 2012 Kate
Cinnamon Apple Granola

I have been sitting on this recipe for quite some time.  It is one of my favorite granola recipes, but I get hesitant to share my recipes that I use a dehydrator.  I know only a few of you have one and this can certainly be done in the oven, but the dehydrator always tastes best.

This is the perfect flavor for this time a year and can be enjoyed plain or with milk!  The added protein powder makes this the perfect high fat and moderate protein breakfast!!!  You may also like to try my other grain free granola recipes, Almond Nut Joy, Banana Nut and Pumpkin Spice.

Maybe a dehydrator should be on your holiday wish list!!!  The Nesco that I have is very reasonably priced.

Cinnamon Apple Granola

Ingredients

  • 2 1/2 cups raw nuts, chopped (I used almonds and walnuts)
  • 1 apple, diced
  • 1/3 cup almond flour
  • 1/4 cup vanilla protein powder* (I used Jay Robb’s Vanilla Egg White Protein)
  • 2 1/2 tsp cinnamon
  • 1 tsp lucuma powder, optional
  • 1/2 cup apple sauce
  • 1/4 cup honey
  • 2 tbsp almond butter
  • 1/2 tsp vanilla extract
  • couple dashes of sea salt

Instructions

  1. Combine the chopped nuts, apple pieces, protein powder, almond flour, lucuma, cinnamon and salt in a bowl and mix well
  2. In a separate bowl, combine the apple sauce, almond butter, honey and vanilla
  3. Combine the two bowls and stir until all the dry ingredients are coated
  4. Place on dehydrator sheets in clumps and dehydrate at 145 for 2 hours, then turn down to 115 until desired crunch is obtained. I left it in there for 24 hrs.
  5. For oven method, place on a parchment lined cookie sheet and bake at 175-200 until desired crunch is obtained. Stir every so often to cook evenly

Quick notes

*Substitute the protein powder for an additional 1/4 cup almond flour.

I used Nature’s Hollow Xylitol Honey for a lower sugar option.


For those of you that try this in the oven, let us all know how it turned out!

Kate's Healthy Cupboard - Gluten Free Recipes
In Breakfasts, Recipes, Snacks and Appetizers2 Tags Almond Butter, Almond flour, Almonds, Breakfast, Dairy Free, Egg White Protein, Egg-Free, Granola, Holiday
8 Comments

Bacon Wrapped Scallops

November 8, 2012 Kate
Bacon Wrapped Scallops

So let's be honest, what isn't delicious when it's wrapped in bacon...can't think of anything!!  I don't eat it that often, but when I do, I savor every last bite.  I am not worried about bacon fat, or really any healthy fat for that matter.  As long as your bacon is from a hormone free source and not full of sugar, treat yourself to it here and there!  I get mine from a local butcher, but I highly recommend US Wellness Meats for their bacon and all things meat!  Trusted family farm raising animals right!!

This is such an easy recipe and may remind you of a popular appetizer that calls for water chest nuts wrapped in bacon.  This is just as good, but lacks the crunch of the chestnut, so feel free to add them to each bite as well.  I used bay scallops, it's what I had, but diver scallops cut in half will work just fine.  You may need a bigger piece of bacon for the diver scallops halves or if you are adding a water chest nut.

Bacon Wrapped Scallops

Ingredients

  • 1 lb bay scallops (or diver scallops cut in half)
  • 8-10 pieces of bacon
  • 1/2-2/3 cup Coconut Aminos (found online or Asian aisle of natural grocery stores)
    (Gluten Free Soy alternative)
  • can of water chest nuts (optional)
  • tooth picks or bamboo skewers

Instructions

  1. Marinate the scallops (and water chestnuts) in the Coconut Aminosfor at least an hour
  2. Cut the bacon into half or thirds depending on what scallops you are using or if you are adding chestnuts
  3. Wrap the bacon around the scallop and hold it together with a toothpick or skewer
  4. Place the wrapped scallops on a broiler pan. If you don’t have one, a cooling rack placed on a cookie sheet that is lined with foil works great too
  5. Broil for 3-4 minutes on each side. Watch these so they don’t burn
  6. Serve hot and crispy!
Kate's Healthy Cupboard - Gluten Free Recipes
In Entrees, Recipes, Snacks and Appetizers2 Tags Bacon, Low Carb, Paleo, Primal, Seafood
1 Comment

Coconut Curry Carrot Soup

October 10, 2012 Kate
Coconut Curry Carrot Soup

It's definitely soup season here in Colorado!!!  I just returned from ten days in Arizona and can't believe how cold it feels here now!  I've decided I prefer the warmth and the idea of never having to scrape ice off my windshield!

While I was in Arizona, I made this soup for Tom's (my boyfriend) grandmother.  She is 93...reminds me of Betty White, love her!!  She hasn't been feeling great and I think dehydration is playing a role in her tiredness.  Old people don't want to drink so they don't have to go potty.  She of course thinks she drinks a ton of fluids.  It's hard to convince her that her coffee with Starbuck's Ice Cream in it in the morning and her Vodka on the rocks at night just doesn't cut it!!!  Needless to say,  I was on a mission to get some fluids in her!  I had her drinking coconut water and kombucha along with some homemade bone broth.  I figured soup would be a great way to secretly increase her fluid intake.  She loooooved this soup and ate it everyday for lunch and raved about it every time I dished it up for her.  Hope you enjoy it as much as sweet Verna May did!!!

Recipe: Coconut Curry Carrot Soup

Ingredients

  • 1 tbsp grass-fed butter or coconut oil
  • 2 heaping cups of thickly sliced carrots (about 4 carrots)
  • 2 thin slices of fresh ginger root
  • 1 medium onion, chopped
  • 5 cups chicken broth (I prefer homemade*)
  • 3/4 cup full fat coconut milk
  • 3/4 tsp red curry paste (add more if you want it spicier)
  • salt and pepper to taste
  • 1 scallion, sliced
  • 1 tbsp chopped cilantro
  • 2 chicken breasts (optional)

Instructions

  1. Heat the butter/oil in a large saucepan and stir in the carrots and ginger
  2. Cook over medium heat until the carrots start to brown, about 6-8 minutes stirring constantly
  3. Add the onions and cook until they are translucent
  4. Stir in the broth, coconut milk and curry paste
  5. Bring to a boil, reduce heat and simmer covered for 25 minutes
  6. If you want to add chicken to this recipe, add it to the simmering soup. Remove chicken once it's fully cooked and set aside
  7. Strain the solids so you can remove the ginger root and discard
  8. Add the solids plus 2 cups of the liquid to a blender and puree
  9. Add the remaining liquid and process until completely pureed
  10. Pour soup back into saucepan to add shredded chicken or pour into soup bowls (Use a fork to shred the chicken once it has cooled enough to touch. Add it to the soup and stir)
  11. Serve with some scallions and cilantro sprinkled on top and additional salt and pepper if needed

Quick notes

*I prefer to use homemade chicken broth for all of the health benefits. Store bought will work, but may be higher in sodium so be careful when you salt the soup. I use this recipe for broth. I also add onion, carrots, celery and garlic cloves to my pot for flavor. I use a large crockpot and let simmer for 24 hours to let all of the gelatin out of the bones.

Kate's Healthy Cupboard - Gluten Free Recipes
In Entrees, Side Dishes, Soups, Vegetables, Recipes, Snacks and Appetizers2 Tags Chicken, Coconut Milk, Nut-Free, Paleo
Comment

Cinnamon Maple Coconut Bites

October 5, 2012 Kate
Cinnamon Maple Coconut Bites

Tiss the season for lots of cinnamon...and pumpkin spices!  Here is another easy recipe for a quick sweet treat similar to my Coconut Vanilla Bean Dough Bites Recipe and the Coconut Brownie Bites Recipe.  I used a dehydrator, but it's not necessary.  If you have been thinking of buying one though, I'd bite the bullet and do it, so worth it!!

Cinnamon has some amazing health benefits so why not incorporate it into your day!  A few of those benefits include:  regulates blood sugar, reduces LDL cholesterol levels, has natural anti-infectious compounds, reduces pain linked to arthritis, may reduce the proliferation of cancer cells, serves as a natural food preservative, contains fiber, calcium, iron, and manganese, can be effective for menstrual pain and infertility.  Wow, I might have to make more of these bites or another batch of my Apple Cinnamon Upside Down Cakes!

Cinnamon Maple Coconut Bites

Ingredients

  • 1 1//2 cups unsweetened shredded coconut
  • 1/4 cup vanilla protein powder (I used Jay Robb’s Vanilla Egg White Protein), sub for almond flour if you prefer
  • 1 tbsp coconut oil
  • 3-4 tbsp maple syrup*
  • 1/2 tsp vanilla extract
  • 1 tbsp lucuma powder (optional)
  • 2 tsp cinnamon
  • dash of sea salt

Instructions

  1. Pour the coconut into a food processor and blend until small pieces are produced
  2. Add all of the remaining ingredients and blend well.
  3. Using a small cookie scoop, place each bite onto dehydrator sheets
  4. Dehydrate at 125 for 2-4 hours depending on how soft you want them
  5. Oven option: Set temp to lowest possible setting or use dehydrator setting. Bake for 1-2 hours depending on heat setting

Quick Notes

*I used Xylitol Maple Syrup as a reduced sugar option.

*For more information on Lucuma, read this post

I like to reheat mine each time I treat myself to one or two or maybe three!!  Store in an airtight container.

Kate's Healthy Cupboard - Gluten Free Recipes
In Breakfasts, Recipes, Snacks and Appetizers2 Tags coconut, Dehydrated, Desserts, Egg White Protein, Nut-Free, Paleo, Primal, Vegan
3 Comments

Raw Beet and Sunflower Seed Crackers

September 24, 2012 Kate
Raw Beet and Sunflower Seed Crackers

This may sound very similar to a recipe from a few months back, cause it is.  I basically took my recipe for my Raw Beet Sunflower Seed Pesto and made a few changes to create this delicious cracker!  If you are a beet person, this is a must try!  I used my dehydrator, but I believe this should work just fine in the oven.  Many ovens have a dehydrator option or just bake these at the lowest possible setting.

 Raw Beet and Sunflower Seed Crackers

Ingredients

  • 2 large beets, peeled and chopped (about 5 cups)
  • 4 garlic cloves
  • 3/4 – 1 cup fresh basil leaves
  • 1 cup raw sunflower seeds
  • 2 tbsp balsamic vinegar
  • 1 tbsp psyllium husk*
  • 1 tsp sea salt

Instructions

  1. Place the chopped beets into a food processor and blend until pureed
  2. Add in the remaining ingredients excluding the sunflower seeds and blend until well combined
  3. Add the seeds to the mixture and combine. Do not let the seeds get so small they disappear.
  4. Dehydrate at 145 for 2 hours. Reduce the temp to 105 and dehydrate until crisp. Once the top is completely dry, I flip the crackers to finish. this is the best time to cut or score the “dough” into desired cracker size.
  5. Oven Method: Bake on a parchment lined cookie sheet at lowest temperature setting or dehydrator setting until desired crunch. You may want to turn the crackers over part way through to cook evenly. You can try cutting or scoring the crackers at that time as well.

Quick notes

*Psyllium husk powder helps to bind the ingredients, like an egg does or flax meal mixed with liquid does. It can be found at most health food stores in the supplement section. It is a powder that is high in fiber and when consumed in high amounts, it can cause intestinal distress. I promise the one tablespoon of it in this entire recipe will not cause a problem for you!!

Kate's Healthy Cupboard - Gluten Free Recipes
In Recipes, Snacks and Appetizers2 Tags Crackers, Dehydrated, Nut-Free, Paleo, Primal, Raw, Sunflower Seeds, Vegan
Comment

Lollipop Rolls

August 20, 2012 Kate
Lollipop Rolls
Lollipop Rolls

For those of you that don't know me, I am a huge sushi fan!  Yes, I love raw fish!  I like cooked salmon, but raw salmon sashimi does not taste fishy at all, and if it does, it's old or bad quality!  I buy sushi grade salmon and tuna from Whole Foods and have never had it be bad.  They have it already portioned out in slices and pack it fresh on a regular basis.  Raw fish does not stay fresh for long, so please buy it to use that day or possibly the next.  So if you are someone that avoids sashimi because you can't stand how fishy cooked salmon is, give it a try, you might be surprised!!

One of my favorite sushi restaurants in Scottsdale that we frequent a lot, has four different lollipop rolls on their menu.  I just love how refreshing they are with the cucumber wrap and they are free of rice for all you grain free friends out there!  The roll I order consists of salmon, yellowfin tuna, crab and avocado wrapped in cucumber and served with a ponzu dipping sauce.  Being gluten and dairy free tends to mean you can not enjoy any sauces at sushi restaurants.  I love these as is with some wasabi on top, but for my lollipops I decided to dip them in my Avocado Vinaigrette.  I love the mixture of avocado and sushi so this is the perfect match!!  The other option is to eat it like a traditional roll and dip it in a mixture of wasabi and some Coconut Aminos (gluten free soy sauce alternative that tastes great!!).

I was so excited to post this recipe that I didn't want to wait any longer as I experimented with a gluten free ponzu sauce.  I will work on one, seems pretty simple.  I am also going to work on a pesto dipping sauce that many places serve with rolls as well.  These may look complicated, but really take no time at all!!!

Lollipop Rolls

Makes 12 rolls

Ingredients

  • 3/4 lb of sushi grade fish (I used salmon and tuna, but crab or shrimp will also work)
  • 1 large cucumber
  • 1/2 of an avocado, sliced into 6 strips
  • 12 bamboo skewers
  • wasabi powder

Instructions

  1. Using a mandoline, slice the cucumber lengthwise into 1/8 inch thick slices
  2. Lay out a slice of cucumber vertically. Place fish slices and a slice of avocado horizontally across the cucumber. Set all of them right next to each other. You may need to trim off and pieces that are hanging over the edge of the cucumber
  3. Roll the cucumber tightly until it overlaps itself.
  4. At the overlap spot, poke a bamboo skewer into each side so you can slice it right down the middle to form two rolls.
  5. Repeat the process until you have 12 finished rolls.
  6. Combine wasabi powder with a bit of water to create desired consistency

Don't like sushi, enjoy these with chicken or beef strips and some raw veggies!  Don't be afraid to get creative!

Kate's Healthy Cupboard - Gluten Free Recipes
In Entrees, Recipes, Snacks and Appetizers2 Tags Fish, Low Carb, Nut-Free, Paleo, Raw, Seafood, Sushi
4 Comments

Coconut Vanilla Bean Dough Bites

June 21, 2012 Kate
Raw Coconut Dough Bites

The title says it all, but I will add one more thing...MELT IN YOUR MOUTH DELICIOUS! If you like coconut, go make these and report back to us about how good they are.

I used my dehydrator for this recipe, been using it a lot lately.  These can certainly be done in an oven as well.  My oven has a dehydrator setting on it so check to see if yours has that option too.  If not, set the temperature for as low as possible (mine is 175).  I have quite a few recipes coming up that use the dehydrator.  It is a favorite among raw foodies because you are simply removing all of the moisture without cooking.  It does take a lot longer than the oven, but also allows for more nutrients to be present.  I personally prefer the dehydrator over the oven method for the treats that I have been making.  I have a very inexpensive one (for now, looking at a different one for the shape of it will make some recipes easier) that can be found at Bed, Bath and Beyond or Amazon.  It is the round Nesco that you can purchase additional trays if need be.

This recipe calls for Lucuma Powder, a superfood referred to as Inca Gold.  I have had a package of this sitting in my frig for over 6 months so I decided to finally use it! It is not necessary in this recipe, but it does add flavor.

What is Lucuma...a sweet and edible fruit of the Lucuma tree (Pouteria obovata, or Lucuma obovata), resembling a persimmon in appearance.

According to Navita Naturals, (where I order my superfoods from) Lucuma is considered a healthy alternative sweetener as it lends a sweet taste to recipes, but is very low in sugars. With naturally occurring beta-carotene, niacin, and iron, lucuma powder is a welcome antidote to notorious “empty calorie” sweeteners.  Lucuma Powder has a distinctively sweet fragrance and full-bodied, maple-like taste. A deliciously versatile dessert ingredient, lucuma blends well to make alluring smoothies, puddings, and ice creams, and can also be used as a flour in exotic pies and pastries.

Ingredients

  • 1 1/2 cups shredded coconut
  • 1/4 cup vanilla egg white protein (optional, replace with almond flour but this adds great flavor)
  • 1/2 tsp vanilla bean powder (1-2 pods)
  • 1/2 tsp vanilla ext
  • 1 tbsp Lucuma Powder (optional)
  • 3 tbsp virgin coconut oil, softened
  • 2 tbsp coconut cream/butter, softened
  • 3 tbsp liquid sweetener* (maple syrup, honey or coconut nectar)

Instructions

  1. Place the coconut, protein powder and vanilla beans into a food processor and blend until coconut reduces in size
  2. Add in the remaining ingredients and blend until a dough forms
  3. Using a small cookie scoop, place each dough bite onto dehydrator tray or onto a parchment lined cookie sheet
  4. Dehydrate at 125 for 2-4 hours
  5. Bake at 175 for 1-2 hours
  6. Check the bites regularly to see if desired level of "doughiness" has been met

Quick notes

*I used xylitol honey which is not as sweet as regular honey. I added 2 tbsp of Lakanto (erythritol) as well.

These are best right out of the dehydrator/oven.  Don't get me wrong, they are still delicious the next day too...if they last that long.  You can throw them into the dehydrator or oven for 5 minutes to reheat before you enjoy them again!  Store in an airtight container, I prefer glass.

Kate's Healthy Cupboard - Gluten Free Recipes
In Recipes, Desserts2, Snacks and Appetizers2 Tags coconut, Coconut Milk, Dehydrated, Nut-Free, Raw
1 Comment

Plantain Flour Tortillas

June 18, 2012 Kate
Plantain Flour Tortillas

Plantain Flour...what the heck is that and where do you find it?  I had no idea there was such a thing until a few months back.  I ordered a bunch and have been experimenting with this starchy, moisture absorbing flour.  After I created the Plantain Tortilla Chips Recipe, I knew I could make some sort of a tortilla as well.  I will probably still try a "corn tortilla" that could be used for an open face taco, but until then, these bendable tortillas are perfect for tacos, burritos, wraps and so much more!!!  I love them warm with melted butter and rolled up.  I think next time I might add some cinnamon too!

There are so many different grain free tortilla recipes out there using almond flour and/or coconut flour.  I just don't think they taste much like a tortilla.  These turned out to be the next best thing to a gluten filled one.  If you have recently been eating "normal" tortillas, these may seem weird, but if you are used to the very different "bread like" products of the gluten free world, you will enjoy these!  They actually bend without breaking and have that doughy taste and feel to them.  I think they are best when served warm and used the same day they are made.  They are fine a day or two later, but like most baked goods, they are best fresh and warm.  I can't wait to try this in an enchilada recipe.

Recipe: Plantain Flour Tortillas
Ingredients
  • 1 tbsp palm shortening, softened
  • 1 tbsp grass-fed butter, melted
  • 2 cups non-dairy milk (I used plain carton coconut milk)
  • 1 cup plantain flour
  • 1 tsp sea salt
  • coconut oil for the skillet
Instructions
  1. Combine all ingredients into a food processor or blender and blend until smooth
  2. Heat a greased skillet (I used a small one) on med-high heat
  3. Once it is hot, pour about 1/4 cup batter onto pan and swirl around to coat it
  4. Cook until brown and flip to cook the other side
  5. I took the pan off the burner and lowered heat between cooking each one. It seems to get too hot and the batter won't swirl around. If you lower the heat, it won't brown the tortilla and make it crispy.

Makes about 10 small tortillas

Plantain Flour is inexpensive compared to nut and coconut flours.  It can be found on Amazon, but is less expensive to order it directly from the company, Barry Farms.  Here is another pancake recipe using Plantain Flour that will make it worth your while to purchase some of it!

Kate's Healthy Cupboard - Gluten Free Recipes
In Breads and Muffins, Entrees, Side Dishes, Recipes, Snacks and Appetizers2 Tags Egg-Free, Nut-Free, Paleo, Plantains, Primal
5 Comments

Banana Nut Butter Pudding Pops

June 11, 2012 Kate
Banana Nut Butter Pudding Pop

I have figured out that taking pictures of frozen treats is hard!!  They melt extremely fast, especially coconut milk based products.  I promise I will get better at popsicle pictures.  Part of the problem is I don't like the molds I am using.  I love the shape of the popsicle but not the pink and green handles that come with them.  I am going to break down and buy some stainless steel molds I've been eying and avoid plastic all together.  Please bare with me as I hide the green stick in this photo, it was ruining the picture!

Enough about the (not so good) photo...that's bugging me!  Remember pudding pops as kids?  Here is my attempt at recreating something similar and better for you!  This recipe is so quick and easy and can be created to your nut butter preference.  I did use peanut butter, but almond butter or cashew butter would be delicious too!  I may try to do an almond butter and possibly cherry as a combination as well.  Bananas are so mushy and pudding like that they work perfectly as would avocados.  Feel free to play around with different milks, fruits, yogurts or kefirs (if you tolerate dairy) and see what you can come up with!

Recipe: Banana Nut Butter Pudding Pops
Ingredients
  • 2 ripe bananas
  • 1/2 cup nut butter
  • 1 1/2 cups non-dairy milk (I used carton coconut milk)
  • 1 tsp vanilla extract
  • 1/4 tsp salt (omit if nut butter is salted)
  • 2 tbsp honey or sweetener of choice (optional)
Instructions
  1. Toss all of the ingredients into a blender or food processor and combine until smooth
  2. Pour into popsicle molds and freeze overnight

Servings: 6

Variations

This could also be done as ice cream in a machine or frozen in a bowl overnight.  Or if you don't have the patience to freeze it, you can simply enjoy it as pudding!!!

Kate's Healthy Cupboard - Gluten Free Recipes
In Recipes, Desserts2, Snacks and Appetizers2 Tags Dairy Free, Paleo, Primal
Comment

Raw Beet Sunflower Seed Pesto

June 4, 2012 Kate
Beet Pesto
Beet Pesto

If you like beets...yum is all I can say!!!  I think beets are very polarizing, you either love them or hate them.  I personally love them!  I got the inspiration to make this recipe from a restaurant in Denver, Root Down.  For those of you that live here, it's a must for dinner and brunch!  It is a laid back atmosphere with very unique dishes designed to appeal to just about anyone.  From the meat eater to the vegan, you can find something fantastic on their menu.  They cater to food allergies and offer many different variations to most items.  They try to use almost all local food companies for their menu items and create their menu to reflect the season.  I Highly recommend it!

They have a beet arugula salad that I love to get for brunch.  Along with the beets, arugula, toasted hazelnuts, it includes a beet-sunflower seed pesto dolloped next to the salad.  I mix it right in to the salad as a dressing along side the basil vinaigrette and the balsamic reduction that is drizzled around the plate.  I don't think I had ever really read the description of the salad until this past weekend when I ordered it.  Beet-sunflower seed pesto...that's all I needed to read to realize I could recreate something similar.  I decided to take the entire salad, excluding the nuts and arugula, and make a pesto from the remaining items.  Here is what I came up with and I hope you enjoy it as much as I did!!

Recipe: Raw Beet Pesto
Ingredients
  • 2 large beets, peeled and chopped (about 5 cups)
  • 4 garlic cloves
  • 3/4 - 1 cup fresh basil leaves
  • 3/4 cup raw sunflower seeds
  • 2 tbsp balsamic vinegar
  • 1 tbsp olive oil (or more if you prefer)
  • 1 tsp sea salt
Instructions
  1. Place the chopped beets into a food processor and blend until pureed
  2. Add in the remaining ingredients and blend until well combined
Variations

If you can tolerate cheese, you could certainly add some cheese chunks to this as well.

This could be enjoyed in so many different ways.  You could use it as a sauce over pasta, meats or spaghetti squash like traditional pesto.  It can also be served as a dip or spread for vegetables, crackers or chips.  I would even use it as a salad dressing!!!  I have two more recipes in the making that will incorporate this raw nut-free pesto deliciousness!!!

Kate's Healthy Cupboard - Gluten Free Recipes
In Dips and Spreads, Vegetables, Recipes, Snacks and Appetizers2 Tags Dairy Free, Nut-Free, Paleo, Primal, Raw, Sunflower Seeds, Vegan
1 Comment

Spinach and Avocado Dip

May 21, 2012 Kate
Spinach and Avocado Dip

This is a nutrient-dense dip filled with the many benefits of spinach and the heart healthy fats of avocado.  If you are an avocado fan, this is a must to make.  It's almost like a guacamole but the spinach adds a bit of a different element and not to mention so many more nutrients.  I made this with some mexican spices, but feel free to add whatever sounds good to you!!

This dip can be enjoyed with fresh vegetables, spread on Grain Free "Wheat" Crackers, used in place of mayo in an egg or chicken salad or spread on salmon sashimi!  I can easily just eat this straight out of the bowl with a spoon!  If you are trying to get more greens into yours or your families bodies, this is an easy way to sneak spinach in!

Recipe: Spinach and Avocado Dip
Ingredients
  • 1 ripe avocado
  • 4 large handfuls of spinach
  • 1 tsp lemon or lime juice
  • 1 garlic clove
  • 1/4 tsp cumin
  • 1/4 tsp sea salt
  • dash of cayenne pepper
Instructions
  1. Add all of the ingredients into a blender and blend until smooth

Kale is another powerhouse green that you could use in place of or in addition to the spinach. I have not tried this so I am not sure if kale is more obvious in taste.

Kate's Healthy Cupboard - Gluten Free Recipes
In Dips and Spreads, Recipes, Snacks and Appetizers2 Tags Dairy Free, Low Carb, Nut-Free, Paleo, Primal, Vegetables
1 Comment

Kale Chips

May 10, 2012 Kate
Kale Chips
Kale Chips

One of my favorite greens and one of the most nutrient rich greens...Kale!!!  I figured I better post a vegetable recipe before I post anymore sweet treats.  I need to get better about providing more savory recipes and more vegetable ideas, but I really enjoy baking and not to mention taste testing those recipes.  I love kale chips and all, but the cookies I'm perfecting are far more exciting!!

Kale is full of carotenoids and flavonoids, two powerful antioxidants that protect our cells from free radicals that cause oxidative stress. The key flavonoids are kaempferol and quercitin and there are  45 others!  With the addition of high doses of vitamin C, vitamin A, and manganese, kale is certainly a smart choice to battle against cellular oxidation.  Kale also acts as a natural anti-inflammatory, it provides omega-3 fatty acids that helps regulate the body’s inflammation. Many other health aspects of Kale include, the high fiber content that can possibly lower cholesterol, the isothiocyanates from glucosinolates (whatever that is) found in kale can aid in both phases I and II of the body’s detoxification process and Kale is very high in Vitamin K.  Vitamin K can help strengthen our bones, prevents calcium buildup in our tissues that can lead to atherosclerosis, cardiovascular disease and stroke.  And there's more...Kale contains high levels of vitamin A and C, both of which are effective antioxidants that boost immunity.

So do I have you convinced to either try kale or eat more of it yet?  Kale chips are an easy way to enjoy kale and believe it or not, most people find them addicting.  I could eat the entire batch and the best part is, I don't feel a bit guilty about it!!  The options are endless  as to how you could season these chips.  I am pretty simple and just enjoy olive oil and sea salt, but feel free to get creative.

Recipe: Kale Chips
Ingredients
  • One bunch of Dino Kale, washed and dried
  • 1 tbsp extra virgin olive oil or melted coconut oil
  • sea salt to taste
Instructions
  1. Tear the Kale into pieces (they will decrease in size as they cook so don't tear them too small)
  2. Combine the kale and oil in a bowl and massage the kale with the oil so each piece is oiled
  3. Spread single layer onto a parchment lined cookie sheet
  4. Bake at 350 for about 6-8 minutes or until a hint of brown
  5. Let cool completely before storing. Do not pile on top of each other to cool, they will retain moisture and become soggy
  6. Store in a glass container

There are quite a few types of organic kale including red, green curled and lacinato better known as dinosaur kale.  I prefer to use the dino kale for chips because the leaves are flatter and easier to get oil onto.  I do love the curly green kale sauteed or steamed with a little oil and sea salt.  There are so many ways to spice up kale chips and steamed kale.  I like toasted sesame oil with a bit of red pepper flakes and sea salt on my steamed kale.  Another option is to use a bit of raw apple cider vinegar in this kale chip recipe to make salt and vinegar chips.

Kate's Healthy Cupboard - Gluten Free Recipes
In Side Dishes, Vegetables, Recipes, Snacks and Appetizers2 Tags Kale, Low Carb, Paleo, Primal, Vegan
1 Comment

Plantain Tortilla Chips

May 7, 2012 Kate
Plantain Tortilla Chips

I am so excited about this recipe!  This would have been the perfect Cinco de Mayo recipe, but I am a few days late.  I was attempting crackers and loved the result, but realized they tasted like corn chips so I had to make another batch that looked like chips (bummer, I have to eat another batch).

I was once a tortilla chipaholic, it was bad!  I think when going gluten free, that was the only thing I could have that was cracker like so I turned to that bag quite often.  I have chosen to no longer eat corn as of a year ago, so to create a replacement that is grain free...gets me excited!

There are many reasons why I have chosen to give up corn, most importantly because it's a grain.  Sorry folks, it is not a vegetable, it is a grain.  A grain that is one of the number one GMO foods out there.  It can cause intestinal distress much like gluten and cause silent inflammation just like gluten.  That's all I need to hear to quite eating something.  Now if only someone would tell me dark chocolate does the same thing!!!  I need an intervention...but it's so darn good!

I have been into plantains for a while now and am waiting on the arrival of plantain flour!!!   What the heck is a plantain, a big banana?  Plantains tends to be firmer and lower in sugar than bananas. Bananas are almost always eaten raw, while plantains tend to be cooked either when green or unripe (starchy) or overripe (sweet).  They are a good source of potassium, fiber and starchy carbohydrates (perfect for endurance athletes).

Plantains are a staple in tropical regions of the world, much the same way as potatoes are here.  They have a pretty neutral flavor, the unripe fruit is typically cooked by steaming, boiling or frying.  I buy or make plantain chips myself that are just sliced plantains that have been roasted or baked.  They satisfy the crunch, but this recipe is even better and partners up well with guacamole or fresh salsa!

Recipe: Plantain Tortilla Chips
Ingredients
  • 3 unripe (green) plantains, peeled*
  • 2 tbsp refined coconut oil
  • 1/2 tsp sea salt
  • coarse sea salt to sprinkle
Instructions
  1. Peel and slice the plantains into about 1/4 inch slices and lay flat on a cookie sheet for about an hour (this can be skipped if plantains don't seem very moist, wet on the fresh slice side)
  2. Add the plantains and oil to a food processor and combine until smooth
  3. Once all the lumps are gone, add the sea salt and quickly combine
  4. Place the mixture on a sheet of greased parchment paper the size of your cookie sheet
  5. If the dough is dry enough, place another piece of parchment over the top and with a rolling pin, roll out to about 1/8 inch thick rectangle. If the dough seems too wet, spread out evenly with a spatula (I have had dry and I have had wet plantains, not sure what contributes to that)
  6. Using a sharp knife or pizza cutter, cut into the shape and size of chip you prefer
  7. Sprinkle coarse sea salt or regular sea salt over the top of the dough and slide the paper onto a cookie sheet
  8. Bake at 400 for 25-30 minutes until golden brown. You may need to remove some chips as you go that brown faster than the others.  Make sure to cook them long enough or they will be chewy instead of crunchy
  9. Remove cookie sheet and let chips cool
  10. You may need to re-cut the chips or you can break them along the cut lines
  11. Store in an airtight container, glass is my favorite
Quick notes

*The easiest way to peel a plantain is to first cut off the ends. Then with a knife, slice along the pronounced ridges (about 3 of them). Don't worry if you cut into the plantain, it won't matter. Peel one section at a time, it should come off pretty easily.

Unripe (green) plantains can be hard to find.  I prefer the green for their no sugar content and they have less moisture in them.  I have had the best luck going to Sprouts or Sunflower Market and asking if they have any unripe green plantains in the back, they usually do.  Asian markets carry them as well and they are always green there since they go through so many of them.  Whole Foods sells them but they tend to be very yellow and brown, it can be hit or miss there.

If you are an Amazon shopper, would you be so kind to use my affiliate link to make your purchases.  It is at no cost to you, it does provide a tiny kickback to Kate’s Healthy Cupboard.  This allows me to continue making and testing recipes for free.  Thanks so much!!

*I have recently switched all of my skincare and makeup to a company that is free of 1,500 chemicals!!  I am so particular about what goes into my body, I need to be just as picky as to what goes on my body!  Your skin is your largest organ and absorbs chemicals into the bloodstream faster than the gut does!  I am vain when it comes to my skin and was so thrilled to find products that are anti-aging and work!!!  Check out BeautyCounter for more info!!  You will love it!!

Kate's Healthy Cupboard - Gluten Free Recipes
In Dips and Spreads, Side Dishes, Recipes, Snacks and Appetizers2 Tags Nut-Free, Paleo, Plantains, Primal, Vegan
35 Comments

Strawberry Lime Sorbet

April 30, 2012 Kate
Strawberry Lime Sorbet

It's warming up again and I have been busy experimenting with the ice cream maker!!  I love my Cuisinart, it's so easy!  We had one as a kid that was this huge, noisy wooden thing.  I have seen similar versions today that you have to put ice all around it and rock salt and whatever else it entails...too much trouble!  Now I know why it was only used for special occasions, like twice a year.  The Cuisinart is small, quick and inexpensive for a delicious easy treat.  It's something you could easily get in the habit of pulling out every night during the summer.  Good thing all my recipes are lower in sugar and dairy free (except when dark chocolate is added)!

The first round of this sorbet made us all pucker up a little too much!  I added more strawberries and took down the lime juice and it seems to be perfect...in our opinion.  Feel free to add more strawberries or simply leave out the lime but we think the tart compliments the berries well.  This is very refreshing and reminds me of a daiquiri, I think it would be excellent with a little rum stirred in and umbrella on top!

Recipe: Strawberry Lime Sorbet
Ingredients
  • 4 cups frozen strawberries
  • 1/4-1/3 cup lime juice
  • 1/2 cup water
  • 1/2 tbsp lime zest
  • 1/8-1/4 cup honey*
Instructions
  1. Throw everything into a high powered blender (I used a Vitamix) and blend until smooth
  2. The consistency may be perfect as is to serve or for a more frozen treat, run it through an ice cream maker
  3. Store in an airtight container in the freezer and let it sit our for about 15 minutes before serving
Quick notes

*I used Nature's Hollow Honey made with Xylitol to lower the sugar amount

Kate's Healthy Cupboard - Gluten Free Recipes
In Desserts, Recipes, Snacks and Appetizers2 Tags Dairy Free, Desserts, Ice Cream, Nut-Free, Paleo, Primal, Sorbet
10 Comments

Maple Vanilla Cashew Butter

April 20, 2012 Kate
Maple Vanilla Cashew Butter

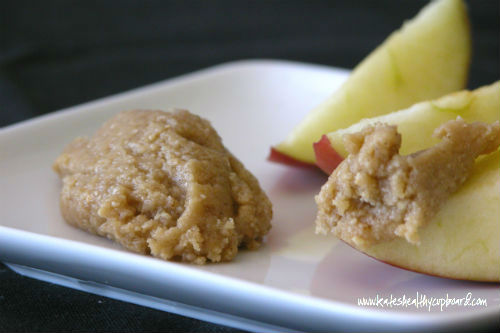
As I have mentioned before, I have a slight, ok major addiction to Justin's Nut Butters.  I have realized that I can not buy a jar of it until I am sure I can eat it in moderation.  It seriously tastes like frosting, have you tried the Vanilla Almond Butter flavor yet?  I keep hoping he will come out with a cashew butter, but he hasn't.  Cashews tend to be a sweeter nut and I think they would be a great addition to his line, especially a chocolate cashew butter...yum!!!

Instead of waiting on him, I created my own!!  I tried to make it a bit less addictive but it's still pretty darn good.  It's a perfect addition to sliced apples or spread on top of the Grain Free "Wheat" Crackers, Grain Free Honey "Wheat" Crackers or just by the spoonful!

Recipe: Maple Vanilla Cashew Butter
Ingredients
  • 2 cups roasted unsalted cashews*
  • 3 tbsp refined coconut oil, melted
  • 3 tbsp maple syrup
  • 1/4 tsp vanilla bean powder or 1-2 vanilla bean pods (substitute vanilla extract to taste)
  • 1/2 tsp celtic sea salt
  • 1 tbsp coconut palm sugar, powdered*
Instructions
  1. Place the nuts in a food processor or Vitamix blender and blend until smooth and creamy
  2. Add in all the remaining ingredients and blend until combined
  3. Store in a glass jar in the refrigerator. It will harden a bit so remove a few minutes before serving if you want it softened
Quick notes

*I buy raw cashews and roast them on a dry cookie sheet in the oven at 450 for about 5 minutes. You can certainly buy them roasted.

*Run the coconut sugar through the Vitamix or coffee grinder before hand to powder it. I may work to skip this step but the cashew butter may be a bit gritty. I actually like that!

Variations

For a lower sugar option, you can use Nature's Hollow Xylitol Maple Syrup and Lakanto in place of the coconut palm sugar.

Feel free to try this with any nut or a combination of nuts!

Kate's Healthy Cupboard - Gluten Free Recipes
In Desserts, Dips and Spreads, Recipes, Snacks and Appetizers2 Tags Cashews, Paleo, Primal
Comment

Taro Chips

April 18, 2012 Kate
Taro Chips
Taro Chips

What the heck is Taro?  Taro root is a staple in Asian and African cultures. These root vegetables can be used in place of potatoes in most dishes and have a slightly nuttier flavor. They are high in fiber, vitamins C, E and B6, as well as copper, potassium and manganese.

I first found these in the chip aisle that I no longer frequent.  The brand Terra makes root chips of all sorts and varieties.  You have probably seen their sweet potato chips, beet chips and mixed root chips.  I love them all, but they are fried in vegetable oils.  Not a fan of that for numerous reasons including the high amounts of omega 6's (pro-inflammatory) and the fact that any health benefit is destroyed with the heat of frying that oil.

With that said, I have opted to make my own since I love the taste sop much.  The Taro root is not an easy thing to find, but it has been available at most Whole Foods.  It can always be found at Asian market for less expensive.  They are ugly looking things so do not get intimidated and don't judge a book by it's cover!!!  they can be found in the produce section next to all the other roots and random looking foods you've probably never heard of!  They come in all different sizes, but I think the larger size is best for chips.

The plant is considered toxic when raw so don't think about trying it!  Once you have peeled the skin off with a vegetable peeler, rinse it under water or let it soak.

Recipe: Taro Chips

Ingredients

  • Taro Root
  • Coconut Oil Spray or coconut oil, melted
  • Celtic Sea Salt

Instructions

  1. Peel the taro and cut off the ends
  2. Rinse or soak the root with water
  3. Slice the taro using a mandoline into desired thickness of chip. You can also slice this into pieces as you would a potato
  4. Line a cookie sheet with parchment paper and spray it with the coconut oil spray
  5. Place the chips single layer on the sheet and spray with oil or brush with melted coconut oil
  6. Sprinkle with sea salt and any other seasoning
  7. Bake at 400 for 8-10 minutes, flip the chips and bake for about 5 more minutes or until brown
  8. Store in an airtight container. I prefer a glass canister

These are the perfect thing to add some crunch back into your life if you have missed it going gran free!  I love them with my Spicy Tuna Sashimi Salad on top!

Kate's Healthy Cupboard - Gluten Free Recipes
In Recipes, Snacks and Appetizers2 Tags Nut-Free, Paleo, Primal
1 Comment

Spicy Tuna Sashimi Salad

April 16, 2012 Kate
Spicy Tuna Sashimi Salad

This is for all you sushi lovers...or for those that want t give it a try!!  I am a huge fan of sashimi, salmon being my favorite.  Sashimi is thinly sliced, raw seafood.  Many different kinds of fresh fish and seafood are served raw in Japanese Cuisine. It can be served plain or wrapped up in a sushi roll.  I prefer it plain topped with a slice of avocado and wasabi or drizzles with Avocado Vinaigrette.

I had the hardest time years ago trying to force myself to try sushi, let alone sashimi!  It is now a favorite and staple in my diet every week.  I would only eat this at a quality sushi/Japanese restaurant or from Whole Foods.  You can find sushi grade salmon and tuna sashimi in the seafood section of most Whole Foods.  If it is fresh, it does not taste fishy at all!!!  I actually think cooked salmon tastes more fishy than raw.  Be sure to buy it the day you plan to eat it or close to the day.

If you like to use wasabi with your sushi, you can buy it powdered.  It is typically found in the asian section and all you have to do is add a bit of water to the powder.  This recipe doesn't call for it, but it is something I enjoy along side my avocado and sashimi.

If you haven't tried sashimi, now is the time!!!  So easy to digest and full of good fats!  This salad has so much flavor you probably won't even know it's raw fish!!!

Recipe: Spicy Tuna Sashimi Salad

Servings: 2

Ingredients
  • 8 ounces sushi grade tuna, chopped
  • 1 large avocado, chopped
  • 3 tbsp macadamia nuts, chopped
  • 4 green onions, chopped whites and greens
  • 1 1/2-2 tsp hot pepper oil
  • 1 tsp avocado oil (could use lite olive oil or coconut oil or omit)
  • 2-3 tsp Coconut Aminos
  • Sesame seeds
Instructions
  1. Roast the nuts in a dry skillet over high heat until slightly brown, let cool
  2. Combine the tuna, avocado and onions in a bowl
  3. Combine the oils and Coconut Aminos in a bowl, pour over the tuna mixture and stir
  4. Top with a sprinkle of sesame seeds and the nuts

Enjoy this with homemade Taro Chips, on cucumber slices, on Grain Free Wheat Crackers or simply plain!

Visit Allergy Free Wednesday for additional allergy free recipes!

Kate's Healthy Cupboard - Gluten Free Recipes
In Dips and Spreads, Entrees, Side Dishes, Recipes, Snacks and Appetizers2 Tags Fish, Macadamia Nuts, Paleo, Raw, Sushi
2 Comments

Perfect Hard Boiled Eggs

April 13, 2012 Kate
Hard Boiled Eggs
Hard Boiled Eggs

This may not be a very exciting post for most of you, but it is for me!  I get excited when food not only tastes good, but looks good!

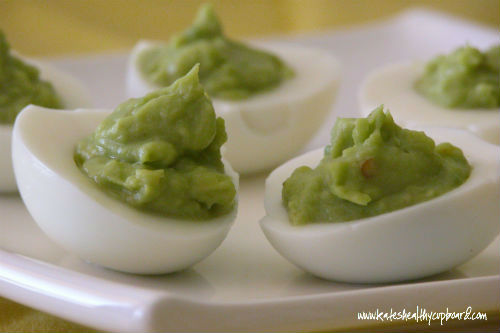
I was not thrilled with the way my eggs looked in the Avocado Deviled Egg recipe, so I had some homework to do!  I want an egg that is fairly easy to peel and the yolk must show no signs of over cooking (gray edges).  I have read a few people's thoughts on how to boil the perfect egg and below is what worked for me.

Some people suggested using older eggs, I used new.  Maybe older would have worked even better, but this method should work either way.  Please keep in mind altitude may play a role.  Water boils faster at higher altitudes but takes longer to cook.  The water doesn't get as hot when it boils here compared to lower altitudes.  With that said, the time may need to be adjusted slightly.  I will try this method next time I'm in AZ and update this post as to what the results were.

Recipe: Perfect Hard Boiled EggsIngredients
  • 6-12 eggs, (pastured are the best for you)
  • 1/2 tsp baking soda
Instructions
  1. Place the eggs in a saucepan, add soda and water until the eggs are fully covered
  2. Use a pan large enough the eggs have a bit of wiggle room
  3. Place the pan on the stove and bring it to a boil, full boil
  4. Once the water reaches a full boil, turn off the stove and place the lid on the pan
  5. Let the eggs sit for 12 minutes
  6. Place a large bowl of ice and cold water in the sink
  7. Remove the eggs from the stove after 12 minutes and immediately rinse with cold water and place them in the ice bath
  8. Let the eggs sit for 5-10 minutes

Let me know if you have any other tricks or tips!

Kate's Healthy Cupboard - Gluten Free Recipes
In Breakfasts, Side Dishes, Recipes, Snacks and Appetizers2
2 Comments

Avocado Deviled Eggs

April 2, 2012 Kate
Avocado Deviled Eggs

Deviled eggs may be something you traditionally serve at your Easter brunch.  How about switching it up a bit with Avocado Deviled Eggs.  Who doesn't like avocado! Eggs are a great source of protein and many other nutrients.  These are really an any time of the year great snack!  They are super easy and fulfilling with the heart healthy fat the avocado provides.  You can doctor up the egg yolk and avocado mixture any way you'd like.

Recipe: Avocado Deviled Eggs
Ingredients
  • 8 eggs, hard boiled and peeled
  • 1 large ripe avocado
  • 2-4 tbsp hot sauce
  • dash of sea salt
  • splash of lime juice
Instructions
  1. Slice the eggs lengthwise and remove the yolks
  2. Rinse the whites to get any leftover yolk out, pat dry
  3. Combine the yolks, avocado, hot sauce, salt and lime juice in a food processor
  4. Pulse until almost smooth
  5. Spoon the mixture into each egg white half
Quick notes

The amount of hot sauce will vary depending on how hot the sauce is. I used 4 tbsp of The Green from Horsetooth Hot Sauce. (local company sold at Whole Foods and Vitamin Cottage or from their website) It is pretty spicy but I love it. It's a mix of green habaneros, serranos, tomatillos, garlic and onion.

I am determined to get hard boiled eggs to come out perfect!  If you could see the eggs in the back of my picture, you'd say my egg skills need work!!!  Every cookbook seems to think they have the answer.  Our altitude makes a bit of a difference but I am going to figure it out!  If anyone knows the trick, please let me know!!!

Kate's Healthy Cupboard - Gluten Free Recipes
In Breakfasts, Dips and Spreads, Entrees, Side Dishes, Recipes, Snacks and Appetizers2 Tags Paleo, Primal
2 Comments

Gingersnap Cookies

March 23, 2012 Kate
Gingersnap Cookies
Gingersnap Cookies

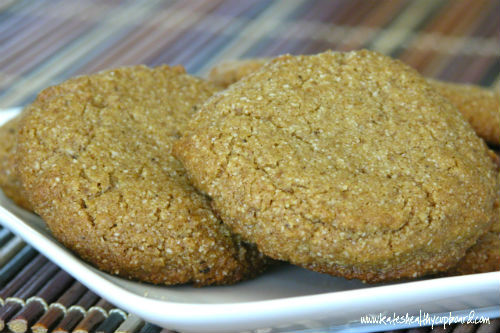
I had a client ask if I could try to make her family's all time favorite cookie into a gluten free cookie with a little less sugar.  Gingersnaps are a favorite in my family as well, so when they approved and her family did too, I knew it was a success!!  These are a bit crunchy on the outside and oh so chewy on the inside with the perfect amount ginger. Gingersnaps are traditionally made with molasses.  Molasses is made from the cane of a sugar plant,  harvested and stripped of its leaves.  Its juice is extracted usually by crushing or mashing, but also by cutting.  The juice is boiled to concentrate it, which promotes the crystallisation of the sugar.

Molasses is an excellent source of manganese and copper. It is a very good source of iron, calcium, potassium and magnesium. In addition, molasses is a good source of vitamin B6 and selenium.

I choose to use Yacon Syrup in place of molasses in my recipes.  It is a sweetening agent extracted from the tuberous roots of the yacon plant indigenous to the Andes mountains.  I like using it because of its nutritional properties—few calories and low sugar levels.  Yacon is composed primarily of water and about 50% FOS (fructooligosaccharide).   These short chain sugars have a lower caloric value and high fiber content.  FOS can be extremely helpful to the digestive tract as it is considered a prebiotic.  Yacon Syrup is less strong than molasses.  You may need to add a bit more of it in a recipe when substituting for molasses.

Recipe: Gingersnap Cookies

Ingredients

  • 2 1/4 cups almond flour (Honeyville)
  • 4 tbsp palm shortening
  • 3 tbsp honey (use Nature's Hollow Xylitol Honey for lower sugar option)
  • 1 tbsp coconut palm sugar or Swerve
  • 1/4 - 1/3 cup yacon syrup or 1/4 cup molasses
  • 1 tsp vanilla extract
  • 2 1/2 tsp ground ginger
  • 1 tsp ground cloves
  • 1 tsp cinnamon
  • 1/4 tsp baking soda
  • 1/4 tsp celtic sea salt

Instructions

  1. Cream the shortening, honey, yacon or molasses and vanilla
  2. Combine the flour, ginger, cloves, cinnamon, coconut palm sugar or Lakanto, soda and salt
  3. Add the flour mixture to the wet mixture and stir until combined
  4. Scoop out the dough onto a parchment lined cookie sheet. (These will spread a tiny bit when cooked. If you prefer a flat cookie, press down with your palm. I pressed down just slightly)
  5. Bake at 350 for 8-10 minutes

Makes about 18 cookies

Most gingersnap recipes have you roll the dough in sugar before you bake them.  The goal was to decrease the amount of sugar in these cookies, so I eliminated that step.  We all think they are sweet enough as is.  Let us know what you think!!!

Kate's Healthy Cupboard - Gluten Free Recipes
In Recipes, Desserts2, Snacks and Appetizers2 Tags Almond flour, Cookies
3 Comments
Older Posts →
download.jpeg

Welcome to Kate's Healthy Cupboard! A place for healthy, grain free recipes, some low carb recipes, safe beauty and products for the home  and more...


>>  CONNECT WITH KATE  <<

pinterest.png
facebook.png
instagram.png

>>  SUBSCRIBE  <<

Success! Now check your email to confirm your subscription.

There was an error submitting your subscription. Please try again.


>>  SEARCH RECIPES  <<


Copyright 2016 Kate's Healthy Cupboard  ||  Website Design