• Blog
  • Recipes
  • Lifestyle
  • Safer Skincare
  • About
  • Contact
Menu

Kate's Healthy Cupboard

Street Address
City, State, Zip
Phone Number
Healthy Lifestyle, Healthy Grain Free Recipes

Your Custom Text Here

Kate's Healthy Cupboard

  • Blog
  • Recipes
  • Lifestyle
  • Safer Skincare
  • About
  • Contact

Grain Free "Cheez-Its" Crackers

March 22, 2013 Kate
Grain Free Dairy Free Cheez-Its Crackers www.kateshealthycupboard.com

Have you seen how many varieties of Cheez-Its there are now?  I'm rarely at any store other than Whole Foods and Natural Grocers, so when I am, I am always in awe at all the new junk food...it really isn't worthy of being called food!  Is anyone else guilty of looking at other people's carts and wondering what they are thinking and how did they miss that soda, boxed fake meals and corn syrup laden goodies are so horrible for you!!!   I realize not everyone is so fortunate to shop at Whole Foods, but come on, make better choices with what is available to you!!!

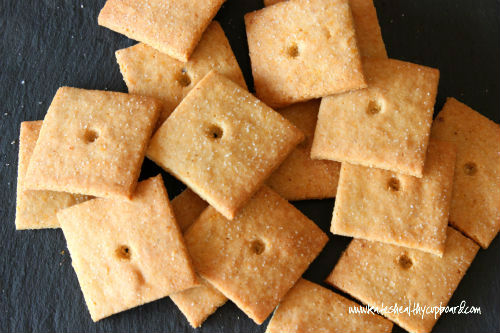
OK, enough of my rant!  Here is a recipe that uses nutritional yeast for a dairy free cheesy cracker recipe that you can feel good about eating!  I almost didn't get a chance to take a picture of these before they were gone.  Someone was sneaking them off the pile of my setup for the picture...they are that good!!!  These are the perfect cracker to dip or break up into my Bacon Chili Recipe!!!

Grain Free “Cheez-Its”

Ingredients

  • 1 3/4 cup almond flour*
  • 3 tbsp Nutritional Yeast
  • 1/2 tsp sea salt, plus more for sprinkling on top
  • 1 egg
  • 1 tbsp butter or coconut oil, melted
  • 2 tbsp lemon juice

Instructions

  1. Combine the flour, salt and yeast in a bowl
  2. In a small mixing bowl, whisk the egg with the melted butter/oil and lemon juice
  3. Combine the two bowls and stir until dough forms
  4. Place the dough between two sheets of parchment paper and roll out to about 1/8 inch thickness
  5. With a sharp knife or pizza cutter, cut dough into desired cracker size (I use a ruler with a pizza slicer to get them straight and even) and sprinkle the top with more sea salt
  6. Slide the bottom piece of parchment and crackers onto a cookie sheet
  7. Bake at 350 for 15-20 minutes until golden (the crispier they will be in you let them golden)
  8. The outer crackers will brown the fastest, remove those and continue to cook the remaining crackers

Quick notes:  *Honeyville or Bob’s Redmill will work just fine for these crackers.

Variations:  I used melted butter to make these a bit “creamier” tasting, but expellor pressed coconut oil will work for dairy free option.

Enjoy!


In Recipes, Snacks and Appetizers3 Tags Crackers, Dairy Free, Nutritional Yeast, Paleo, Primal, Vegan
29 Comments

Cashew "Alfredo" Sauce (Guest Post)

March 5, 2013 Kate
Alfredo Sauce
Alfredo Sauce

Last weekend I had the opportunity to meet Ann from The Paleo Network.  She and her husband are triathletes that have gone grain and dairy free and are reaping the benefits!  They were featured on our local news  a few weeks back to tell their story.  We had a great time chatting about food, of course we did, we both love to be in the kitchen!

Today I am sharing a recipe with you for her Cashew Alfredo Sauce that she happened to mention to me. I decided I had to make this since it sounded so good!!!  It is such a versatile sauce and could be used in so many ways!  I was craving mushrooms today so I sauteed mushrooms and grass-fed ground beef together and drizzled...ok drenched it with the sauce!  Yum!!!  Ann uses it in a number of ways that she shares with you today!

The only thing I did differently was that I sauteed the garlic in coconut oil (or you could use butter) and then added it to the oil to add to the cashew sauce.  I don't like to use olive oil with high heat is the reason for this.

Paleo Sausage & Veggie Pizza
Lasagna Baked
Lasagna Baked

Hello to all of you! A big thank you to Kate for giving me the opportunity to write this post. A little background on the recipe I’m sharing with you today. I grew up in the Midwest eating creamy casseroles and decadent comfort foods. My favorite Italian dish (and maybe my favorite dish all together) while growing up was Fettuccine Alfredo. Since going Paleo, I no longer eat dairy or grains. What does this Midwest girl do? I learned you could make creamy sauces out of cashews. I knew nutritional yeast added a "cheesy" flavor.  Traditional alfredo sauce typically has garlic in it.  So I threw ingredientstogether into my Vitamix blender and tested it out on some spaghetti squash and zucchini “noodles”. Perfection! Since then, I’ve used it as part of my Paleo Lasagna and on Paleo Pizza (drizzled on top of the meat and veggies). I’ve also mixed it into cauliflower rice, roasted Brussels sprouts and shredded chicken. It also tastes great in omelettes (serves as a glue to hold it together) or atop egg muffins.

Cashew “Alfredo” Sauce

Ingredients

  • 2 cups raw cashews, soaked in water for at least 6 hours
  • 8 garlic cloves, minced
  • ¼ cup olive oil
  • ½ cup nutritional yeast
  • 2 t. sea salt

Instructions

  1. Drain and rinse your raw cashews.
  2. Add the cashews to your blender (I use my Vitamix ) and enough cold water to cover the cashews. Blend until creamy and smooth.
  3. Saute minced garlic in the olive oil in a small frying pan over medium heat for 1-2 minutes, or until slightly golden.
  4. Add oil and garlic to the cashew sauce along with the sea salt and nutritional yeast. Blend again until incorporated and smooth.
  5. Add additional water, if necessary.

Variations

You could probably add a little fresh basil (either to the blender or as a garnish). Roasted red peppers (pureed into the sauce) could also be a nice touch.


Let us know what you drizzle or pour this Alfredo sauce over!!!

Kate's Healthy Cupboard - Gluten Free Recipes
In Dips and Spreads, Entrees, Recipes Tags Cashews, Dairy Free, Nutritional Yeast, Paleo, Primal
3 Comments

"Cheesy" Kale Chips

February 21, 2013 Kate
Cheesy Kale Chips
Cheesy Kale Chips

I love Whole Foods, wandering around seeing what new products have been granted self space and what local products are new to market as well.  I spend a lot of time in Scottsdale, Arizona and a lot of time at the Whole foods there.  Every time I go, I have to take some extra time that first trip to the store to see what's new.  Arizona is part of the western region for Whole Foods that includes California, where Colorado is part of the mountain west region, so we get different products.  Arizona gets a lot of products that originate from California and if they sell well, we will be lucky to hopefully see them on the shelves in Colorado and vice versa.

There are a couple things I can't find at my local Whole Foods that I love to get down there.  One item in particular, Quite Cheezy Kale Chips made by Alive & Radiant Foods (my Whole Foods only sells two of the flavors as of late and the Quite Cheesy is not one of them).  The entire line of their products are delicious. I think I seriously bought a bag every trip I made to the store (that is often) and ate the entire bag!  Serving size is 2.2, that's a joke...I eat the whole bag wishing I had more!  After looking at the ingredient list, I knew I could make these at home when I got back to my dehydrator.  This recipe is pretty darn close...close enough for me!

I know not everyone has a dehydrator, but you should (in my opinion), since there are so many great things you can do with them and they are reasonably priced (I have this dehydrator and it works great).  I have not tried this in the oven on the dehydrate setting, but if you do, please leave a comment on how they turned out.  This spread would be awesome as a "cheese" spread for crackers (I have numerous grain-free cracker recipes) or as a dip for vegetables.  So if you don't have a dehydrator, you can still enjoy this recipe!

“Cheesy” Kale Chips

Ingredients

  • 1 cup raw cashews (soaked overnight)
  • 1/3 cup roasted red bell pepper*
  • 2 tablespoons lemon juice
  • 2 tablespoons Nutritional Yeast**
  • 1/2 tsp sea salt
  • 1 bunch kale (I used Dino, but any Kale will work)

Instructions

  1. Wash the kale, pat dry and tear into pieces, about 1 1/2 inches and place in a bowl
  2. Drain the water off of the cashews and place all of the ingredients in a food processor or blender until smooth
  3. Pour the spread into the bowl and massage it into the kale to cover each piece
  4. Place kale on dehydrator trays and dehydrate at 125 for 8-10 hours or until desired crispiness
  5. Store in an airtight container, I prefer glass

Quick notes

*I used roasted peppers for additional flavor. The Alive & Radiant Foods is considered raw, so a red bell pepper is what they used. Either one will work.

**Nutritional Yeast is something a lot of vegetarians use to make things taste cheesy. It is full of B vitamins, some protein and lots of flavor. It can be found in the baking section of a health food store or may be sold in bulk. It looks like yellow flaky fish food to me:)

Variations

To make these a bit spicy, add some cayenne pepper or other seasonings you like.


If you are looking for ways to get more greens in your kids, this recipe will work!

Kate's Healthy Cupboard - Gluten Free Recipes
In Vegetables, Recipes, Snacks and Appetizers3 Tags Cashews, Dairy Free, Dehydrated, Nutritional Yeast, Paleo, Primal, Raw
6 Comments
download.jpeg

Welcome to Kate's Healthy Cupboard! A place for healthy, grain free recipes, some low carb recipes, safe beauty and products for the home  and more...


>>  CONNECT WITH KATE  <<

pinterest.png
facebook.png
instagram.png

>>  SUBSCRIBE  <<

Success! Now check your email to confirm your subscription.

There was an error submitting your subscription. Please try again.


>>  SEARCH RECIPES  <<


Copyright 2016 Kate's Healthy Cupboard  ||  Website Design