• Blog
  • Recipes
  • Lifestyle
  • Safer Skincare
  • About
  • Contact
Menu

Kate's Healthy Cupboard

Street Address
City, State, Zip
Phone Number
Healthy Lifestyle, Healthy Grain Free Recipes

Your Custom Text Here

Kate's Healthy Cupboard

  • Blog
  • Recipes
  • Lifestyle
  • Safer Skincare
  • About
  • Contact

Peanut Butter Cheesecake Cookies

March 9, 2017 Kate Criswell
Peanut Butter Chessecake Cookie.jpg

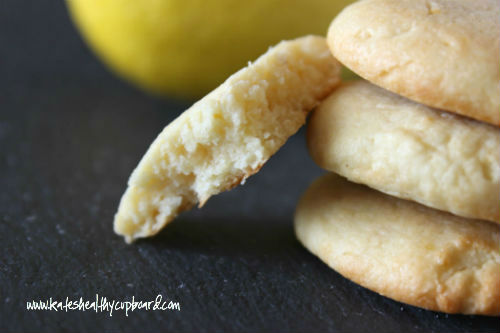
I pretty much love all things peanut butter and this cookie is no different!  This recipe came about after falling in love with Kite Hill's Dairy Free Cream Cheese made from almond milk (the chive flavor is amazing as well).  So not only is this recipe grain free, it's dairy free too!!  

I haven't had cream cheese in decades after eliminating for many reasons.  So often I have come across sugar cookie recipes made with cream cheese and am always bummed I can't try them. The added cream cheese adds creaminess and moisture to a baked good along with acting as the fat in the recipe.  After discovering and loving this cream cheese....I may be creating many cookie and baked goods in the months to come! These Peanut Butter Cheesecake Cookies are just the beginning!!  I would describe these as a mild peanut butter soft batch cookie that melts in your mouth!  

Ingredients:

  • 1 cup natural peanut butter 
  • 8 oz Kite Hill Cream Cheese (full fat cream cheese will work)
  • 1 generous cup granulated sweetener (I used Swerve and coconut sugar)
  • 1 tsp vanilla
  • 2 eggs
  • 1 scant cup cassava flour (I used Otto's)
  • 1 tsp sea salt
  • 1 tsp baking soda

Instructions:

  1. Cream together the peanut butter, cream cheese, sugar and vanilla. Add in eggs one at a time
  2. In a separate bowl, combine the flour, salt and soda and add to the wet ingredients
  3. Roll dough (should be thick) into 1- 1 1/2 inch balls and place on a parchment lined cookie sheet.  
  4. Press down the dough with your palm or use a fork like traditional peanut butter cookies. They do not spread very much, so they will be about the size you press them into.
  5. Bake at 350 for 6-8 minutes
  6. Let cool for 5 minutes before removing from the cookie sheet
  7. Store in an airtight glass container

I buy Kite Hill Cream Cheese from Whole Foods or Natural Grocers.  You can find Otto's Cassava Flour online or from Natural Grocers

Enjoy!

__________

Many of you know I am a consultant with Beautycounter and advocate for more health protective laws in the personal care industry. An industry that includes over 10,000 chemicals with only 10% of those being tested for human health! An industry that has banned 1,400 ingredients in the European Union while the U.S has only banned 30 to date! I feel I have an enormous responsibility to educate and empower you to make changes to safer products for you and your family. We deserve better!  Beautycounter has banned 1,500 ingredients and is not only safe, but also high performing! 

I am giving away one of the new Beautycounter + Collections! A Collection of targeted MASKS, MIST and OILS formulated with SAFER INGREDIENTS to enhance your current skincare regimen! Products to BRIGHTEN, PLUMP and BALANCE the skin. See more about the line here: http://bit.ly/BCPLUS

To enter, join my NEW Better Beauty~ Safer Skincare Group and comment on the Beautycounter + Giveaway Post!! Join here : https://www.facebook.com/groups/264686570609990/

I will be posting about: Beauycounter products and my favorite clean beauty products outside of Beautycounter, educational articles and tools, makeup tutorials, product GIVEAWAYS and MONTHLY PROMOS, clean living ideas, recipes for nourishing the skin from the inside out, DIY ideas and more!

Thank you so much for all your continued support!!! Please message me with any product questions!!


In Desserts2 Tags Peanut Butter, Cookies, Grain Free, Dairy Free, Cassava Flour, Kite Hill Cream Cheese
2 Comments

Dairy Free Chocolate Pomegranate Ice Cream

November 1, 2015 Kate
Pomegranate chocolate ice cream2

It may be November 1st, but it's 70 degrees here and it's pomegranate season!!  Who doesn't love ice cream year round!!!  I use my Cuisinart Ice Cream Maker on a regular basis as dairy free ice cream is my go to sweet treat. Pomegranates have taken over the produce section of my Whole Foods.  What a fun fruit that can be a little work...or you can buy the pre-packed fresh arils like I do.  Pomegranates are actually a berry and have numerous healthy benefits.  They are full of nutrients, anti-oxidants, have anti-inflammatory effect and may help fight numerous diseases.  Besides being nutrient dense little power houses, they taste great!  I love the sweet tartness mixed with the added crunch of the seed!

I hope you enjoy the mixture of pomegranates and dark chocolate as much as I do!  Here is a link to all the Dairy Free Ice Cream Recipes on the blog.

Chocolate Pomegranate Ice Cream
Serves: 4-6

Ingredients

  • 2 cans full fat coconut milk
  • 2 egg yolks
  • 1/2 cup non dairy milk alternative
  • 1/2 cup granulated sweetener (I used Swerve for low sugar option)
  • 2 tsp vanilla extract
  • 1/4 tsp sea salt
  • 3 ounces dark chocolate chunks
  • 2/3 cup pomegranate anils

Instructions

  1. Combine cans of coconut milk, non dairy milk in a sauce pan and heat on medium (If using a dry sweetener, add it here too)
  2. Once milk begins to simmer, turn heat down to low
  3. In a large bowl, whisk the egg yolks, add sweetener (liquid) and vanilla extract and mix well
  4. Take a ladle full at a time of the milk mixture and incorporate it into egg mixture as you continuously whisk the eggs
  5. Once you have mixed all of the milk in, cover the bowl and let cool in the frig (or the freezer if you won’t be using an ice cream maker or anxious for it to cool)
  6. Place cold mixture into ice cream maker and follow directions
  7. Once the ice cream started to take form and harden, stir in the anils and chocolate
     

xo,

In Recipes, Desserts4 Tags Chocolate, Coconut Milk, Dairy Free, Ice Cream, Swerve
3 Comments

Bacon Pecan Maple Mustard Chicken

September 30, 2015 Kate
Bacon Pecan Maple Mustard Chicken

I recently received a sampler pack of goodies from Steve's Paleo Goods.  The box was full of grain free granola, cookies, jerky's sauces, dried fruits and more!! The cool thing about this online paleo store, is that 15% of the proceeds go to Steve's Club National Program.  This is his 501c3 non-profit that brings fitness, nutrition guidance and mentorship to at-risk youth.  He works with CrossFit Affiliates across the country to start Steve’s Club Local Clubs in their own communities. This has always been his passion; and it continues to be the driving force behind Steve's PaleoGoods.  You can find these goodies along with nut butters, spice rubs, oils, cracklings and so much more at Whole Foods or online!!

 One smell of the two sauces I erceived and I knew I needed to create a savory recipe for you guys!  I was lucky enough to receive his Maple Mustard and Ginger Cilantro sauces.  These can be used for dressings, marinades, sauces and dips.  The best part is that they are made with olive oil and apple cider vinegar, unlike most sauces and dressings that are full of gmo canola oil!  I hope you enjoy this recipe as much as we did!!  It makes for great leftovers...even cold right out of the fridge!

Bacon Pecan Maple Mustard Chicken

Prep time: 10 mins
Cook time: 30 mins
Total time: 40 mins
Serves: 4

Ingredients

  • 4 chicken breasts, thinned out
  • 1/4 - 1/3 cup Maple Mustard*
  • 4-5 strips of bacon, cooked and cut into pieces
  • 1/4 cup pecans, chopped into pieces
  • Stone ground mustard

Instructions

  1. Place the chicken breasts in a greased baking dish
  2. Brush or spoon on about 1 tbsp of Maple Mustard onto the top of each breast to lightly coat. Reserve the rest of the sauce for later
  3. Sprinkle the bacon and pecan pieces over each breast
  4. Bake with a loose cover at 350 for 15 minutes. Remove the cover and bake an additional 15 minutes.
  5. Remove from the oven and drizzle the remaining Maple Mustard over each breast. Finish them off with another drizzle of stone ground mustard

Notes
*Maple Mustard sauce is from Steve's Paleo that can be found online (link in blog) or from Whole Foods.

xo,

In Recipes, Entrees2 Tags Bacon, Chicken, Dairy Free, Low Carb, Paleo
Comment

Chocolate Candy Cookie Bars

August 20, 2015 Kate
Chocolate Candy Cookie Bars

Oh my goodness it' been way too long....hope I remember how to do a blog post!!  I haven't been experimenting in the kitchen for awhile for many reasons, but mainly the lack of time and the desire to not eat so many baked goods!!  I love baking, but I just don't need to be eating as many goodies as I was.  Please read the end of this post to see what has consumed most of my time and I wouldn't have it any other way!!

These cookie bars are so fun and yummy!!!  They are made from Cassava Flour which makes them nut free, grain free and of course gluten free!!  Cassava is a starchy root also known as yuca.  You are seeing cassava chips on store shelves and yuca fries on menus.  The flour acts similar to glutinous flour and the company I buy it from, Otto's Natural, says you can swap it in a recipe 1:1.  I have found that you need less cassava flour, it absorbs so much liquid!!  I love the finished product and the moisture and texture it provides in baked goods!!  I plan to experiment more with it as we head into fall and winter...baking season!!!

Another new ingredient I used in this recipe is Little Secrets Chocolate.  I love that candy companies are coming out with healthier versions of M&M's!!  Little Secrets are sweetened with real organic sugar and colored with natural food colorings such as beet powder, turmeric, etc!!   These are found at Natural Grocers and Whole Foods or on Amazon.  They come in Dark, Milk and Peanut Butter....they are all awesome!!!  Of course this recipe can be made with chocolate chips, but the colorful candy makes it that much more fun!!

Chocolate Candy Cookie Bars
Serves: 12

Ingredients

  • 1/2 cup grass-fed butter, softened*
  • 1/2 cup granulated sweetener (I used Swerve to make it lower in sugar)
  • 3/4 cup cassava flour**
  • 1 egg
  • 1 tbsp non dairy milk
  • 1 tsp vanilla extract
  • 1/2 tsp gluten free baking powder
  • 1/4 tsp sea salt
  • 3/4 cup chocolate candies or chips**

Instructions

  1. In a large mixing bowl, combine the flour, baking powder and salt, set aside
  2. Cream the softened butter with the sugar
  3. Add in the vanilla, milk and egg, mix well
  4. Combine the two bowls and mix until combined
  5. Fold in the chocolate pieces or chips
  6. Spread the batter into an 8x8 greased cookie pan
  7. Bake at 350 for about 28 minutes or until golden
  8. Let cool before cutting
  9. Store in an airtight container. I prefer storing these in the fridge and eating them cold!

Notes

*Softened coconut oil should work to make this dairy free
**Links for Cassava Flour and Chocolate Candy are in the body of the post above recipe.

If you are an Amazon shopper, would you be so kind to use my affiliate link to make your purchases.  It is at no cost to you, it does provide a tiny kickback to Kate’s Healthy Cupboard.  This allows me to continue making and testing recipes for free.  Thanks so much!!

I have switched all of my skincare and makeup to a company that is free of 1,500 chemicals!  The European Union bans about 1,400 chemicals and the US bans 11 in an unregulated industry!  I am so particular about what goes into my body, I need to be just as picky as to what goes on my body!  Your skin is your largest organ and absorbs chemicals into the bloodstream faster than the gut does!  I am vain when it comes to my skin and was so thrilled to find products that are safe, non toxic, but are still anti-aging and work!!!  The makeup is chic, on trend and high performing!  Check out BeautyCounter for more info!!  Their mission is to get safe products into the hands of everyone!  I feel compelled to help educate and share this mission!  

Kate's Healthy Cupboard - Gluten Free Recipes
In Recipes, Desserts4 Tags Chocolate, Cookies, Dairy Free, Nut-Free, Swerve
Comment

Dairy Free Peanut Butter Ice Cream Pie

July 9, 2014 Kate
Dairy Free Peanut Butter Ice Cream Pie Recipe

It has been really hot here in Colorado the past few days, so it's ice cream season for sure!!  Even though I eat ice cream year round since it's so easy and delicious to make!  I have the smaller Cuisinart Ice Cream Maker and love it!!!  It has been worth every penny and it's not even that badly priced!

Fourth of July came around and I was in charge of the dessert.  Since it's been so hot I wanted to do an ice cream dessert.  I was looking at gluten filled recipes to get some crust inspiration and then it hit me...use my Flourless Peanut Butter Cookie Recipe as the pie crust!!  I chose to add chocolate chips to the recipe to get some more chocolate in there...everything's better with more chocolate in my world!!  The peanut butter ice cream is simply adding peanut butter to vanilla ice cream.  I'm not going to lie, I actually bought a quart of ice cream from Whole Foods that was full of dairy so I wouldn't be able to eat dessert! I wanted my treat to be tortilla chips and guacamole instead of this pie!!  I also chose peanut butter since it's most people's favorite even though I don't eat it often.  This will work and be delicious with any nut or seed butter, so feel swap out the peanut butter for the ice cream, the cookie crust and the nut topping!

Dairy Free Peanut Butter Ice Cream Pie
Serves: 8

Ingredients

  • 1 batch of Flourless Peanut Butter Cookie Dough
  • 1 batch of Dairy Free Vanilla Ice Cream (or a quart of store bought)
  • 1/2 cup additional peanut butter (I buy fresh grind)
  • 1/4 cup additional chocolate chips for drizzle (Enjoy Life Brand for dairy free)
  • 1/4 cup peanuts for topping

Instructions

  1. Prepare the cookie recipe and spread the dough into a pie dish, pressing up the sides
  2. Bake at 350 for 15-20 minutes. Less time means softer crust
  3. Remove from oven and set aside to cool completely. This can be done the night before and stored in the refrigerator
  4. Prepare the ice cream, but blend in the peanut butter before you run it thru the ice cream maker or freeze it. If you bought the ice cream, blend or stir in the peanut butter.
  5. Scoop the softened ice cream into the pie crust and swirl around. Place it in the freezer to harden
  6. Once the ice cream has hardened, place the chocolate chips in a double broiler to melt. With a spoon, drizzle the chocolate over the pie.
  7. Sprinkle the nuts in the middle or all over the pie
  8. Refreeze until you are ready to serve. You may need to allow it to soften up before cutting into it, but the peanut butter seems to keep it from freezing rock hard

Notes
Any nut or seed butter will work in this recipe!


If you are an Amazon shopper, would you be so kind to use my affiliate link to make your purchases.  It is at no cost to you, it does provide a tiny kickback to Kate’s Healthy Cupboard.  This allows me to continue making and testing recipes for free.  Thanks so much!!

I have switched all of my skincare and makeup to a company that is free of 1,500 chemicals!  The European Union bans about 1,400 chemicals and the US bans 11 in an unregulated industry!  I am so particular about what goes into my body, I need to be just as picky as to what goes on my body!  Your skin is your largest organ and absorbs chemicals into the bloodstream faster than the gut does!  I am vain when it comes to my skin and was so thrilled to find products that are safe, non toxic, but are still anti-aging and work!!!  The makeup is chic, on trend and high performing! Check out Beautycounter for more info!!  Their mission is to get safe products into the hands of everyone!  I feel compelled to help educate and share this mission!  

Kate's Healthy Cupboard - Gluten Free Recipes
In Recipes, Desserts4 Tags Chocolate, Dairy Free, Swerve
1 Comment

Brownie Fudge

June 26, 2014 Kate
Brownie Fudge Recipe

Sometimes you just throw some stuff in a bowl and hope for the best...I got what I was looking for with this one!!  I wanted a fudge, but cooked, so kind of a brownie at the same time.  A fat bomb is what some people may call this since it's loaded with healthy fats like coconut butter, full fat coconut milk and grass-fed butter!  These are nut free and are best stored in the refrigerator!!

Brownie Fudge
Ingredients

  • 3/4 cup coconut cream/butter, melted
  • 1/3 cup full fat coconut milk cream (The thick cream on top of a chilled can of coconut milk)
  • 2 tbsp grass-fed butter, melted (coconut oil or ghee would work)
  • 1 pastured egg
  • 2 tsp vanilla extract
  • 5 tbsp cacao powder
  • 3/4-1 cup granulated sweetener (I used Swerve for no sugar option)
  • 1/2 tsp vanilla bean powder
  • 1/4 tsp sea salt
  • 1/4 tsp baking soda

Instructions

  1. In a mixing bowl, combine the cacao powder, sweetener, vanilla bean powder, soda and salt, set aside
  2. Place the melted coconut cream/butter, grass-fed butter, coconut milk cream in a bowl and beat until smooth
  3. Add in the egg and vanilla extract, beat until combined
  4. Add the dry ingredients to the wet and beat until all the cacao lumps are gone!
  5. Spread the mixture into either a 6x6 or 8x8 greased pan, depending on how thick you want them
  6. Bake at 350 for about 20-25 minutes until edges get brown. The center may seem uncooked, especially in the 6x6 pan, but that's ok
  7. Let the pan cool and then place in the refrigerator to cool completely
  8. These are best stored in the refrigerator

Notes

The easiest way to melt coconut cream/butter is to place the jar in a pot and bring the water to a boil.


If you are an Amazon shopper, would you be so kind to use my affiliate link to make your purchases.  It is at no cost to you, it does provide a tiny kickback to Kate’s Healthy Cupboard.  This allows me to continue making and testing recipes for free.  Thanks so much!!

I have switched all of my skincare and makeup to a company that is free of 1,500 chemicals!  The European Union bans about 1,400 chemicals and the US bans 11 in an unregulated industry!  I am so particular about what goes into my body, I need to be just as picky as to what goes on my body!  Your skin is your largest organ and absorbs chemicals into the bloodstream faster than the gut does!  I am vain when it comes to my skin and was so thrilled to find products that are safe, non toxic, but are still anti-aging and work!!!  The makeup is chic, on trend and high performing! Check out Beautycounter for more info!!  Their mission is to get safe products into the hands of everyone!  I feel compelled to help educate and share this mission!  

Kate's Healthy Cupboard - Gluten Free Recipes
In Recipes, Desserts4 Tags Chocolate, Coconut Creme, Coconut Milk, Dairy Free, Flourless, Nut-Free
13 Comments

Olive Garlic Crackers

June 4, 2014 Kate
Olive and Garlic Crackers Recipe

I know I post a lot of snacks and treats, but that is what I find the hardest to change when going grain free!  I am such a simple eater when it comes to my meals...protein, vegetable and a healthy fat...that I don't make new recipes all that often!  I am always looking for something to crunch on or to fill my sweet tooth, so that is where my creativity and time are spent.  My clients seem to have the hardest time with that aspect as well, so snacks and treats are my top priority.  Enjoy these grain free crackers!

Olive Garlic Crackers

Ingredients

  • 2 cups almond flour (any brand will work here)
  • 1/2 cup green olives, diced
  • 1 egg, whisked
  • 1 tbsp grass-fed butter, melted Ghee, or coconut oil, or MCT oil  
  • 1/4 tsp or more sea salt
  • 1/4 tsp garlic powder

Instructions

  1. Combine flour, salt and garlic in a large mixing bowl and add in the olives
  2. Pour the melted butter and egg over the mixture and stir until combined
  3. Place the dough on a piece of parchment paper with another piece of parchment placed over top
  4. Press the dough dough a bit and then roll it out with a rolling pin until it's about 1/8-1/4 inch thick
  5. Using a pizza cutter or sharp knife, cut the crackers into the desired size
  6. Bake at 350 for 15-20 minutes or until golden on top
  7. Store in an airtight container, glass is my favorite

If you want to try Swerve or need to order more, use coupon code KATE10 for a 10% discount.  Swerve is my favorite sugar replacement.  It is the only sugar alcohol that will not cause tummy troubles and it does not raise blood glucose levels.

If you are an Amazon shopper, would you be so kind to use my affiliate link to make your purchases.  It is at no cost to you, it does provide a tiny kickback to Kate’s Healthy Cupboard.  This allows me to continue making and testing recipes for free.  Thanks so much!!

*I have recently switched all of my skincare and makeup to a company that is free of 1,500 chemicals!!  I am so particular about what goes into my body, I need to be just as picky as to what goes on my body!  Your skin is your largest organ and absorbs chemicals into the bloodstream faster than the gut does!  I am vain when it comes to my skin and was so thrilled to find products that are anti-aging and work!!!  Check out BeautyCounter for more info!!  You will love it!!

Kate's Healthy Cupboard - Gluten Free Recipes
In Recipes, Snacks and Appetizers3 Tags Almond flour, Crackers, Dairy Free
21 Comments

Flourless Lemon Cookies

May 15, 2014 Kate
Flourless Lemon Cookies Recipe

I have been at it again with the coconut butter!!  I am on a mission to create a bunch of goodies that don't require a bunch of nut flour.  Nothing against nut flour, but I am trying to limit nut consumption and give people options.  Coconut Creme or Butter is a great alternative to using nut flours and butters.  The fiber in it helps bind and hold baked goods together.  I'm guessing this recipe could be made without the cashew butter and with a full cup of coconut butter.  The cashew butter helps bind and doesn't melt like the coconut butter does and I felt I needed something to help absorb some of the lemon juice.  Feel free to try it and let us all know how it goes!!

Lemon is one of my favorite flavors and it pairs well with coconut butter.  These cookies almost melt in your mouth!  I have a couple other cookie recipes similar to these Flourless Lemon Cookies that use coconut butter.  Check out my Flourless Chocolate Chip Cookies and my Flourless Nut-Free Snickerdoodle Recipe.  Sorry I can't get my link option to work, but both of these cookies were recent posts, so just scroll down the main page of my website!

Flourless Lemon Cookies
Prep time: 10 mins
Cook time: 10 mins
Total time: 20 mins
Serves: 12

Ingredients

  • ¾ cup coconut creme, softened*
  • ¼ cup cashew butter (I prefer fresh grind, jarred has added oils)
  • ⅔ - ¾ cup granulated sweetener (I used Swerve for no sugar option)
  • 1 egg
  • ¼ cup FRESH lemon juice, strained (about 1 lemon)
  • 1 tbsp grated lemon peel
  • 1 tsp baking powder (gluten and corn free)
  • dash of sea salt

Instructions

  1. Place the softened coconut creme in a food processor and pulse until smooth
  2. Add in the remaining ingredients and process until combined and lemon peel has disappeared
  3. Depending on how soft your coconut creme was, you may need to place the dough in the refrigerator for a few minutes to harden
  4. Once dough is hard enough, roll it into about one inch balls. Place the balls on a parchment lined cookie sheet and slightly press down. The cookies will spread slightly.
  5. Bake at 350 for about 10-12 minutes or until slightly brown around edges
  6. Let the cookies cool for a few minutes to help them set up then transfer to a cooling rack
  7. Store in an airtight container and refrigerate if you prefer a harder cookie.

Notes

*To soften the coconut butter, place the open jar in a sauce pan of simmering water. Most brands have a thick layer of coconut oil on the top, remove that to use for something else. You want to use all butter in this recipe or the oil will cause these to spread too much!!


If you are an Amazon shopper, would you be so kind to use my affiliate link to make your purchases.  It is at no cost to you, it does provide a tiny kickback to Kate’s Healthy Cupboard.  This allows me to continue making and testing recipes for free.  Thanks so much!!

I have switched all of my skincare and makeup to a company that is free of 1,500 chemicals!  The European Union bans about 1,400 chemicals and the US bans 11 in an unregulated industry!  I am so particular about what goes into my body, I need to be just as picky as to what goes on my body!  Your skin is your largest organ and absorbs chemicals into the bloodstream faster than the gut does!  I am vain when it comes to my skin and was so thrilled to find products that are safe, non toxic, but are still anti-aging and work!!!  The makeup is chic, on trend and high performing! Check out Beautycounter for more info!!  Their mission is to get safe products into the hands of everyone!  I feel compelled to help educate and share this mission!  

Kate's Healthy Cupboard - Gluten Free Recipes
In Recipes, Desserts4 Tags Cashews, Coconut Creme, Dairy Free, Swerve
18 Comments

Kombucha and Kefir Jello

May 6, 2014 Kate
Kombucha and Kefir Jello Recipe

We all know the benefits of Kombucha, Kefir and Gelatin, so why not combine them all!!  These jello cubes or gummies are full of probiotics and some protein from the gelatin along with many other benefits of the gelatin.  I love both kombucha and kefir, but prefer to drink Kevita Kefir since it is lower in sugar and made from coconut water.  If you have not tried Kevita, I highly suggest you do!!  It's not as carbonated as kombucha, but still delicious and refreshing.  They just came out with new flavors including Tangerine, my favorite!!  My other favorite is the Lemon Cayenne, but they are all good!  If you are struggling with candida, I highly recommend you stay away from most kombuchas, as they do have some added sugar.

Kombucha and Kefir Jello

Ingredients

  • 1 bottle (about 15 ounces) Kombucha or Kefir
  • 3 tbsp grass-fed gelatin, I prefer Great Lakes Gelatin
  • Sweetener of choice (optional, I used 1 teaspoon of Swerve)
  • ¾ cup water, divided into ¼ and ½ cup

Instructions

  1. Bring 1/2 cup water to a boil
  2. Sprinkle the gelatin in the bottom of a mixing bowl and pour the 1/4 cup water over it entirely to soften
  3. Once the water is BOILING, pour it over the gelatin as you stir it. Stir until all of the clumps are gone. You may need to mash some of the clumps, but it will all dissolve.
  4. Add the sweetener, stir and let the gelatin cool for a couple minutes. Don't wait too long or it will start to harden!
  5. Slowly add the kombucha or kefir stirring the entire time, it may fizz a little
  6. Pour into a mold or a 6x6, 8x8 or loaf pan depending on how thick you want the jello
  7. Place in refrigerator to set up
  8. Cut into desired size and serve

Notes

*If you want a more gummy type texture, add a couple more tablespoons of gelatin. You may need to increase the amount of boiling water to dissolve it all.

If you want to try Swerve or need to order more, use coupon code KATE10 for a discount.  If you are an Amazon shopper, would you be so kind to use my affiliate link to make your purchases.  It is at no cost to you, it does provide a tiny kickback to Kate’s Healthy Cupboard.  This allows me to continue making and testing recipes for free.  Thanks so much!!

Kate's Healthy Cupboard - Gluten Free Recipes
In Recipes, Snacks and Appetizers3 Tags Dairy Free, Egg-Free, Gelatin, Nut-Free
1 Comment

Dairy Free Lemon Gelato

April 22, 2014 Kate
Dairy Free Lemon Gelato Recipe

I absolutely love all things lemon...even this gelato in the middle of winter!  I made this recipe months ago but decided to wait for some warmer weather to share it with you!  If you love lemon and low carb desserts, make sure to head over to All Day I Dream About Food's Luscious Low Carb Lemon Desserts Round Up!!  Even if you aren't a lemon lover, check out Carolyn's website anyway!  She has a ton of amazing looking dishes and desserts...and she loves Swerve as much as I do so her treats are low to no sugar!!

Dairy Free Lemon Gelato
Serves: 4

Ingredients

  • 1 can full fat coconut milk
  • 1 cup non-dairy milk
  • 4 egg yolks
  • 1/2-3/4 cup granulated sweetener ( I used Swerve for no sugar option)
  • 3/4 cup fresh lemon juice (2-3 lemons)
  • 2 heaping tbsp grated lemon peel

Instructions

  1. Whisk the egg yolks and set aside
  2. Combine the milks and sweetener in a heavy saucepan over medium high heat and bring to a simmer
  3. Once the milk is simmering, reduce the heat to low
  4. Slowly whisk about a ladle full of milk into the egg yolks, whisking the entire time
  5. Slowly add the egg yolk mixture back into the warm pan, whisking the entire time. Add the lemon peel at this time
  6. Continue cooking the mixture on low and stirring until it thickens up, coats the back of a spoon
  7. Remove from heat and stir in the lemon juice. Strain the mixture to remove any seeds and the lemon peel
  8. Place in the fridge or freezer to cool
  9. Once cooled, run thru an ice cream maker or freeze it in a loaf pan or use the ziploc method*

Notes

*I haven't tried this, but you simply pour the mixture into a ziploc and freeze. When you are ready to serve the Gelato, place the frozen mixture into a blender and blend until smooth!

Affiliate Banners_Generic_728x90-2.jpg
In Recipes, Desserts3 Tags Coconut Milk, Dairy Free, Nut-Free, Swerve
15 Comments

Flourless Nut Free Snickerdoodle Cookies

March 24, 2014 Kate
Flourless Nut Free Snickerdoodle Cookies Recipe

So excited to share this nut-free, dairy free and starch free cookie recipe and to introduce you to Red Ape Cinnamon!  I randomly came across this company and was so thrilled I did!  They have an organic cinnamon that is sustainably harvested that is slowly ground to sweet, fragrant perfection. If it's good enough for some of the most discerning chefs, it must be good enough for us!  For any of you that have been to Portland, you know of the famous Salt & Straw and Scoop Shop Ice Cream shops.  They use Red Ape Cinnamon in their Snickerdoodle ice cream....yum!!!  Why Red Ape...5% of the profits from their cinnamon products go to protecting orangutans and their habitat.  A portion of the funds also go towards adopting orangutans.  So not only are their products fantastic, but they are also doing great things for the environment!

Cinnamon has many health benefits including decreasing blood sugar levels, but not all cinnamon is created equal!  I actually just heard something this morning that cheaper cinnamon like the brand you buy in huge containers at Costco, usually aren't made completely of cinnamon!  Yes it may taste good from the cinnamon flavor they add, but you certainly aren't getting the health benefits!  Besides the amazing taste of Red Ape Cinnamon, another bonus is that you don't need very much to add incredible flavor.

You can read more about Red Ape Cinnamon and how it came to be on their website.  It is not just cinnamon, they have a variety of awesome and unique spice blends that all include cinnamon.  I used their Premium Ground Cinnamon and their Cinnamon Sugar Shake in this cookie recipe.  Stay tuned later this week for a savory recipe using another one of their spice blends!  And......one of you lucky readers is going to win a jar of each of their products!!!  Comment on this post or on Kate's Healthy Cupboard Facebook where the recipe has been posted and let us know what product you can't wait to try from Red Ape Cinnamon!!!  Please go like Red Ape Cinnamon on Facebook, follow them on Pinterest and check out their website for more cinnamon recipes.  I will randomly select a winner on Monday, March 31st!  You will have two chances to win, comment on this post and on the upcoming savory post later this week!!

If you have been grain free for a while, you know it's hard to replicate glutinous dessert recipes exactly.  Almond flour does a pretty good job and so does adding some starch, but I am really trying to create some nut free, low carb options for people.  This Snickerdoodle Recipe will definitely cure your sweet tooth, they almost melt in your mouth from the coconut butter...Enjoy!

Recipe: Flourless Nut Free Snickerdoodle CookiesIngredients

Makes about 12

  • 1 cup coconut creme/butter*, softened
  • 1 egg
  • 1/2 cup granulated sweetener (I used Swerve for no sugar option)
  • 2 tsp vanilla
  • 1/4 tsp baking soda
  • 1/4 tsp baking powder (gluten and corn free)
  • 1/4 tsp sea salt
Cinnamon Coating**:
  • 1 tbsp Red Ape Cinnamon Sugar Shake
  • 1 tsp Red Ape Premium Cinnamon
  • 2 tbsp granulated sweetener (I used combo of Swerve and Coconut Palm Sugar. You could use all Cinnamon and Sugar Shake, but I wanted to cut down on the sugar)
Quick Notes:
*I order coconut creme from Tropical Traditions or you can usually find the Artisana Brand at Whole Foods or other natural grocery stores. The top layer is coconut oil, so you may need to scrape that off to get to the creme, but save the oil for another use. I soften it by placing the jar in a small saucepan of simmering water.
**You can use any combo of cinnamon and sugar in a 1:1 ratio but use a bit more sugar than cinnamon)
Instructions
  1. In a mixing bowl or food processor, combine the coconut butter/creme, egg (whisked if using a bowl) and vanilla
  2. Add the 1/2 cup sugar, soda, powder and salt, mix well.  Make sure no clumps remain in dough
  3. In a small bowl, combine the cinnamon and sugar mixture for the coating
  4. Roll the dough into one inch or larger dough balls. If batter is too runny from the coconut creme, place it in the frig for a few minutes to harden
  5. Roll each ball in the cinnamon sugar mix and coat well. I sort of mashed it into each ball and then rerolled each ball
  6. Place the balls on a parchment lined cookie sheet and press down with the palm of your hand. Cookies should not spread much unless batter is really soft
  7. Take the leftover cinnamon sugar mixture and sprinkle it over top the cookies
  8. Bake at 350 for about 12 minutes
  9. Remove from heat and let the cookies sit on the cookie sheet until they are set up. They will fall apart if you try to remove them when hot
  10. Place on a cooling rack to finish setting up

If you want to try Swerve or need to order more, use coupon code KATE10 for a 10% discount.  Swerve is my favorite sugar replacement.  It is the only sugar alcohol that will not cause tummy troubles and it does not raise blood glucose levels.

If you are an Amazon shopper, would you be so kind to use my affiliate link to make your purchases.  It is at no cost to you, it does provide a tiny kickback to Kate’s Healthy Cupboard.  This allows me to continue making and testing recipes for free.  Thanks so much!!

*I have recently switched all of my skincare and makeup to a company that is free of 1,500 chemicals!!  I am so particular about what goes into my body, I need to be just as picky as to what goes on my body!  Your skin is your largest organ and absorbs chemicals into the bloodstream faster than the gut does!  I am vain when it comes to my skin and was so thrilled to find products that are anti-aging and work!!!  Check out BeautyCounter for more info!!  You will love it!!

Kate's Healthy Cupboard - Gluten Free Recipes
In Recipes, Desserts3 Tags Coconut Creme, Cookies, Dairy Free, Flourless, Nut-Free, Paleo
9 Comments

Nut Free Fudge Brownies

March 20, 2014 Kate
Grain & Nut Free Fudge Brownies

Are you a fudgy brownie or cake-like brownie person?  I am definitely a fudgy type...I'd eat cake if I wanted cake!  This brownie recipe is so dense and fudge like, they almost melt in your mouth! I debated whether I call this recipe brownie fudge or fudge brownies..either way, they are delicious!

I am trying to create recipes that are nut free or lower in nuts.  I think almond flour works great in baked goods, but I want to make something that everyone can have.  Some may say tapioca or arrowroot makes these too high in carbs, not so fast!  The 1/4 cup of flour is adds 25 carbs and unless you eat the entire pan, that's not much per serving!  I also used Swerve to keep the sugar very low.  If you want to try Swerve or need to order more, use coupon code KATE10 for a discount.

Grain & Nut Free Brownies
Ingredients
  • 1/4 cup tapioca flour/starch (arrowroot should work, tapioca tends to be a tad bit sweeter)
  • 1/3 cup cacao or cocoa powder
  • 1 cup granulated sweetener ( I used Swerve for no sugar option plus a tbsp coconut palm sugar)
  • 6 tbsp grass-fed butter (see dairy free option below)*
  • 2 oz 100% cacao (4 squares)
  • 3 pastured eggs
  • 2 tbsp full fat coconut milk
  • 1 tbsp vanilla extract
  • 1/2 tsp sea salt
Instructions
  1. Melt the chocolate squares, butter and coconut milk in a double broiler
  2. Whisk the eggs and vanilla in a small bowl and set aside
  3. In a large mixing bowl combine the tapioca flour, cacao powder, sweetener and salt
  4. Add the egg mixture to the flour mixture and stir a couple times, doesn't need to be combined well
  5. Once the chocolate is melted, pour it over the egg and flour mixture and stir until combined
  6. Pour batter into an 8x8 greased baking dish
  7. Bake at 350 for 25-30 minutes
  8. Store in an airtight container
Quick Notes:

*I haven't tried this with coconut oil, but it should work.  I would only do about 5 tbsp of oil.

You can also use chocolate chips or any high cacao chocolate bar in place of the 100% cacao.  I wanted to make these dairy free and sugar free or I would have used my favorite chocolate chips.  You may need to reduce the amount of sweetener.


If you are an Amazon shopper, would you be so kind to use my affiliate link to make your purchases.  It is at no cost to you, it does provide a tiny kickback to Kate’s Healthy Cupboard.  This allows me to continue making and testing recipes for free.  Thanks so much!!

*I have recently switched all of my skincare and makeup to a company that is free of 1,500 chemicals!!  I am so particular about what goes into my body, I need to be just as picky as to what goes on my body!  Your skin is your largest organ and absorbs chemicals into the bloodstream faster than the gut does!  I am vain when it comes to my skin and was so thrilled to find products that are anti-aging and work!!!  Check out BeautyCounter for more info!!  You will love it!!

Kate's Healthy Cupboard - Gluten Free Recipes
In Recipes, Desserts3 Tags Chocolate, Coconut Milk, Dairy Free, Nut-Free, Swerve
Comment

Cracked Pepper Cashew Crackers

February 25, 2014 Kate
Grain Free Crackered Pepper Cashew Crackers Recipe

The Whole Foods I shop at used to have Cracked Pepper and Sea Salt Cashews in the bulk section...and I loved them!!  Unfortunately you know they were roasted in crappy vegetable oil and would be very easy to make yourself!  They no longer carry them, I could make them or I could get a bit more creative and make a cracker recipe out of cashews in the same flavor. Let this recipe be a template for you to make any cracker flavor you'd like with any nut you'd like!  I loved the spiciness of the pepper and couldn't get enough of these!!!  This could easily be turned into a sweet cracker with a touch of sweetener and cinnamon in place of the salt and pepper.  Looking for other grain free cracker ideas, I have a bunch of different recipes for you!

Cracked Pepper Cashew Crackers
Ingredients
  • 2 generous cups raw cashews
  • 1 pastured egg
  • 1 tbsp coconut oil, butter or ghee*
  • 1 tsp sea salt
  • 1 tsp cracked black pepper
Instructions
  1. In a food processor, grind the cashews into a flour. Make sure not to over blend into cashew butter, but you want it as fine as possible
  2. Add in the salt and pepper and pulse to combine
  3. In a mixing bowl, whisk the egg and oil together and stir in the flour mixture until combined
  4. Place the ball of dough in the center of a large piece of parchment paper with an additional piece of paper over top
  5. Roll out to desired thickness, about 1/8 - 1/4 inch
  6. Using a sharp knife or pizza cutter, cut into desired size.  You may want to sprinkle more salt and pepper over the top of dough
  7. Bake at 350 for 12-15 minutes or until a bit brown
  8. Store in an airtight container
Quick notes

*I used expeller pressed coconut oil. Macadamia nut oil would be great here too!

If you are an Amazon shopper, would you be so kind to use my affiliate link to make your purchases.  It is at no cost to you, it does provide a tiny kickback to Kate’s Healthy Cupboard.  This allows me to continue making and testing recipes for free.  Thanks so much!!

*I have recently switched all of my skincare and makeup to a company that is free of 1,500 chemicals!!  I am so particular about what goes into my body, I need to be just as picky as to what goes on my body!  Your skin is your largest organ and absorbs chemicals into the bloodstream faster than the gut does!  I am vain when it comes to my skin and was so thrilled to find products that are anti-aging and work!!!  Check out BeautyCounter for more info!!  You will love it!!

Kate's Healthy Cupboard - Gluten Free Recipes
In Recipes, Snacks and Appetizers3 Tags Cashews, Crackers, Dairy Free, Paleo, Vegan
Comment

Sauteed Radishes

February 8, 2014 Kate
Sauteed Radishes Recipe

How about a savory Valentine's Recipe!!!  Don"t worry, more chocolate and sweets to come!!! It's so funny how much more attention my treat recipes get than recipes like these radishes!

I bought the Easter Egg Radishes that are bright pink, red and white for this dish, but the color diminishes a ton when you cook them.  These are so pretty and could be served cold drizzled with a dressing for your Valentine's Day dinner as an alternative.

radishes
radishes

I had never tried cooking radishes until today...yum!!  You don't even have to be a radish fan to like this recipe.  So much of the "spiciness" is removed and they almost taste like little potatoes, maybe that's because of the butter.  I think radishes would add a lot of flavor to roasted vegetables, so next time you roast a chicken with veggies, add some radishes.  This is an easy recipe and can be seasoned to your liking!  And, as an added bonus, radishes contain nutrients that detoxify and nourish the body!!!

Sauteed Radishes
Ingredients
  • 2 bunches of radishes
  • 2-3 tbsp grass-fed butter, ghee or coconut oil
  • 1-2 tsp sage (I used dried)
  • sea salt and pepper to taste
Instructions
  1. Wash and remove the leaves and stems from the radishes. Cut in half or quarters depending on the size of the radishes
  2. Melt the butter over medium high heat in a skillet and toss in the radishes
  3. Let cook for about 6-7 minutes or until soft and browned, stir occasionally
  4. Sprinkle the sage, salt and pepper
Variations

Diced onions and/or garlic would also be good in this recipe.

If you are an Amazon shopper, would you be so kind to use my affiliate link to make your purchases.  It is at no cost to you, it does provide a tiny kickback to Kate’s Healthy Cupboard.  This allows me to continue making and testing recipes for free.  Thanks so much!!

*I have recently switched all of my skincare and makeup to a company that is free of 1,500 chemicals!!  I am so particular about what goes into my body, I need to be just as picky as to what goes on my body!  Your skin is your largest organ and absorbs chemicals into the bloodstream faster than the gut does!  I am vain when it comes to my skin and was so thrilled to find products that are anti-aging and work!!!  Check out BeautyCounter  for more info!!  You will love it!!

Kate's Healthy Cupboard - Gluten Free Recipes
In Vegetables, Recipes Tags Dairy Free, Egg-Free, Nut-Free, Paleo, Vegan, Vegetables
2 Comments

Chocolate Dipped Valentine's Marshmallows

February 3, 2014 Kate
Sugar Free Chocolate Dipped Valentine's Marshmallows

So excited to bring you this fun Valentine's Day Marshmallow Recipe.  I can't really take credit for it...only the pink part and chocolate dipping is my creation.  The best part is that these are naturally colored with beet juice.  The credit goes to Adrienne over at Whole New Mom.  Her website it full of great recipes, DIY remedies, lotions and potions.  Go check her blog out!!! This recipe calls for liquid sweetener and I have not been able to find anything that works in recipes to replace honey, syrup or corn syrup with no sugar.  Adrienne has the answer...vegetable glycerin!!  We have all heard that you shouldn't put anything on your skin that you wouldn't put in your mouth.  Well vegetable glycerin is often times found in skin care as a natural preservative, but also has a bit of sweetness to it and is completely food grade.  What the heck is vegetable glycerin?

According to Wise Geek: Vegetable glycerin can also be made directly from vegetable oil — often coconut or palm oil — by heating it to a high temperature under pressure with water. The glycerin backbone splits off from the fatty acids, and is absorbed by the water, from which it is then isolated and distilled to obtain the pure product. Food-grade vegetable glycerin is 99.7% pure, with the remaining 0.3% being water. Select this line to insert text description of recipe here

Glycerin is widely used in the food industry for two main reasons: it has a sweet taste, but has fewer calories than sugar; and it is hygroscopic, that is, it absorbs moisture from the air. It is therefore used both to sweeten foods and to keep them moist. The compound is metabolized more slowly than sucrose— the type of sugar most commonly found in candy and in processed foods — and therefore does not have such a dramatic effect on blood sugar levels. It also does not contribute to bacterial tooth decay. Foods marketed as being low in carbohydrates are often sweetened with glycerin.

Another major use is in the cosmetics industry. Due to its hygroscopic properties, it is used in many moisturizing skin products, as it seems to help relieve dry skin problems by drawing water up from the lower layers. It is also a component of glycerin soap, which is often used by people with sensitive skin. Lotions containing this compound are also popular.

I did some research to find a source of vegetable glycerine that was from coconut and/or palm oils, not soy oil.  I think the best source is from Wilderness Family Naturals.  They are a trusted company with great products (I have no affiliation)!!!  You can also use Now Foods Vegetable Glycerin that I believe to be a reputable source as well.  The Now Brand can be found in many local health food stores and possibly Whole Foods.  It is sold in the lotion section since many people add it to their homemade lotions.

Recipe: Chocolate Dipped Valentine’s Marshmallows

Original Marshmallow Recipe from Whole New Mom

Ingredients

  • 2 tbsp gelatin from grass-fed cows (I use Great Lakes Gelatin)
  • 1/2 cup cold water that has been beet juice infused (directions below)
  • 1 – 1 1/2 cups granulated sweetener (I used a cup total of Swerve and Xylitol
    mixed for sugar free option)
  • 1/2 cup hot water
  • 1/2 cup liquid sweetener (I used vegetable glycerin for sugar free option, see above for info and where to buy)
  • 2 tsp vanilla extract
  • 1/2 cup dark chocolate chips* (Use Enjoy Life Chocolate Chips for dairy free option)

Instructions

  1. Peel and cut a very small raw beet into about 1 inch chunks. Place the beets in a saucepan along with 1/2 cup of water
  2. Warm the water on low heat to get the beets to bleed. You want really pink/red water. Once you blend this with the gelatin and other ingredients, it really lightens up.
  3. Place the water in the refrigerator to cool for a few minutes.  Remove and discard the beets
  4. In a large mixing bowl or standup mixer, pour the cooled pink water and sprinkle the gelatin over top, let sit
  5. Combine the granulated sweetener, liquid sweetener and additional 1/2 cup hot water in a heavy bottom saucepan
  6. Cook over medium high heat until mixture reaches 240-245 (soft ball stage)
  7. With a hand mixer or standup mixer, start beating the gelatin and beet water as you slowly add in the hot sweeteners.
  8. Slowly add in the vanilla and continue to beat until stiff peaks have formed, thick marshmallow creme
  9. Pour the creme into an 8×8 greased pan (or larger if you want thinner marshmallows)
  10. Let sit and harden. Cut into desired shape and size
  11. Melt the chocolate in a double broiler. Using a toothpick or skewer, dip the marshmallows in the chocolate and let cool
  12. Store in an airtight container. I prefer glass jars

Quick notes

*Use more chocolate if you want to completely coat the marshmallows

Variations

As Adrienne suggests, you can roll marshmallows in coconut, cocoa, nuts or any other topping.


If you want to try Swerve or need to order more, use coupon code KATE10 for a 10% discount.  Swerve is my favorite sugar replacement.  It is the only sugar alcohol that will not cause tummy troubles and it does not raise blood glucose levels.

If you are an Amazon shopper, would you be so kind to use my affiliate link to make your purchases.  It is at no cost to you, it does provide a tiny kickback to Kate’s Healthy Cupboard.  This allows me to continue making and testing recipes for free.  Thanks so much!!


Kate's Healthy Cupboard - Gluten Free Recipes
In Recipes, Desserts3 Tags Chocolate, Dairy Free, Gelatin, Holiday, Nut-Free, Paleo, Swerve, Vegetable Glycerin
5 Comments

Cranberry Pecan Crackers

November 19, 2013 Kate
Cranberry Pecan Crackers Recipe

The Holidays are here...so are all of the pumpkin recipes!  I haven't been in a pumpkin mood, so I'm trying to create some different holiday flavors this season.  First up, these Cranberry Pecan Crackers made with homemade dried cranberries.  I really like how this recipe turned out, the tartness of the cranberries with the bit of sweetness from the pecans works well together.  The crackers are almost a bit flakey and would pair well with a goat cheese spread if you can tolerate dairy.  I wish I could...sounds delicious!!

If you like the combination of cranberries and pecans, I highly recommend these Cranberry Pecan Muffins.  The topping alone makes these delicious and perfect for Thanksgiving morning!

Recipe: Cranberry Pecan Crackers

Ingredients

Dried Cranberries:

  • 1 1/2 cups fresh cranberries
  • 1 tsp coconut oil, melted
  • dash of sweetener (optional)

Crackers:

  • 1 tbsp grass-fed butter, Ghee or coconut oil, melted
  • 1 -2 tsp granulated sweetener (I used Swerve for no sugar option)
  • Couple dashes of sea salt or more for salty crackers.  I sprinkled the top of rolled out dough will a tiny bit more salt

Instructions

Cranberries:

  1. Combine cranberries, coconut oil and sweetener in a bowl. Pour onto a parchment lined cookie sheet and bake at 250 for 2-2 1/2 hours.
  2. Remove from heat once the majority of berries look dried, set aside to cool.

Crackers:

  1. Place the pecans and cranberries in a food processor and combine until pecans look like coarse sand
  2. Add the egg, butter/oil, sweetener and salt to the mixture and pulse until combined and dough forms
  3. Place the dough between two pieces of parchment paper and roll out to about 1/8 of an inch thick
  4. Using a pizza cutter or sharp knife, cut crackers into desired size
  5. Bake at 350 for 10-12 minutes or until lightly browned. Thinner crackers will cook faster and you may need to remove outer edge crackers before you remove the inner crackers
  6. Let cool to crisp up and store in an airtight container. I love using glass jars for my snacks!

Quick notes

*I did not want to use store bought dried cranberries, they have added sunflower oil and white sugar. You can certainly substitute store bought, but you will probably only need 1/2 cup or less and leave out the sweetener all together.  These crackers will definitely turn out to be a sweeter version!!

Variations

*You can use a dehydrator to dry out the cranberries. I chose the oven method since many people do not have a dehydrator.

Looking for a great online source for nuts and sooo much more...check out www.nuts.com for a huge variety of baked goods and nuts and nut flours!  If you want to try Swerve in your holiday baking, use coupon code Kate10 for 10% off when you order online.

If you want to try Swerve or need to order more, use coupon code KATE10 for a discount.  If you are an Amazon shopper, would you be so kind to use my affiliate link to make your purchases.  It is at no cost to you, it does provide a tiny kickback to Kate’s Healthy Cupboard.  This allows me to continue making and testing recipes for free.  Thanks so much!!

*I have recently switched all of my skincare and makeup to a company that is free of 1,500 chemicals!!  I am so particular about what goes into my body, I need to be just as picky as to what goes on my body!  Your skin is your largest organ and absorbs chemicals into the bloodstream faster than the gut does!  I am vain when it comes to my skin and was so thrilled to find products that are anti-aging and work!!!  Check out BeautyCounter for more info!!  You will love it!!

Kate's Healthy Cupboard - Gluten Free Recipes
In Recipes, Snacks and Appetizers3 Tags Crackers, Dairy Free, Holiday, Paleo, Pecans
7 Comments

Chocolate Coconut Sport Gummies

October 15, 2013 Kate
Chocolate Coconut Sport Jellies

I was recently listening to my favorite podcast, Ben Greenfield Fitness (one of the best out there, love those guys) and he was talking about fueling for races and made some comment about a high fat gummy for fuel.  It got me thinking that I could create one myself that could be stuffed away in a ziploc for use on a long training day.  You don't have to be an athlete to enjoy these, you can just call this coconut jello and enjoy it as a high fat treat!! I'm sure some of you athletes out there know what Clif Blocks are...gummy blocks full of sugar that are meant to be consumed during a race.  Some people need substance rather than a liquid, so these work great, but it's all sugar!  More and more athletes are turning to a high fat, low carb lifestyle and are doing away with the gels, gu's and other simple sugars as fuel during races and longer training sessions.  The purpose of this is to tap into your bodies fat stores for energy rather than being a sugar burner.  These gummies are a perfect source of fat for quick energy and you get some protein (amino acids) from the gelatin as well!  The triathlon and marathon season is coming to a close, but these would be good for those looking for a convenient way to fuel your workouts or to tie you over between meals.

I am a huge fan of gelatin, I actually use it daily in hot bone broth, soups or just in hot water.  It is beneficial for the gut, joints, skin and much more!!  Wellness Mama has a great post about its benefits and all of the ways to use it.  I recommend Great Lake's Gelatin (Natural Grocer's sells it) or Upgraded Self Collagen from The Bulletproof Exec website.

I also love using MCT oil (Medium-Chained-Triglycerides, also found in coconut oil and are different than Long-chained-triglycerides found in oil olive and other fats). MCT's are absorbed more like carbohydrates and are used and burned quickly by the body and not stored in the fat cells and any extra are converted into ketones.  Sounds like the perfect fat for fueling your long runs, bike rides or whatever activity you choose!  MCT oil is tasteless and stays in liquid form, so it is perfect for salad dressings or to drizzle on any dish for added fat.  You can certainly leave this out of the recipe, but it's what provides the fat along with the coconut milk that will be your fuel!  Don't get crazy and start dumping MCT oil on all your meals right away, it can cause intestinal issues for some people that are not used to large amounts of fat.  I actually didn't have any issues with it and add it to my morning smoothie every day.  I use Dave Asprey's MCT Oil or I'd suggest Now Foods MCT Oil that can be found at some health food stores in the supplement department or from Amazon.

I have not taken these out on a run (I typically don't eat anything), but please let me know if they survive the heat and how they worked for you!!

Chocolate Coconut Gummies

Ingredients

  • 1 can full-fat coconut milk
  • 3 tbsp gelatin (from grass-fed source, see above for sources)
  • 1 tbsp or more MCT oil (optional, see above for sources)
  • 1/4 tsp vanilla bean powder or 1 tsp vanilla extract
  • 2-3 tsp cacao powder (these are also good without, but cacao adds flavor and antioxidants)
  • couple sprinkles of sea salt
  • Stevia or other sweetener to taste (I used a tbsp of Swerve for no sugar option)

Instructions

  1. Place all ingredients in a blender and mix until well combined
  2. Pour into a candy mold or glass dish (size depends on how thick you want the gummies to be) and refrigerate until firm
  3. Cut into desired size and store in the refrigerator

Notes

You can tailor these to your liking by adding more cacao or none at all or try using different extracts or flavorings.

xo,

In Recipes, Desserts3 Tags Chocolate, Coconut Milk, Dairy Free, Gelatin, MCT Oil, Nut-Free
18 Comments

Flourless Double Chocolate Chip Cookies

September 17, 2013 Kate
Flourless Double Chocolate Cookie Recipe

These rock!!!  So easy, so scrumptious and low sugar when you use Swerve...my favorite natural sugar alternative!  The final product is a dense cookie with a bit of a crunch.  Your chocolate craving and sweet tooth will definitely be cured!

This cookie recipe is perfect for those of you that are nut-free and there's a dairy free option.  This sparked another idea for a flourless cookie recipe...stayed tuned, especially if you aren't a chocolate person!ned cookie sheets, it should spread out some.  I used the spoon to spread to desired size.

Makes 8 large cookies or 12 small cookies

Recipe: Flourless Double Chocolate Chip Cookies

Ingredients

  • 1-2 egg whites (I used 2 pastured eggs from Tropical Traditionswhich can be smaller in size)
  • 1/3 cup cocoa/cacao powder
  • 3/4 cup granulated sweetener ( I used almost all  Confectioner’s Swerve with a bit of coconut palm sugar)*
  • 2 tsp vanilla extract
  • dash of sea salt
  • 1/2 cup dark chocolate chips**

Instructions

  1. Beat whites (start with one) and vanilla for a few seconds until bubbly
  2. Add in cocoa powder, sugar and salt, beat until combined. Batter should be like a thick brownie batter consistency. If it seems too runny, add some more cocoa or sugar. If it seems too thick, add a bit more egg white. You really can’t mess these up!
  3. Fold in the chocolate chips
  4. Spoon batter onto parchment lined cookie sheets, it should spread out some.  I used the spoon to spread to desired size.
  5. Bake at 350 for 12-14 minutes until centers looks done
  6. Let cool on the cookie sheet. Warm cookies will not come off parchment paper cleanly

Variations

*I made these with granulated Swerve and with Confectioner’s Swerveand both tasted great!  The batter will seem gritty if you don’t “powder” your sugar, but the end result will be great!!

**Use Enjoy Life’s Dairy Free Chocolate Chips or Chunks for a Dairy Free option.

If you want to try Swerve or need to order more, use coupon code KATE10 for a 10% discount.  Swerve is my favorite sugar replacement.  It is the only sugar alcohol that will not cause tummy troubles and it does not raise blood glucose levels.

If you are an Amazon shopper, would you be so kind to use my affiliate link to make your purchases.  It is at no cost to you, it does provide a tiny kickback to Kate’s Healthy Cupboard.  This allows me to continue making and testing recipes for free.  Thanks so much!!

*I have recently switched all of my skincare and makeup to a company that is free of 1,500 chemicals!!  I am so particular about what goes into my body, I need to be just as picky as to what goes on my body!  Your skin is your largest organ and absorbs chemicals into the bloodstream faster than the gut does!  I am vain when it comes to my skin and was so thrilled to find products that are anti-aging and work!!!  Check out BeautyCounter for more info!!  You will love it!!

Kate's Healthy Cupboard - Gluten Free Recipes
In Recipes, Desserts3 Tags Chocolate, Cookies, Dairy Free, Flourless, Nut-Free, Swerve
9 Comments

Peach Cookie Bars

September 13, 2013 Kate
Peach Cookie Bars
Peach Cookie Bars

Peach's are still piled high at my local Whole Foods!  Hopefully your local farmer's market or natural grocery store is well stocked too.  I wanted to do something different with peaches and came up with this yummy cookie bar recipe.  I wanted a dense, crispy, but gooey moist bar.  I think I got it!

You could certainly make these more cake-like if you wanted to by adding an egg.  I haven't tried this so I don't know how it would turn out.  I would eliminate the milk to keep it from being soggy.  If anyone tries this, let us all know how it turns out!  I have always been a gooey brownie or bar person, never a cakey brownie person.  I guess that's why I never liked cake...I was the one asking for a corner piece scraping the frosting off to enjoy and leaving the cake behind!

Peach Cookie Bars

Ingredients

  • 2 cups Honeyville Almond Flour*
  • 1/2 cup arrowroot flour
  • 1/4-1/2 cup granulated sweetener ( I used 1/2 cup of mostly Swerveand a bit of coconut palm sugar)
  • 1 peach, peeled and sliced (the more unripe the peach is, the better)
  • 2 tbsp grass-fed butter, softened and cut into pieces
  • 1-2 tbsp non-dairy milk
  • 1 tbsp vanilla extract
  • 1- 1 1/2 tsp cinnamon
  • 1/2 tsp baking soda
  • 1/4 tsp sea salt

Instructions

  1. Line an 8×8 baking dish with parchment paper, this makes it really easy to get the bars out in one piece
  2. Place all of the dry ingredients into a food processor and combine
  3. Add in the butter, vanilla and 1 tbsp of milk and pulse until a dough forms
  4. The dough should form a ball and be wet, Add more milk if needed
  5. Press the dough into the baking dish until fully covered, then place the peach slices on top of the dough
  6. Bake at 350 for 32-35 minutes or until the top is golden
  7. Let cool, remove the bars from the pan by pulling up on the sides of the parchment paper. Cut into desired size bars
  8. Store in an airtight container. These are great at room temp, but as with all almond flour goodies, I think they are best out of the freezer!!! Let them sit for a minute or two out of freezer to thaw the peach.

Quick notes

*I suggest using Honeyville Almond Flour, Bob’s Red Mill does not absorb moisture like the more finely ground flours.

Variations

Softened coconut oil should work in place of the butter for those that are dairy free.


These are even more delicious with Dairy Free Vanilla Bean Ice Cream on top!!  Also if you have been wanting to try Swerve, the confectioner's Swerve is $2 off right now!!  If your order is over $30, shipping is free and you can use coupon code kate10 for an additional 10% off!!!

Kate's Healthy Cupboard - Gluten Free Recipes
In Recipes, Desserts3 Tags Almond flour, Dairy Free, Egg-Free, Swerve, Vegan
Comment

Homemade Creamy Coconut Milk

September 9, 2013 Kate
Homemade Creamy Coconut Milk2

I have tried to like homemade coconut or almond milk, but just can't give up my store bought milks.  They are creamy and seem thicker than homemade versions.  I imagine if you add dates to sweeten your milk, they may make it thicker, but I don't want that much sugar added to my milk.

The ingredient that is responsible for the creaminess in the box varieties is carrageenan or sometimes guar gum.  Carrageenan is from red seaweed that acts is a thickener or emulsifier.  It's what gives many ice creams a good mouth feel.  You'd think that seaweed would be safe or even beneficial, but studies show it may be hard on the gastrointestinal tract.  It may be fine for some of you, but my thought is that if possible, remove it from my diet.  There is more and more talk about the dangers of it, enough to make food manufacturers remove it.  Califia (my favorite brand found in the refrigerate section in a plastic bottle) and So Delicious are in the process of removing carrageenan.  In the meantime, I have found a way to make a creamy homemade version!

Th secret ingredient, kelp noodles!!  Kelp is a brown seaweed full of nutrients!  Some people take kelp for it's iodine content.  Many of you have probably had these noodles in stir fry, as pasta or in a salad.  Most natural grocery stores sell them or you can find them on Amazon, but they are much less expensive at your local store.  They are usually found in the refrigerator section, often times near fermented foods or vegetarian cheeses and tofu (don't be buying any of these).  I rinse the noodles well and store it in an airtight container.  I promise you would never taste or even know the noodles are in the milk!!

Recipe: Homemade Creamy Coconut Milk

Ingredients

  • 1/2 cup kelp noodles (loose, don't pack them)*
  • 1/2 tsp vanilla extract
  • dash of sea salt
  • sweetener (optional, I use liquid stevia or Swerve for no sugar option)

Instructions

  • Blend the coconut and water on high until smooth. Pour through a Nut Milk Bag or cheesecloth into a pitcher, drain all of the liquid out of the bag
  • Pour the mixture back into the blender and add the kelp noodles, vanilla, salt and sweetener. Blend on high until smooth.
  • Store in an airtight container in the refrigerator

Quick notes

*Make sure you rinse and drain the noodles before you use them.

Variations

Add kelp noodles to any homemade nut milk to make it creamier. Increase the amount of noodles if you prefer thicker milk.

Kate's Healthy Cupboard - Gluten Free Recipes
In Beverages, Recipes Tags coconut, Coconut Milk, Dairy Free, Nut-Free, Vegan
4 Comments
Older Posts →
download.jpeg

Welcome to Kate's Healthy Cupboard! A place for healthy, grain free recipes, some low carb recipes, safe beauty and products for the home  and more...


>>  CONNECT WITH KATE  <<

pinterest.png
facebook.png
instagram.png

>>  SUBSCRIBE  <<

Success! Now check your email to confirm your subscription.

There was an error submitting your subscription. Please try again.


>>  SEARCH RECIPES  <<


Copyright 2016 Kate's Healthy Cupboard  ||  Website Design