• Blog
  • Recipes
  • Lifestyle
  • Safer Skincare
  • About
  • Contact
Menu

Kate's Healthy Cupboard

Street Address
City, State, Zip
Phone Number
Healthy Lifestyle, Healthy Grain Free Recipes

Your Custom Text Here

Kate's Healthy Cupboard

  • Blog
  • Recipes
  • Lifestyle
  • Safer Skincare
  • About
  • Contact

Coconut Curry Cauliflower (Red Ape Cinnamon Giveaway)

March 27, 2014 Kate
Coconut Curry Cauliflower Recipe

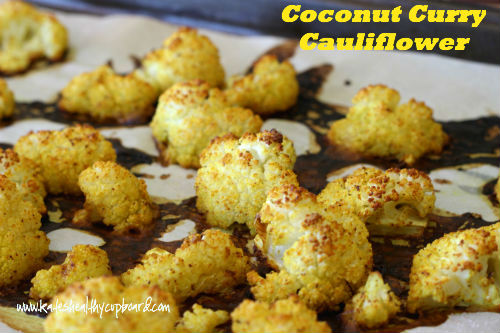
I'm taking roasted cauliflower to a whole different level!  Instead of using an oil or butter to roast the cauliflower, I decided to use full fat coconut milk for the fat and for flavor.  I also used Organic Buddha Shake Curry Mix from Red Ape Cinnamon company for the curry powder.  To read more about Red Ape Cinnamon and enter to win a bunch of their awesome cinnamon and spices, including the curry mix I used, head over to my previous post.  While you're there, check out the delicious Flourless Snickerdoodle Cookie Recipe if you haven't yet!!

Coconut Curry Cauliflower
Ingredients
  • 1 head of cauliflower, cut into pieces
  • 1/2 cup full fat coconut milk*
  • 1 1/2 tsp or more Red Ape Cinnamon Organic Buddha Shake Curry Mix (or any curry blend)
  • sea salt to taste
Instructions
  1. Whisk together the coconut milk and curry powder in a bowl
  2. Place 1/3 of the cauliflower pieces in the milk mixture and coat.
  3. Place the cauliflower onto a parchment lined cookie sheet and repeat the process with the remaining cauliflower. Pour the remaining milk over top and sprinkle with sea salt
  4. Bake at 425 for about 25 minutes or until the cauliflower starts to brown
  5. Serve hot
Quick notes

*Use a milk that tends to be thicker so it doesn't completely run off the cauliflower. I prefer Whole Foods brand or Thai Kitchen in the red and black can.

If you are an Amazon shopper, would you be so kind to use my affiliate link to make your purchases.  It is at no cost to you, it does provide a tiny kickback to Kate’s Healthy Cupboard.  This allows me to continue making and testing recipes for free.  Thanks so much!!

Kate's Healthy Cupboard - Gluten Free Recipes
In Vegetables, Recipes Tags Coconut Milk, Egg-Free, Nut-Free, Paleo, Vegan, Vegetables
Comment

Sauteed Radishes

February 8, 2014 Kate
Sauteed Radishes Recipe

How about a savory Valentine's Recipe!!!  Don"t worry, more chocolate and sweets to come!!! It's so funny how much more attention my treat recipes get than recipes like these radishes!

I bought the Easter Egg Radishes that are bright pink, red and white for this dish, but the color diminishes a ton when you cook them.  These are so pretty and could be served cold drizzled with a dressing for your Valentine's Day dinner as an alternative.

radishes
radishes

I had never tried cooking radishes until today...yum!!  You don't even have to be a radish fan to like this recipe.  So much of the "spiciness" is removed and they almost taste like little potatoes, maybe that's because of the butter.  I think radishes would add a lot of flavor to roasted vegetables, so next time you roast a chicken with veggies, add some radishes.  This is an easy recipe and can be seasoned to your liking!  And, as an added bonus, radishes contain nutrients that detoxify and nourish the body!!!

Sauteed Radishes
Ingredients
  • 2 bunches of radishes
  • 2-3 tbsp grass-fed butter, ghee or coconut oil
  • 1-2 tsp sage (I used dried)
  • sea salt and pepper to taste
Instructions
  1. Wash and remove the leaves and stems from the radishes. Cut in half or quarters depending on the size of the radishes
  2. Melt the butter over medium high heat in a skillet and toss in the radishes
  3. Let cook for about 6-7 minutes or until soft and browned, stir occasionally
  4. Sprinkle the sage, salt and pepper
Variations

Diced onions and/or garlic would also be good in this recipe.

If you are an Amazon shopper, would you be so kind to use my affiliate link to make your purchases.  It is at no cost to you, it does provide a tiny kickback to Kate’s Healthy Cupboard.  This allows me to continue making and testing recipes for free.  Thanks so much!!

*I have recently switched all of my skincare and makeup to a company that is free of 1,500 chemicals!!  I am so particular about what goes into my body, I need to be just as picky as to what goes on my body!  Your skin is your largest organ and absorbs chemicals into the bloodstream faster than the gut does!  I am vain when it comes to my skin and was so thrilled to find products that are anti-aging and work!!!  Check out BeautyCounter  for more info!!  You will love it!!

Kate's Healthy Cupboard - Gluten Free Recipes
In Vegetables, Recipes Tags Dairy Free, Egg-Free, Nut-Free, Paleo, Vegan, Vegetables
2 Comments

Bacon Brussel Sprouts

January 8, 2014 Kate
Bacon Brussel Sprouts

Happy New Year!  I hope everyone had a great holiday season and got a chance to enjoy a few of my treats.  I just finished off the last of the cookies I made for Christmas.  It's so nice to know almost all of my treats were free of sugar since I used Swerve (my favorite sugar alternative) in all my recipes.  If your resolutions include giving up or decreasing the sugar in your diet, I highly recommend trying Swerve!  They are running a special in January and always offer 10% off to my readers with coupon code KATE10.

Enough about the sweets, it's time for vegetables, dinners and breakfasts for a while...well until it's Valentine's recipe time!  We enjoyed this brussels sprout recipe for our Thanksgiving and Christmas dinner.  These were a huge hit by everyone, even the brussels sprout haters liked them...how can you not when bacon is included!   This recipe is not a lot of work and certainly isn't high maintenance!

Recipe: Bacon Brussels Sprouts

Ingredients

  • 3-4 slices bacon, sliced into 1/2 inch pieces
  • 1 lb brussels sprouts, halved or quartered depending on size
  • 1/4 cup onions, diced
  • 1/2 cup water
  • salt and pepper to taste

Instructions

  1. Place the sliced bacon in a skillet over medium heat and cook until tender but not full cooked
  2. Remove all but 2 tbsp of the bacon grease and toss in the onions, cook until onions are translucent and bacon is fully cooked
  3. Add the brussels sprouts, stir to coat with grease
  4. Stir in the water and sprinkle with some salt and pepper
  5. Turn temperature down to low and place a lid on the skillet
  6. Let cook for 30-60 minutes or until very tender. The longer they cook, the more the sprouts take on the bacon flavor
  7. Salt and pepper to taste

If you are an Amazon shopper, would you be so kind to use my affiliate link to make your purchases.  It is at no cost to you, it does provide a tiny kickback to Kate’s Healthy Cupboard.  This allows me to continue making and testing recipes for free.  Thanks so much!!

Kate's Healthy Cupboard - Gluten Free Recipes
In Side Dishes, Vegetables, Recipes Tags Bacon, Low Carb, Nut-Free, Paleo, Vegetables
3 Comments

"Rice" and Bacon Stuffed Pumpkin

November 14, 2013 Kate
Rice Stuffed Pumpkin2

Here's a fantastic and fun recipe to add to your Thanksgiving menu.  I originally had this dish with rice in place of cauliflower a couple years ago and loved it!!!  I figured I could recreate this to be grain free by using cauliflower rice.  My inspiration came from this recipe, Pumpkin Stuffed With Everything Good.  It was made with bread crumbs, but along the way it has been changed to rice (I include how to do that variation below).  I made my own additions and changes as well.  I had to make some adjustments after trying to cook the cauliflower in the pumpkin. I decided it gets way too much moisture (which is perfect for cooking rice), so it needed to be cooked in a casserole dish.  Also, through trial and error, I decided that sauteing the onions and mushrooms in the bacon grease added some additional flavor.  You certainly can leave the entire pumpkin part out (unless you are using rice), but it makes for such a great fall presentation!Instructions

Recipe: “Rice” Stuffed Pumpkin

Ingredients

  • 1 medium sized pumpkin, about 3 pounds
  • 1 medium head of cauliflower, riced (run though a food processor)
  • 4 pieces of bacon, cut into 1/2 inch pieces
  • 1 1/2 cups mushrooms, chopped
  • 3/4 cup sliced green onion, greens and whites (about 4 onions)
  • 1/4 cup unsweetened vanilla non-dairy milk
  • 2 tbsp grass-fed butter, melted (optional, see variation below)
  • 2-3 garlic cloves, minced
  • 1 tbsp fresh thyme, chopped
  • 1/2 tsp sea salt
  • 1/8-1/4 tsp nutmeg
  • Pepper to taste

Instructions

  1. Place the riced cauliflower in a large mixing bowl and set aside
  2. Cook bacon in a skillet until crispy, remove from grease and add to the cauliflower. Pour out all but 2 tablespoons of grease.
  3. Place the onions and mushrooms in the skillet of grease and saute over medium heat until the onion is translucent and mushrooms are tender
  4. Add the onion and mushroom mixture, garlic, butter, milk, thyme, salt, pepper and nutmeg to the cauliflower and mix well
  5. Place the mixture in a casserole dish and cover
  6. Bake at 350 for an hour
  7. While the cauliflower is baking, cut off the top of the pumpkin and remove the seeds and guts
  8. Once the cauliflower is done, spoon it into the pumpkin and place it on a cookie sheet. Return it to the oven with the lid on for another 15-30 minutes (make sure the oven shelf is low enough so the stem isn’t touching the burner).
  9. Remove the top after 15 minutes and remove from oven if cauliflower is done or cook another 15 minutes with lid off until done.
  10. Serve hot in the pumpkin

Variations

Butter makes everything better! You could substitute it with ghee as a dairy free option or increase the milk to 1/3 cup from 1/4 cup.

The original recipe calls for bread crumbs or rice. To make this with rice, sub the cauliflower with 2 cups of uncooked rice, use 1/3 cup milk and cook the entire dish inside the pumpkin from the start for 60-90 minutes with lid on.  Remove lid the last 15-30 minutes and cook until rice is done (Directions in link above for original recipe).


Holiday baking season is here!!  My favorite place to order all of my nut flours, nuts, chocolate, dried fruit, etc is www.nuts.com.  They have every kind of nut flour out there that is finely ground and sure to make your grain free baked goods perfect! They are certified gluten free so there is absolutely no cross contamination!!


Baking wouldn't be the same without a sweetener, but I prefer to use a sweetener that won't raise insulin levels, is natural, won't upset your belly and won't leave you feeling guilty!  Swerve is my go to...and you can enjoy 10% off as one of my readers with coupon code KATE10!

Kate's Healthy Cupboard - Gluten Free Recipes
In Side Dishes, Vegetables, Recipes Tags Bacon, Low Carb, Nut-Free, Paleo
1 Comment

Coconut "Rice"

June 4, 2013 Kate
Coconut Cauliflower Rice

Summer is here....hence why I have been absent in the kitchen lately.  I am trying to get outside more and get off of the computer.  Don't worry, I still have lots of recipes in the pipeline!

This recipe is inspired by a recipe from The Joy of Cooking, one of my favorite cookbooks.  The original recipe was made with jasmine rice, but I chose to make it with cauliflower "rice" and loooooved how it turned out.  I could have eaten the entire head of cauliflower!

Coconut “Rice”

Ingredients

  • 1 cup full fat coconut milk
  • 1/2 cup water
  • 1 large head of cauliflower, trimmed and washed
  • 2 slices of fresh ginger, peeled (about inch in size)
  • 1/2 tsp sea salt
  • 1-2 tbsp toasted unsweetened coconut shreds (optional)

Instructions

  1. Place raw cauliflower in a food processor and pulse until rice size pieces are formed
  2. Using a Nut Milk Bag or kitchen towel, drain the excess water out of the cauliflower, set aside
  3. In a saucepan, combine the coconut milk, water and ginger and bring to a boil
  4. Add the cauliflower and simmer for 30 minutes uncovered
  5. Remove from heat and discard the pieces of ginger, add in the salt. Do not add it beforehand, it pulls water out vegetables.
  6. Serve with the toasted coconut sprinkled over top

This could easily be sweetened with something like Swerve and reduce the amount of salt to make it a sweet treat.  Another idea is to add protein powder of choice and eat it like a hot breakfast cereal (maybe even add some grass-fed butter).  You could also do something similar to my Pumpkin Spice Cream Of "Wheat Recipe and add in eggs.

Kate's Healthy Cupboard - Gluten Free Recipes
In Side Dishes, Vegetables, Recipes Tags Coconut Milk, Egg-Free, Low Carb, Nut-Free, Paleo, Vegan
1 Comment

Balsamic Roasted Asparagus

April 23, 2013 Kate
Basalmic Roasted Asparagus

Happy Earth Day!!!  Asparagus is in season and on sale!!!  I love asparagus simply roasted or sauteed with sea salt.  The one downfall...why does it have to make your pee smell immediately?? Did you know you either have the gene or not that allows you the pleasure ofsmelling it?  I thought the gene determined if the pee actually smelled, but apparently everyone's smells.  Who knew?

Enough about that!!!  Here is a little twist on roasting asparagus if you're looking for a new way to fix it!  I made this about 6 months ago and am just getting around to posting it...I like creating and posting baked goods so much more!

Basalmic Roasted Asparagus

Ingredients

  • 1 bunch asparagus, trimmed
  • 1 tablespoon oil (melted coconut oil, olive oil or toasted sesame oil for a bit of spice)
  • 2 tsp toasted sesame seeds
  • 1 tbsp balsamic vinegar
  • 1 tbsp coconut aminos
  • sprinkle of crushed red pepper flakes

Instructions

  1. Spread oil onto a parchment lined cookie sheet and roll the asparagus in the oil
  2. Place the asparagus in a single layer and sprinkle the sesame seeds over them
  3. Roast in the oven at 425 for about 10 minutes, check frequently to make sure it’s not getting over cooked and too tender
  4. While that is roasting, combine the vinegar, coconut aminos and red pepper flakes in a small bowl
  5. Remove asparagus and drizzle it with mixture and serve
bundle
bundle
Kate's Healthy Cupboard - Gluten Free Recipes
In Vegetables, Recipes Tags Paleo, Primal, Vegan, Vegetables
1 Comment

"Cheesy" Kale Chips

February 21, 2013 Kate
Cheesy Kale Chips
Cheesy Kale Chips

I love Whole Foods, wandering around seeing what new products have been granted self space and what local products are new to market as well.  I spend a lot of time in Scottsdale, Arizona and a lot of time at the Whole foods there.  Every time I go, I have to take some extra time that first trip to the store to see what's new.  Arizona is part of the western region for Whole Foods that includes California, where Colorado is part of the mountain west region, so we get different products.  Arizona gets a lot of products that originate from California and if they sell well, we will be lucky to hopefully see them on the shelves in Colorado and vice versa.

There are a couple things I can't find at my local Whole Foods that I love to get down there.  One item in particular, Quite Cheezy Kale Chips made by Alive & Radiant Foods (my Whole Foods only sells two of the flavors as of late and the Quite Cheesy is not one of them).  The entire line of their products are delicious. I think I seriously bought a bag every trip I made to the store (that is often) and ate the entire bag!  Serving size is 2.2, that's a joke...I eat the whole bag wishing I had more!  After looking at the ingredient list, I knew I could make these at home when I got back to my dehydrator.  This recipe is pretty darn close...close enough for me!

I know not everyone has a dehydrator, but you should (in my opinion), since there are so many great things you can do with them and they are reasonably priced (I have this dehydrator and it works great).  I have not tried this in the oven on the dehydrate setting, but if you do, please leave a comment on how they turned out.  This spread would be awesome as a "cheese" spread for crackers (I have numerous grain-free cracker recipes) or as a dip for vegetables.  So if you don't have a dehydrator, you can still enjoy this recipe!

“Cheesy” Kale Chips

Ingredients

  • 1 cup raw cashews (soaked overnight)
  • 1/3 cup roasted red bell pepper*
  • 2 tablespoons lemon juice
  • 2 tablespoons Nutritional Yeast**
  • 1/2 tsp sea salt
  • 1 bunch kale (I used Dino, but any Kale will work)

Instructions

  1. Wash the kale, pat dry and tear into pieces, about 1 1/2 inches and place in a bowl
  2. Drain the water off of the cashews and place all of the ingredients in a food processor or blender until smooth
  3. Pour the spread into the bowl and massage it into the kale to cover each piece
  4. Place kale on dehydrator trays and dehydrate at 125 for 8-10 hours or until desired crispiness
  5. Store in an airtight container, I prefer glass

Quick notes

*I used roasted peppers for additional flavor. The Alive & Radiant Foods is considered raw, so a red bell pepper is what they used. Either one will work.

**Nutritional Yeast is something a lot of vegetarians use to make things taste cheesy. It is full of B vitamins, some protein and lots of flavor. It can be found in the baking section of a health food store or may be sold in bulk. It looks like yellow flaky fish food to me:)

Variations

To make these a bit spicy, add some cayenne pepper or other seasonings you like.


If you are looking for ways to get more greens in your kids, this recipe will work!

Kate's Healthy Cupboard - Gluten Free Recipes
In Vegetables, Recipes, Snacks and Appetizers3 Tags Cashews, Dairy Free, Dehydrated, Nutritional Yeast, Paleo, Primal, Raw
6 Comments

Creamy Roasted Cauliflower and Mushroom Soup

January 10, 2013 Kate
Creamy Roasted Cauliflower and Mushroom Soup

It seems that most of the west is about to experience a bit of a cold front.  I thought this would be the perfect time to share this recipe!  I'm fortunate enough to still be in Arizona where a cold front means it's going to be in the 50's!  I live in Colorado, so listening to the weather forecast here cracks me up!!  What these people think is cold is definitely a hot winter day at home!

Even if it's not cold where you are, this is a delicious soup recipe to enjoy for lunch or dinner.  I served it with bacon pieces and used the bacon grease for flavor.  If you'd prefer, you can certainly skip the bacon, but who skips bacon?  This would also be good with shredded chicken as well.

Creamy Roasted Cauliflower and Mushroom Soup

Ingredients

  • 1 head of cauliflower, cut into pieces
  • 2 tbsp coconut oil
  • 2-3 pieces of bacon (optional)
  • 2 tbsp bacon grease, butter or coconut oil
  • 1/4-1/2cup white onion, diced
  • 2 garlic cloves, minced
  • 1 tsp fresh thyme or 3 tsp dried
  • 8 oz mushrooms, sliced
  • 1/4 cup white wine
  • 3 cups homemade chicken broth (or canned)
  • 3/4 cup full fat coconut milk
  • 2 tbsp grass-fed butter (optional)
  • sea salt and pepper

Instructions

  1. Place the pieces of cauliflower in a bowl and coat with the 2 tablespoons of coconut oil. Place single layer on a parchment lined cookie sheet and sprinkle with salt and pepper and roast at 400 for 25-30 minutes
  2. Cook the bacon in a skillet, reserve the grease, cut the bacon into pieces and set aside
  3. Place the bacon grease, coconut oil or butter in a large sauce pan with the onion. Saute the onions until slightly browned
  4. Add the garlic, thyme and mushrooms. Saute until the mushrooms are tender, about 5-10 minutes
  5. Add the white wine and de-glaze the pan
  6. Add the chicken broth and cauliflower and bring to a boil. Reduce heat to a simmer for 5 minutes
  7. Place the soup, coconut milk and optional butter in a food processor or blender and combine until desired consistency
  8. Salt and pepper to taste
  9. Sprinkle the bacon pieces on top (optional)

I served this tonight and when I told Tom what I had made, this was his response: "If I saw that on the label ofa soup can, I would not think it sounded very good."  About two bites into it, he kept telling me how awesome it was!  I knew he was going to like it!  Butter, bacon and mushrooms, who wouldn't love this!!

Kate's Healthy Cupboard - Gluten Free Recipes
In Entrees, Side Dishes, Soups, Vegetables, Recipes, Snacks and Appetizers3 Tags Bacon, Coconut Milk, Dairy Free, Egg-Free, Low Carb, Mushrooms, Nut-Free, Paleo, Primal
4 Comments

Sauteed Shredded Brussels Sprouts

November 16, 2012 Kate
Shredded Brussel Sprouts

Some of you may make the same menu every Thanksgiving, and others like to switch it up a bit.  I am sure we all have our staples of turkey, mashed potatoes and gravy, sweet potatoes and what ever else is a family favorite.  Here is an idea for any of you looking for a new idea for a vegetable to serve.  It includes bacon, so it's sure to make everyone go after a second helping...except those vegetarians out there!!!

I have quite a few recipes to get out before the holiday, so I am going to keep it short and sweet in my upcoming posts.  I have a fantastic muffin recipe coming that is perfect to include in your breakfast on Thanksgiving morning and a pumpkin tart dessert for anyone looking to do something different than a traditional pumpkin pie!!

Sauteed Shredded Brussel Sprouts

Ingredients

  • 2 lbs fresh brussels sprouts (2 bags), cleaned and trimmed
  • 4 slices of bacon (US Wellness Meats is a great place to buy bacon that is pasture raised and sugar free)
  • 2-3 garlic cloves, minced
  • 1/2- 1 cup onions, diced
  • salt and pepper to taste

Instructions

  1. Place the brussels sprouts in a food processor and pulse until they are shredded
  2. In a large skillet, fry the bacon until crispy. Set aside and reserve 2 tbsp of bacon grease in the pan
  3. Add the onion, salt and pepper to the pan and saute until the onions are close to translucent
  4. Add the sprouts and the garlic and continue to saute until completely cooked (about 3-5 minutes)
  5. Tear the bacon into pieces and stir into the sprouts

I found myself going back for more of this...it's that good and such a different way to fix brussels sprouts.  I think this would also be good with cabbage if any of you are not sprouts fans.

Kate's Healthy Cupboard - Gluten Free Recipes
In Side Dishes, Vegetables, Recipes Tags Bacon, Dairy Free, Low Carb, Paleo, Primal, Vegetables
Comment

Pumpkin Spice Cream of "Wheat"

October 24, 2012 Kate
Pumpkin Spice Cream of Wheat

One of the most common complaints I hear from clients is, "what can I eat for breakfast now that I can't have cereal, a bagel or pancakes.  I can't eat eggs everyday!"  I can rattle off numerous things other than starchy high carb foods...and something besides eggs.  Too many of us have gotten in the mindset that breakfast has to be a "breakfast" food, and that is not the case.  Get creative and don't hesitate to eat leftovers from the previous nights dinner.  I personally love my protein smoothie that's full of fat and spinach (you wouldn't know it's in there if the shake wasn't green!) that I make every morning and look forward to it everyday...and it doesn't even have fruit in it!!!

I am on a mission to create some low starch breakfast options that will make you think you're getting the carbs you are so used to eating.  The best part is, you won't be hungry an hour later!  There are numerous breakfast recipes on my site that are higher in fat, lower in starch and supply a good amount of protein.  Some of my favorites include:  Coconut Pancakes and Strawberry Syrup, Banana Bread French Toast, Egg Muffins,Banana Pancakes,Grain Free Thin Pancakes, Almond Nut Joy Granola,Grain Free Banana Nut Granola and Pumpkin Spice Granola.  And for all of you cold cereal people, I'm working on a recipe, but the bad news is, it has to be done in a dehydrator.  I tried it in the oven and it just doesn't work.  When it comes to granolas, my cookie bites and some cracker recipes, a dehydrator is so worth it!!!

I recently had the idea of making a hot cereal, but didn't want it to be an entire bowl of mushed nuts.  I somehow wanted to incorporate mashed cauliflower with protein in the form of powder.  About a month ago, I came across this recipe for Faux "Oat" Meal and loved how she used real eggs for the protein!  You would never guess that eggs or cauliflower were in this cream of "wheat" recipe!  I did things a little differently and loved what I came up with!  There are many flavor options for those of you that don't like pumpkin.

Pumpkin Spice Cream of “Wheat”

Serves: 2-3

Ingredients

  • 1 medium head of cauliflower, steamed
  • 4 eggs
  • 1 1/4 cups non-dairy milk (I love So Delicious unsweetened vanilla)
  • 4 tbsp coconut cream (The cream that rises to the top of a can of full fat coconut milk that has been refrigerated)
  • 1/4 cup pumpkin
  • 1/2 tsp maple flavor (vanilla should work too)
  • 1-3 tbsp sweetener (I used 3 tbsp of Swerve which is erythritol.)
  • 1 tsp cinnamon
  • 1/2 tsp ground ginger
  • 1/2 tsp ground cloves
  • 1/2 tsp nutmeg
  • couple dashes of salt
  • grass-fed butter (optional)

Instructions

  1. Place the steamed cauliflower in a food processor and pulse until it’s “riced”
  2. Whisk the 4 eggs in a large mixing bowl and set aside
  3. In a medium sized saucepan, combine the milk, cream, pumpkin and cauliflower and slowly bring to a boil. Reduce heat to a simmer and cook for 1-2 minutes
  4. Remove the pan from heat and add a 1/4 cup at a time to the eggs, whisking the entire time you add the hot mixture. The eggs will start to cook if you aren’t careful. This process makes the eggs safe to eat for those concerned with eating raw eggs
  5. Pour the mixture back in to the food processor, add the maple extract, spices, salt and sweetener and pulse until well combined
  6. Serve hot with a dollop of grassfed butter (optional)

Quick notes

Since all cauliflower heads are different sizes, you may want to add milk if it seems to thick or add some almond flour to thicken it up.

Variations

Serve with nuts, coconut or fresh fruit on top. Another variation would be to replace the pumpkin with applesauce and just use cinnamon for the spice.  You could also add just cocoa powder or simply leave it as a maple nut version.


I still think adding a vanilla protein powder would work just fine in place of the eggs.  Add it at the time you would add in the spices.

Kate's Healthy Cupboard - Gluten Free Recipes
In Breakfasts, Vegetables, Recipes Tags Breakfast, Coconut Milk, Holiday, Nut-Free, Paleo, Pumpkin
7 Comments

Coconut Curry Carrot Soup

October 10, 2012 Kate
Coconut Curry Carrot Soup

It's definitely soup season here in Colorado!!!  I just returned from ten days in Arizona and can't believe how cold it feels here now!  I've decided I prefer the warmth and the idea of never having to scrape ice off my windshield!

While I was in Arizona, I made this soup for Tom's (my boyfriend) grandmother.  She is 93...reminds me of Betty White, love her!!  She hasn't been feeling great and I think dehydration is playing a role in her tiredness.  Old people don't want to drink so they don't have to go potty.  She of course thinks she drinks a ton of fluids.  It's hard to convince her that her coffee with Starbuck's Ice Cream in it in the morning and her Vodka on the rocks at night just doesn't cut it!!!  Needless to say,  I was on a mission to get some fluids in her!  I had her drinking coconut water and kombucha along with some homemade bone broth.  I figured soup would be a great way to secretly increase her fluid intake.  She loooooved this soup and ate it everyday for lunch and raved about it every time I dished it up for her.  Hope you enjoy it as much as sweet Verna May did!!!

Recipe: Coconut Curry Carrot Soup

Ingredients

  • 1 tbsp grass-fed butter or coconut oil
  • 2 heaping cups of thickly sliced carrots (about 4 carrots)
  • 2 thin slices of fresh ginger root
  • 1 medium onion, chopped
  • 5 cups chicken broth (I prefer homemade*)
  • 3/4 cup full fat coconut milk
  • 3/4 tsp red curry paste (add more if you want it spicier)
  • salt and pepper to taste
  • 1 scallion, sliced
  • 1 tbsp chopped cilantro
  • 2 chicken breasts (optional)

Instructions

  1. Heat the butter/oil in a large saucepan and stir in the carrots and ginger
  2. Cook over medium heat until the carrots start to brown, about 6-8 minutes stirring constantly
  3. Add the onions and cook until they are translucent
  4. Stir in the broth, coconut milk and curry paste
  5. Bring to a boil, reduce heat and simmer covered for 25 minutes
  6. If you want to add chicken to this recipe, add it to the simmering soup. Remove chicken once it's fully cooked and set aside
  7. Strain the solids so you can remove the ginger root and discard
  8. Add the solids plus 2 cups of the liquid to a blender and puree
  9. Add the remaining liquid and process until completely pureed
  10. Pour soup back into saucepan to add shredded chicken or pour into soup bowls (Use a fork to shred the chicken once it has cooled enough to touch. Add it to the soup and stir)
  11. Serve with some scallions and cilantro sprinkled on top and additional salt and pepper if needed

Quick notes

*I prefer to use homemade chicken broth for all of the health benefits. Store bought will work, but may be higher in sodium so be careful when you salt the soup. I use this recipe for broth. I also add onion, carrots, celery and garlic cloves to my pot for flavor. I use a large crockpot and let simmer for 24 hours to let all of the gelatin out of the bones.

Kate's Healthy Cupboard - Gluten Free Recipes
In Entrees, Side Dishes, Soups, Vegetables, Recipes, Snacks and Appetizers2 Tags Chicken, Coconut Milk, Nut-Free, Paleo
Comment

"Notato" Pancakes

September 27, 2012 Kate
Notato Pancakes
Notato Pancakes

Have you ever taken left over mashed potatoes and made potato pancakes the next day?  I loved them, but no more potatoes for me so these "notato" pancakes made with cauliflower will have to do...and they do!  If you eat white potatoes regularly, these may not do it for you and your starch addiction.  Otherwise, give these a try and let me know what you think!  You may also enjoy this Mashed Cauliflower Recipe next time you're craving mashed potatoes!

“Notato” Pancakes

Ingredients

  • 1 large head of cauliflower, chopped and steamed
  • 1-2 tbsp fresh chives, minced
  • 2 eggs
  • 1/2 tsp garlic powder
  • salt and pepper to taste
  • 1-2 tbsp coconut oil for frying

Instructions

  1. Pat dry the steamed cauliflower to remove as much moisture as possible
  2. In a food processor, pulse the cauliflower into tiny pieces. Do not puree it!
  3. In a mixing bowl, whisk the eggs and add the cauliflower, chives, garlic, salt and pepper and stir until combined
  4. Heat a large skillet over medium high heat and add 1 tbsp of oil
  5. Once the oil is hot, spoon the mixture into the pan and press down into a pancake shape
  6. Cook until brown and pancake is holding together enough to flip and brown the other side
  7. You may need to add more oil to the pan for the second batch of pancakes
  8. If your batter seems too running, add a bit of coconut flour if you’d like. I prefer these to be flourless!


Serve nice and hot!

Kate's Healthy Cupboard - Gluten Free Recipes
In Side Dishes, Vegetables, Recipes Tags Low Carb, Nut-Free, Paleo, Primal, Vegetables
10 Comments

Mashed Cauliflower

August 15, 2012 Kate
Mashed Cauliflower
Mashed Cauliflower

I am sure many of you have heard of this idea or already serve cauliflower this way.  I have never tried doing this, not a big cooked cauliflower fan, more of a broccoli girl.  All I can say...why did I wait so long to do this!!!  It really does remind me of mashed potatoes.  I haven't had white potatoes in a very long time, so someone that lives on them may disagree with me!  This is a great starch free side dish to enjoy with out the guilt!

If you are someone that is skipping over this recipe because this is old news to you, just wait, I have a unique one coming that uses this as a base!!

Recipe: Mashed Cauliflower
Ingredients
  • 1 head of cauliflower, steamed
  • 2 tbsp grass-fed butter
  • 2 garlic cloves
  • 1 tbsp chives, chopped
  • 1/4-1/2 cup plain dairy free milk, unsweetened (optional)
  • salt and pepper
Instructions
  1. Place the steamed cauliflower, butter, garlic, milk and salt and pepper in a Vitamix or high speed blender and blend until smooth.
  2. Pour into a bowl and stir in the chives and additional salt and pepper if needed.

There are many variations to this recipe.  Crumbled bacon would be good on top and you can also substitute the chives for green onion if you prefer.

Kate's Healthy Cupboard - Gluten Free Recipes
In Side Dishes, Vegetables, Recipes Tags Egg-Free, Low Carb, Nut-Free, Primal, Vegetables
1 Comment

Spicy Collard Greens Chips

August 2, 2012 Kate
Collard Green Spicy Chips

This is hardly a recipe but I wanted to share it.  I am sure you have seen all the hoopla around kale chips.  There are so many recipes out there for different variations and now you can find them in the raw food section of many health food stores.  I looove them and can eat an entire batch of them in one sitting.

Collards greens make for an incredibly tasty chip as well!  I really like using these greens for the ease of spreading flavors and oils on them.  Collards are huge flat leaves so they are easier to clean and work with.  They are part of the cruciferous vegetable family such as, broccoli, kale and cabbage,  I am sure you have heard all of the health benefits of cruciferous vegetables, so add collard greens to the mix for some variety!

Recipe: Spicy Collard Green Chips
Ingredients
  • 1 bunch of collard greens
  • 1 tbsp olive oil
  • 1-2 tbsp hot sauce
Instructions
  1. Tear the greens into pieces (they will decrease in size as they cook so don't tear them too small)
  2. Combine the leaves, oil and hot sauce in a bowl and massage the greens with the mixture so each piece is covered
  3. Spread single layer onto a parchment lined cookie sheet
  4. Bake at 350 for about 6-8 minutes or until a hint of brown
  5. Let cool completely before storing. Do not pile on top of each other to cool, they will retain moisture and become soggy
  6. Store in a glass container

It's ok if you eat the entire batch, for reals!!

Kate's Healthy Cupboard - Gluten Free Recipes
In Vegetables, Recipes, Snacks and Appetizers3 Tags Paleo, Primal, Vegan, Vegetables
1 Comment

Parsnip Latkes

July 24, 2012 Kate
Parsnip Latkes
Parsnip Latkes

I'm guessing most of you have not ever tried a parsnip, or if you have, you didn't realize it.  I am the girl at Whole Foods that always makes the cashier pull out her produce code book to look up all the random vegetables I buy.  It's not every day that they ring up parsnips, daikon radishes, black radishes, taro root, leeks, tumeric root or plantains to name a few.

According to Wikipedia,  Parsnip is a root vegetable related to the carrot.  Parsnips resemble carrots, but are paler in colour than most carrots, and have a sweeter taste, especially when cooked.  While parsnips can be eaten raw, they are more commonly served cooked. They can be boiled, roasted or used in stews, soups and casseroles.  Parsnips can also be fried or thinly sliced and made into crisps.  The parsnip is richer in vitamins and minerals than its close relative, the carrot. It is particularly rich in potassium with 600 mg per 100 g. The parsnip is also a good source of dietary fiber.

The parsnip looks like a larger pale colored carrot, but in my opinion, doesn't taste like a cooked carrot.  I am not interested in eating a cooked carrot ever again as far as I'm concerned.  I can't stand them!  I actually like parsnips a lot done as parsnip chips in the oven and really liked how this latke recipe turned out.  They have a subtle taste of sweetness and seasoned with the onions, scallions and garlic, it was the perfect balance!!

Recipe: Parsnip Latkes
Ingredients

Makes 8-10 latkes

  • 4 cups grated peeled parsnips
  • 2 large eggs
  • 2 green onions, sliced (all of the whites and light green parts)
  • 1 heaping tbsp of the greens (scallions), sliced
  • 1/2 tsp garlic powder
  • salt and pepper
  • 1-2 tbsp refined coconut oil (no coconut taste) for the pan
Instructions
  1. Whisk the eggs in a large bowl
  2. Add the parsnips, onions, scallions, and seasonings to the bowl of eggs and mix well
  3. Place coconut oil in a skillet and heat over med-high
  4. Place about 1/3 cup of mixture into pan (about 3 fill fit at a time) and pat down to form a pancake
  5. Cook until brown and flip to brown the other side.  You want them to be crisp on the outside, but still soft on the inside.

Just like anything, these are best right out of the pan, but they are still great as leftovers!

Kate's Healthy Cupboard - Gluten Free Recipes
In Side Dishes, Vegetables, Recipes, Snacks and Appetizers3 Tags Low Carb, Paleo, Primal, Vegetables
2 Comments

Raw Beet Sunflower Seed Pesto

June 4, 2012 Kate
Beet Pesto
Beet Pesto

If you like beets...yum is all I can say!!!  I think beets are very polarizing, you either love them or hate them.  I personally love them!  I got the inspiration to make this recipe from a restaurant in Denver, Root Down.  For those of you that live here, it's a must for dinner and brunch!  It is a laid back atmosphere with very unique dishes designed to appeal to just about anyone.  From the meat eater to the vegan, you can find something fantastic on their menu.  They cater to food allergies and offer many different variations to most items.  They try to use almost all local food companies for their menu items and create their menu to reflect the season.  I Highly recommend it!

They have a beet arugula salad that I love to get for brunch.  Along with the beets, arugula, toasted hazelnuts, it includes a beet-sunflower seed pesto dolloped next to the salad.  I mix it right in to the salad as a dressing along side the basil vinaigrette and the balsamic reduction that is drizzled around the plate.  I don't think I had ever really read the description of the salad until this past weekend when I ordered it.  Beet-sunflower seed pesto...that's all I needed to read to realize I could recreate something similar.  I decided to take the entire salad, excluding the nuts and arugula, and make a pesto from the remaining items.  Here is what I came up with and I hope you enjoy it as much as I did!!

Recipe: Raw Beet Pesto
Ingredients
  • 2 large beets, peeled and chopped (about 5 cups)
  • 4 garlic cloves
  • 3/4 - 1 cup fresh basil leaves
  • 3/4 cup raw sunflower seeds
  • 2 tbsp balsamic vinegar
  • 1 tbsp olive oil (or more if you prefer)
  • 1 tsp sea salt
Instructions
  1. Place the chopped beets into a food processor and blend until pureed
  2. Add in the remaining ingredients and blend until well combined
Variations

If you can tolerate cheese, you could certainly add some cheese chunks to this as well.

This could be enjoyed in so many different ways.  You could use it as a sauce over pasta, meats or spaghetti squash like traditional pesto.  It can also be served as a dip or spread for vegetables, crackers or chips.  I would even use it as a salad dressing!!!  I have two more recipes in the making that will incorporate this raw nut-free pesto deliciousness!!!

Kate's Healthy Cupboard - Gluten Free Recipes
In Dips and Spreads, Vegetables, Recipes, Snacks and Appetizers2 Tags Dairy Free, Nut-Free, Paleo, Primal, Raw, Sunflower Seeds, Vegan
2 Comments

Kale Chips

May 10, 2012 Kate
Kale Chips
Kale Chips

One of my favorite greens and one of the most nutrient rich greens...Kale!!!  I figured I better post a vegetable recipe before I post anymore sweet treats.  I need to get better about providing more savory recipes and more vegetable ideas, but I really enjoy baking and not to mention taste testing those recipes.  I love kale chips and all, but the cookies I'm perfecting are far more exciting!!

Kale is full of carotenoids and flavonoids, two powerful antioxidants that protect our cells from free radicals that cause oxidative stress. The key flavonoids are kaempferol and quercitin and there are  45 others!  With the addition of high doses of vitamin C, vitamin A, and manganese, kale is certainly a smart choice to battle against cellular oxidation.  Kale also acts as a natural anti-inflammatory, it provides omega-3 fatty acids that helps regulate the body’s inflammation. Many other health aspects of Kale include, the high fiber content that can possibly lower cholesterol, the isothiocyanates from glucosinolates (whatever that is) found in kale can aid in both phases I and II of the body’s detoxification process and Kale is very high in Vitamin K.  Vitamin K can help strengthen our bones, prevents calcium buildup in our tissues that can lead to atherosclerosis, cardiovascular disease and stroke.  And there's more...Kale contains high levels of vitamin A and C, both of which are effective antioxidants that boost immunity.

So do I have you convinced to either try kale or eat more of it yet?  Kale chips are an easy way to enjoy kale and believe it or not, most people find them addicting.  I could eat the entire batch and the best part is, I don't feel a bit guilty about it!!  The options are endless  as to how you could season these chips.  I am pretty simple and just enjoy olive oil and sea salt, but feel free to get creative.

Recipe: Kale Chips
Ingredients
  • One bunch of Dino Kale, washed and dried
  • 1 tbsp extra virgin olive oil or melted coconut oil
  • sea salt to taste
Instructions
  1. Tear the Kale into pieces (they will decrease in size as they cook so don't tear them too small)
  2. Combine the kale and oil in a bowl and massage the kale with the oil so each piece is oiled
  3. Spread single layer onto a parchment lined cookie sheet
  4. Bake at 350 for about 6-8 minutes or until a hint of brown
  5. Let cool completely before storing. Do not pile on top of each other to cool, they will retain moisture and become soggy
  6. Store in a glass container

There are quite a few types of organic kale including red, green curled and lacinato better known as dinosaur kale.  I prefer to use the dino kale for chips because the leaves are flatter and easier to get oil onto.  I do love the curly green kale sauteed or steamed with a little oil and sea salt.  There are so many ways to spice up kale chips and steamed kale.  I like toasted sesame oil with a bit of red pepper flakes and sea salt on my steamed kale.  Another option is to use a bit of raw apple cider vinegar in this kale chip recipe to make salt and vinegar chips.

Kate's Healthy Cupboard - Gluten Free Recipes
In Side Dishes, Vegetables, Recipes, Snacks and Appetizers2 Tags Kale, Low Carb, Paleo, Primal, Vegan
2 Comments

Green Bean Fries

April 10, 2012 Kate
Green Bean Fries
Green Bean Fries

This is my favorite way to fix string beans.  You can find them as the traditional green bean and also as the rare yellow string bean.  I typically only see the yellow at the farmers markets, but was lucky enough to find them at the Whole Foods in Scottsdale.  I'm not sure what, if there is any, the difference is between the two.  I do know they taste a bit different.  I think the yellow are less beany tasting, less vegetable tasting.  I don't know how to describe the difference.  I prefer the yellow, but seem to think the green might be better for me.  Green beans are much easier to find so I will be sticking to those until some yellow beans pop up at this years farmer's markets.

Recipe: Green Bean Fries
Ingredients
  • 1 lb green beans
  • Spectrum Coconut Oil Spray or a bit of coconut oil
  • Sea salt to taste (or any other seasonings)
Instructions
  1. Clean the beans and snap off the ends, towel dry
  2. Place the beans on a parchment lined cookie sheet, single layer
  3. Bake at 400 for 15-20 minutes until brown. Feel free to turn on the broiler for a minute or two to brown even more

Enjoy!!

Kate's Healthy Cupboard - Gluten Free Recipes
In Side Dishes, Vegetables, Recipes Tags Paleo, Primal
Comment

Roasted Cabbage

March 14, 2012 Kate
Roasted Cabbage
Roasted Cabbage

St Patrick's Day is coming up and cabbage is on the menu!  I'm sorry I don't have a Irish potato soup recipe or soda bread.  I do have an easy way to fix cabbage that can be enjoyed, Irish or not.

I love roasted brussels sprouts and I think this has a little bit of a similar taste to it. That is probably because brussels sprouts are a type of cabbage.  The different varieties are: Green, Savoy, Red, Napa, Bok Choy and Brussels Sprouts.  Cabbage can be enjoyed raw in salads and slaws, braised over low heat, quickly cooked in stir-frys.  Cabbage mellows and sweetens the longer it's cooked.

Cabbage ranks right up there with broccoli, cauliflower and brussels sprouts with the reputation of fighting cancer.  It's also a good source of vitamin C, Fiber, potassium and other nutrients.

Recipe: Roasted Cabbage
Ingredients
  • 1 head of green cabbage, sliced
  • 2 tbsp refined coconut oil, melted
  • 1 tbsp rice vinegar
  • 2 tbsp Coconut Aminos
  • salt and pepper
  • red pepper flakes
  • sesame seeds
Instructions
  1. In a small bowl, combine the oil, vinegar and Coconut Aminos
  2. Lay cabbage slices on a greased cookie sheet
  3. Brush the mixture onto each cabbage slice
  4. Sprinkle with salt, pepper, red pepper flakes and sesame seeds
  5. Bake at 375 for 30-35 minutes

Select this line to type closing text here

Kate's Healthy Cupboard - Gluten Free Recipes
In Side Dishes, Vegetables, Recipes Tags Paleo, Primal
Comment

Meatza Pizza

March 9, 2012 Kate
Meatza Pizza
Meatza Pizza

I can take it or leave it when it comes to pizza, but I love this idea!  I haven't had a slice of pizza since I don't know when.  Having a gluten and dairy sensitivity pretty much crosses pizza off the list of acceptable foods.  I obviously left off the cheese, but if you can handle cheese, have at it!

When I saw this idea, I had to try it.  There are so many variations to pizza toppings and now there is a variation to the crust.  Ground meat makes up this crust and can be done with any combo you would like.  I think this would be a fun thing to do as personal pizzas with kids.  You could make individual meat crusts and let them top it.  That way they have some ownership in their meal and may be more apt to eat it!

Recipe: Meatza Pizza
Ingredients
  • 2 lbs ground meat*
  • 2 eggs
  • 2 cloves garlic, chopped
  • 1-2 tsp salt (if using any italian sausage I would use 1)
  • 2 tbsp fresh herbs (thyme, oregano, parsley, etc)
  • 1/2 tsp onion powder
  • 1/2 cup pizza sauce
  • Any cheese and toppings
Instructions
  1. Place everything in a bowl and combine well with hands
  2. Place the meat on a greased pizza pan or a 11x17 cake pan. Make sure you have sides to your pan for excess liquid to run off.
  3. Press the meat to fill the pan and create sides to look like a crust
  4. Bake at 400 for 12-15 minutes
  5. Remove and spread sauce, cheese and toppings and return to the oven for an additional 5 minutes
  6. Turn the oven to broil and cook for another 1-2 minutes
Quick notes

*I used ground turkey breast (it's what I had) and ground italian pork sausage. The sausage gives it such good flavor.  If you don't use any sausage, you could always add some red pepper flakes or additional seasonings to spice it up.

There are so many different ways to top this!  If you are an olive person, try a Greek meatza with some olives and feta.

Kate's Healthy Cupboard - Gluten Free Recipes
In Entrees, Vegetables, Recipes Tags Beef, Nut-Free, Paleo, Primal, Sausage
1 Comment
Older Posts →
download.jpeg

Welcome to Kate's Healthy Cupboard! A place for healthy, grain free recipes, some low carb recipes, safe beauty and products for the home  and more...


>>  CONNECT WITH KATE  <<

pinterest.png
facebook.png
instagram.png

>>  SUBSCRIBE  <<

Success! Now check your email to confirm your subscription.

There was an error submitting your subscription. Please try again.


>>  SEARCH RECIPES  <<


Copyright 2016 Kate's Healthy Cupboard  ||  Website Design