• Blog
  • Recipes
  • Lifestyle
  • Safer Skincare
  • About
  • Contact
Menu

Kate's Healthy Cupboard

Street Address
City, State, Zip
Phone Number
Healthy Lifestyle, Healthy Grain Free Recipes

Your Custom Text Here

Kate's Healthy Cupboard

  • Blog
  • Recipes
  • Lifestyle
  • Safer Skincare
  • About
  • Contact

"Cheesy" Kale Chips

February 21, 2013 Kate
Cheesy Kale Chips
Cheesy Kale Chips

I love Whole Foods, wandering around seeing what new products have been granted self space and what local products are new to market as well.  I spend a lot of time in Scottsdale, Arizona and a lot of time at the Whole foods there.  Every time I go, I have to take some extra time that first trip to the store to see what's new.  Arizona is part of the western region for Whole Foods that includes California, where Colorado is part of the mountain west region, so we get different products.  Arizona gets a lot of products that originate from California and if they sell well, we will be lucky to hopefully see them on the shelves in Colorado and vice versa.

There are a couple things I can't find at my local Whole Foods that I love to get down there.  One item in particular, Quite Cheezy Kale Chips made by Alive & Radiant Foods (my Whole Foods only sells two of the flavors as of late and the Quite Cheesy is not one of them).  The entire line of their products are delicious. I think I seriously bought a bag every trip I made to the store (that is often) and ate the entire bag!  Serving size is 2.2, that's a joke...I eat the whole bag wishing I had more!  After looking at the ingredient list, I knew I could make these at home when I got back to my dehydrator.  This recipe is pretty darn close...close enough for me!

I know not everyone has a dehydrator, but you should (in my opinion), since there are so many great things you can do with them and they are reasonably priced (I have this dehydrator and it works great).  I have not tried this in the oven on the dehydrate setting, but if you do, please leave a comment on how they turned out.  This spread would be awesome as a "cheese" spread for crackers (I have numerous grain-free cracker recipes) or as a dip for vegetables.  So if you don't have a dehydrator, you can still enjoy this recipe!

“Cheesy” Kale Chips

Ingredients

  • 1 cup raw cashews (soaked overnight)
  • 1/3 cup roasted red bell pepper*
  • 2 tablespoons lemon juice
  • 2 tablespoons Nutritional Yeast**
  • 1/2 tsp sea salt
  • 1 bunch kale (I used Dino, but any Kale will work)

Instructions

  1. Wash the kale, pat dry and tear into pieces, about 1 1/2 inches and place in a bowl
  2. Drain the water off of the cashews and place all of the ingredients in a food processor or blender until smooth
  3. Pour the spread into the bowl and massage it into the kale to cover each piece
  4. Place kale on dehydrator trays and dehydrate at 125 for 8-10 hours or until desired crispiness
  5. Store in an airtight container, I prefer glass

Quick notes

*I used roasted peppers for additional flavor. The Alive & Radiant Foods is considered raw, so a red bell pepper is what they used. Either one will work.

**Nutritional Yeast is something a lot of vegetarians use to make things taste cheesy. It is full of B vitamins, some protein and lots of flavor. It can be found in the baking section of a health food store or may be sold in bulk. It looks like yellow flaky fish food to me:)

Variations

To make these a bit spicy, add some cayenne pepper or other seasonings you like.


If you are looking for ways to get more greens in your kids, this recipe will work!

Kate's Healthy Cupboard - Gluten Free Recipes
In Vegetables, Recipes, Snacks and Appetizers3 Tags Cashews, Dairy Free, Dehydrated, Nutritional Yeast, Paleo, Primal, Raw
6 Comments

Cinnamon Maple Coconut Bites

October 5, 2012 Kate
Cinnamon Maple Coconut Bites

Tiss the season for lots of cinnamon...and pumpkin spices!  Here is another easy recipe for a quick sweet treat similar to my Coconut Vanilla Bean Dough Bites Recipe and the Coconut Brownie Bites Recipe.  I used a dehydrator, but it's not necessary.  If you have been thinking of buying one though, I'd bite the bullet and do it, so worth it!!

Cinnamon has some amazing health benefits so why not incorporate it into your day!  A few of those benefits include:  regulates blood sugar, reduces LDL cholesterol levels, has natural anti-infectious compounds, reduces pain linked to arthritis, may reduce the proliferation of cancer cells, serves as a natural food preservative, contains fiber, calcium, iron, and manganese, can be effective for menstrual pain and infertility.  Wow, I might have to make more of these bites or another batch of my Apple Cinnamon Upside Down Cakes!

Cinnamon Maple Coconut Bites

Ingredients

  • 1 1//2 cups unsweetened shredded coconut
  • 1/4 cup vanilla protein powder (I used Jay Robb’s Vanilla Egg White Protein), sub for almond flour if you prefer
  • 1 tbsp coconut oil
  • 3-4 tbsp maple syrup*
  • 1/2 tsp vanilla extract
  • 1 tbsp lucuma powder (optional)
  • 2 tsp cinnamon
  • dash of sea salt

Instructions

  1. Pour the coconut into a food processor and blend until small pieces are produced
  2. Add all of the remaining ingredients and blend well.
  3. Using a small cookie scoop, place each bite onto dehydrator sheets
  4. Dehydrate at 125 for 2-4 hours depending on how soft you want them
  5. Oven option: Set temp to lowest possible setting or use dehydrator setting. Bake for 1-2 hours depending on heat setting

Quick Notes

*I used Xylitol Maple Syrup as a reduced sugar option.

*For more information on Lucuma, read this post

I like to reheat mine each time I treat myself to one or two or maybe three!!  Store in an airtight container.

Kate's Healthy Cupboard - Gluten Free Recipes
In Breakfasts, Recipes, Snacks and Appetizers2 Tags coconut, Dehydrated, Desserts, Egg White Protein, Nut-Free, Paleo, Primal, Vegan
3 Comments

Raw Beet and Sunflower Seed Crackers

September 24, 2012 Kate
Raw Beet and Sunflower Seed Crackers

This may sound very similar to a recipe from a few months back, cause it is.  I basically took my recipe for my Raw Beet Sunflower Seed Pesto and made a few changes to create this delicious cracker!  If you are a beet person, this is a must try!  I used my dehydrator, but I believe this should work just fine in the oven.  Many ovens have a dehydrator option or just bake these at the lowest possible setting.

 Raw Beet and Sunflower Seed Crackers

Ingredients

  • 2 large beets, peeled and chopped (about 5 cups)
  • 4 garlic cloves
  • 3/4 – 1 cup fresh basil leaves
  • 1 cup raw sunflower seeds
  • 2 tbsp balsamic vinegar
  • 1 tbsp psyllium husk*
  • 1 tsp sea salt

Instructions

  1. Place the chopped beets into a food processor and blend until pureed
  2. Add in the remaining ingredients excluding the sunflower seeds and blend until well combined
  3. Add the seeds to the mixture and combine. Do not let the seeds get so small they disappear.
  4. Dehydrate at 145 for 2 hours. Reduce the temp to 105 and dehydrate until crisp. Once the top is completely dry, I flip the crackers to finish. this is the best time to cut or score the “dough” into desired cracker size.
  5. Oven Method: Bake on a parchment lined cookie sheet at lowest temperature setting or dehydrator setting until desired crunch. You may want to turn the crackers over part way through to cook evenly. You can try cutting or scoring the crackers at that time as well.

Quick notes

*Psyllium husk powder helps to bind the ingredients, like an egg does or flax meal mixed with liquid does. It can be found at most health food stores in the supplement section. It is a powder that is high in fiber and when consumed in high amounts, it can cause intestinal distress. I promise the one tablespoon of it in this entire recipe will not cause a problem for you!!

Kate's Healthy Cupboard - Gluten Free Recipes
In Recipes, Snacks and Appetizers2 Tags Crackers, Dehydrated, Nut-Free, Paleo, Primal, Raw, Sunflower Seeds, Vegan
1 Comment

Coconut Brownie Bites

July 9, 2012 Kate
Coconut Brownie Bites

Here is another recipe from my dehydrator, but should work in an oven as well.  I am loving these little bite treats when I am craving something sweet.  These brownies are rich from the cocoa, so feel free to add additional sweetener.  I think they are just perfect the way they are, but I realize we all have different thoughts on how sweet a brownie should be!

Recipe: Coconut Brownie Bites

Ingredients

  • 1/2 tsp vanilla bean powder (optional)
  • 1/2 tsp vanilla extract (add more if not using beans)
  • 1 tbsp lucuma powder (optional)
  • 1/4 - 1/2 cup honey*

Instructions

  1. Pour the coconut into a food processor and blend until small pieces are produced
  2. Add all of the remaining ingredients and blend well.
  3. Using a small cookie scoop, place each bite onto dehydrator sheets
  4. Dehydrate at 125 for 2-4 hours depending on how soft you want them
  5. Oven option: Set temp to lowest possible setting or use dehydrator setting. Bake for 1-2 hours depending on heat setting

Quick notes

*I used Xylitol honey that is less sweet than regular honey. Start with a 1/4 cup of regular honey and taste.

I have not tried these in the oven yet, so please let us know how they turn out!

Kate's Healthy Cupboard - Gluten Free Recipes
In Recipes, Desserts2, Snacks and Appetizers3 Tags Chocolate, coconut, Dehydrated, Nut-Free, Paleo, Primal, Swerve
4 Comments

Banana Nut Protein Taffy

June 25, 2012 Kate
Banana Nut Protein Taffy

I am having so much fun with my food processor and dehydrator!  It's so hot here that I don't want to use the oven, so dehydrator it is!  Between all the dehydrated goodies and ice cream I have been making/eating, I'm one happy girl!

I was trying to create a banana bread type cracker and ended up with taffy.  I almost was going to call it banana jerky, but it's sticky once you start chewing...so taffy it is!  Regardless, this makes for a great high protein satisfying snack!  Feel free to add more flour and nuts or decrease the bananas to try to get it to a cracker consistency.

I have not tried this in the oven.  I would suggest the lowest heat setting or dehydrator setting if your oven has that option.  Spread the batter on a parchment lined cookie sheet.  Depending on how hot your temp is, you may want to crack open the oven door.   Or simply buy an inexpensive dehydrator, so worth it!!

Recipe: Banana Nut Protein Taffy
Ingredients
  • 2 small bananas
  • 1 cup vanilla protein (I used Jay Robb's Vanilla Egg White Protein)
  • 1 cup almond flour
  • 1/8 - 1/4 cup liquid sweetener
  • 1 tsp vanilla extract
  • 1 tbsp coconut oil
  • 1/2 cup walnuts, chopped
Instructions
  1. Mash the bananas until smooth
  2. Add the remaining ingredients to the bowl and mix well
  3. Spread the mixture onto lined dehydrator trays
  4. Dehydrate at 115 for 8-10 hours or until desired texture
  5. Remove from trays and break into pieces.  Store in a glass airtight container

Feel free to substitute the protein for more flour.  The flour may absorb more liquid and make it more of a cracker.

Kate's Healthy Cupboard - Gluten Free Recipes
In Breads and Muffins, Recipes, Snacks and Appetizers3 Tags Dehydrated, Egg White Protein, Nut-Free, Paleo, Primal, Raw
2 Comments

Coconut Vanilla Bean Dough Bites

June 21, 2012 Kate
Raw Coconut Dough Bites

The title says it all, but I will add one more thing...MELT IN YOUR MOUTH DELICIOUS! If you like coconut, go make these and report back to us about how good they are.

I used my dehydrator for this recipe, been using it a lot lately.  These can certainly be done in an oven as well.  My oven has a dehydrator setting on it so check to see if yours has that option too.  If not, set the temperature for as low as possible (mine is 175).  I have quite a few recipes coming up that use the dehydrator.  It is a favorite among raw foodies because you are simply removing all of the moisture without cooking.  It does take a lot longer than the oven, but also allows for more nutrients to be present.  I personally prefer the dehydrator over the oven method for the treats that I have been making.  I have a very inexpensive one (for now, looking at a different one for the shape of it will make some recipes easier) that can be found at Bed, Bath and Beyond or Amazon.  It is the round Nesco that you can purchase additional trays if need be.

This recipe calls for Lucuma Powder, a superfood referred to as Inca Gold.  I have had a package of this sitting in my frig for over 6 months so I decided to finally use it! It is not necessary in this recipe, but it does add flavor.

What is Lucuma...a sweet and edible fruit of the Lucuma tree (Pouteria obovata, or Lucuma obovata), resembling a persimmon in appearance.

According to Navita Naturals, (where I order my superfoods from) Lucuma is considered a healthy alternative sweetener as it lends a sweet taste to recipes, but is very low in sugars. With naturally occurring beta-carotene, niacin, and iron, lucuma powder is a welcome antidote to notorious “empty calorie” sweeteners.  Lucuma Powder has a distinctively sweet fragrance and full-bodied, maple-like taste. A deliciously versatile dessert ingredient, lucuma blends well to make alluring smoothies, puddings, and ice creams, and can also be used as a flour in exotic pies and pastries.

Ingredients

  • 1 1/2 cups shredded coconut
  • 1/4 cup vanilla egg white protein (optional, replace with almond flour but this adds great flavor)
  • 1/2 tsp vanilla bean powder (1-2 pods)
  • 1/2 tsp vanilla ext
  • 1 tbsp Lucuma Powder (optional)
  • 3 tbsp virgin coconut oil, softened
  • 2 tbsp coconut cream/butter, softened
  • 3 tbsp liquid sweetener* (maple syrup, honey or coconut nectar)

Instructions

  1. Place the coconut, protein powder and vanilla beans into a food processor and blend until coconut reduces in size
  2. Add in the remaining ingredients and blend until a dough forms
  3. Using a small cookie scoop, place each dough bite onto dehydrator tray or onto a parchment lined cookie sheet
  4. Dehydrate at 125 for 2-4 hours
  5. Bake at 175 for 1-2 hours
  6. Check the bites regularly to see if desired level of "doughiness" has been met

Quick notes

*I used xylitol honey which is not as sweet as regular honey. I added 2 tbsp of Lakanto (erythritol) as well.

These are best right out of the dehydrator/oven.  Don't get me wrong, they are still delicious the next day too...if they last that long.  You can throw them into the dehydrator or oven for 5 minutes to reheat before you enjoy them again!  Store in an airtight container, I prefer glass.

Kate's Healthy Cupboard - Gluten Free Recipes
In Recipes, Desserts2, Snacks and Appetizers2 Tags coconut, Coconut Milk, Dehydrated, Nut-Free, Raw
1 Comment

Raw Coconut Cookie Bites

May 3, 2012 Kate
Raw Coconut Cookie Balls

In case you haven't noticed, I like making sweet treats!!  I was recently told I should open a gluten free bakery...and the idea keeps crossing my mind!!  I love the creative side of making treats and have always enjoyed baking, even as a kid.  Once you have to eliminate gluten in your diet, traditional baked goods are not an option.  That's a good thing in the sense that it makes you eliminate processed junk and goodies with added sugar, but it's a bad thing when you have a sweet tooth!

I am a person of balance and if I want something sweet, I will eat something sweet.  It's when we tell ourselves we can't have something that that something becomes our battle constantly and something we tend to over eat.  I allow myself a Double Chocolate Gooey Brownie, a Grain Free Cinnamon Roll or a Chocolate Peanut Butter Protein Ball when I feel like it and will have no regret!  So I will continue to create sweet treats that are far better for you than just about anything you can buy off a store shelf.  I try to always include a healthy fat or protein source in my sweet recipes to make any sugar/insulin response that much less.  Many times I also suggest safe alternative sweeteners to decrease the sugar content in a recipe.  You can read more about those on my Ingredients Page or shop for them in the Amazon store link.

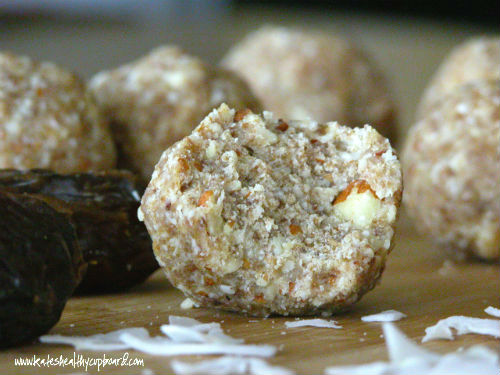
With that said, here is a yummy treat if you are a coconut fan!!  This raw coconut cookie recipe is sweetened with fruit only, packed with healthy fats and gives an option to add extra protein to them.

Recipe: Raw Coconut Cookie Bites
Ingredients
  • 3 cups Medjool Dates* (de-pitted)
  • 1 3/4 cup unsweetened coconut, medium shreds or chips (may need to add about 1/4 cup more if not using protein powder)
  • 4 tbsp coconut creme/butter*, softened
  • 2 tbsp virgin coconut oil, softened*
  • 1 1/2 cups raw almonds
  • 1/3 cup vanilla egg white protein (optional but adds some vanilla flavoring to the cookies)
Instructions
  1. Once the dates have soaked for a couple hours, add them to a food processor along with the coconut creme/butter and coconut oil (add protein at this time)
  2. Process until mixture is well combined and creme and oil are fully melted
  3. Add in the coconut and blend until consistency is doughy and moldable
  4. Add the almonds at this time and blend until almonds are well incorporated
  5. Pack the dough into balls, you may need to press firmly
  6. I prefer to store in the refrigerator in an airtight container. The coconut creme and oil will harden when cooled and allow for a harder ball
Quick notes

*You can find Medjool Dates in the produce section of most grocery stores or the bulk section of Whole Foods. Don't forget to de-pit them!!

*You can find Coconut Butter at most Whole Foods or Vitamin Cottage or Coconut Creme online at Tropical Traditions

*Make sure to use Virgin Coconut Oil, not Refined or Expeller Pressed, you want the coconut flavor!

Kate's Healthy Cupboard - Gluten Free Recipes
In Desserts, Recipes Tags coconut, Dehydrated, Desserts, Egg White Protein, Paleo, Vegan
2 Comments

Green Chili Buffalo Jerky

January 12, 2012 Kate
Buffalo Jerky
Buffalo Jerky

My first experiment with the dehydrator...SUCCESS!!!  I made the best jerky!  I love jerky but so many of them are flavored with soy sauce and I obviously can't have that.  I took my favorite green chili's and favorite spice blend from Penzey's, added them to ground buffalo and created this convenient high protein snack!  Using ground meats makes the process so much easier and you'll never know the difference!!  I just recently made it with ground turkey and beef and they are just as good!!!  Turkey has such little fat that it cooks a bit faster so make sure to check on it!

I have only used a dehydrator to make this but, I think the oven would work as well.  I included instructions for that.  If you try the oven method, please report back about how it worked!!!

Recipe: Green Chili Buffalo Jerky
Ingredients
  • 2 lbs. grass-fed ground buffalo (ground turkey breast or gound beef work great too)
  • 1 1/2 cups 505 Flame Roasted Green Chilis*
  • 1 1/2 tsp Penzey's Adobo Spice Blend*
  • 1/2 - 3/4 tsp sea salt
Instructions
  1. In a large bowl combine all the ingredients and mix together well
  2. Place the mixture on jelly roll lined dehydrator trays. Pat down to a little over 1/4 of an inch
  3. Dehydrate at 160 degrees for about 8 1/2 hours (the longer it goes the more leathery and chewy it will become)
  4. After about 6 hours flip the jerky
  5. Once it is dried to your liking, tear into pieces
Oven Method (I have not tried this but I think this should work)
  1. Set temp to 175 degrees
  2. Press mixture onto cookie sheets a little over 1/4 inch thick
  3. Cook for 4 hours and then flip it and cook another 2 hours. Check it periodically to make sure its not getting too dry
  4. Turn off oven and let it sit in there until completely dried out
  5. Once it's dried out, tear into pieces

*Penzey's is sold online or in one of there many locations.  Adobo spice is a blend of garlic, onion, Tellicherry black pepper, Mexican oregano, cumin and cayenne red pepper.   I'm sure you could sprinkle a few of these spices into the mix and make it taste just as good!  If using 505 chilis, that may be enough spice for some *505 Flame Roasted Chili's have way more flavor than canned green chilis.  They have a kick!  They can be found at some Whole Foods, Vitamin Cottage and on Amazon

Kate's Healthy Cupboard - Gluten Free Recipes
In Snacks and Appetizers, Recipes Tags Beef, Dairy Free, Dehydrated, Low Carb, Nut-Free, Paleo, Primal
Comment

Almond Nut Joy Granola

January 7, 2012 Kate
Almond Joy Nut Granola

When I created the VixiBar line over 3 years ago, I had so many flavor ideas.  Once I created and perfected a few flavors, it was so easy to figure out the others.  I think that is how my recipe creating is going to go as well.  I come up with one grain free dough ball cookie recipe and then I have 5 more like it to try.  I come up with a granola recipe, then I have 5 other flavor ideas in mind.  At least I'm giving variety and hopefully appealing to everyone's tastes!  I know not everyone is going to love every thing I create!!

Enjoy as a cereal, snack or topping on home-made dairy free ice cream

Recipe: Grain-Free Almond Nut Joy Granola
Ingredients
  • 2 cups raw almonds
  • 1 cup raw cashews
  • 1/2 cup raw macadamia nuts
  • 1 cup almond flour*
  • 1/2 cup psyllium husk (could replace with almond flour)
  • 1 3/4 cups coconut chips, flakes or shreds
  • 1/2 cup vanilla egg white protein powder*
  • 2/3 cup roasted almond butter
  • 1/2 cup plus a little more virgin coconut oil*
  • 2/3 cup full fat coconut milk
  • 3/4 cup honey* (I used Nature's Hollow)
  • 1 tsp vanilla
  • 1/2 cup dark chocolate crushed into pieces
  • dash celtic sea salt
Instructions
  1. In a food processor or hand chopper, grind nuts down to desired chunkiness. I prefer smaller pieces
  2. In a large bowl, combine the nuts, husk, flour, coconut chips, protein powder and salt
  3. In a small bowl, combine coconut oil, coconut milk, almond butter, vanilla and honey
  4. Pour the coconut mixture over the nut mixture and stir until nut mixture is coated
  5. Place mixture on dehydrator sheets and place in dehydrator at 115 degrees overnight or until desired crunchiness
  6. For oven method, place the mixture in a thin layer on parchment lined baking sheets. Bake at 175 degrees for 4 hours. Turn the oven off and let granola sit for another 4 hours or overnight to help it dry out. Depending on desired crunchiness, you may cook it less or more
  7. Once mixture has cooled just a bit, add the chocolate pieces and mix well.  You want the mixture a bit warm to make chocolate melt stick to the granola.  If it's too hot it will coat the mixture.  Still good this way, just not chunks of chocolate.  You could also add once it's completely cooled if you just want pieces in the mixture.  I use a dehydrator and like to add the chocolate to the mixture before it dehydrates.  The chocolate does melt some, but that's my favorite!!!
Quick notes

*I normally use Honeyville Almond Flour, but used Bob's Red Mill in this and it will work just fine!

*I like Jay Robb's Vanilla Egg White Protein. You can certainly use a vanilla whey in place of. I like the added protein and think it gives a little flavor, but feel free to leave it out.

*I use Nature's Hollow Xylitol Honey but regular honey will work, maybe add a bit less and taste before adding more.  If you cut down on the amount of honey, you may need to add more oil or milk for additional liquid

*I love using Whole Foods or Tropical Traditions Organic Virgin Coconut Oil in recipes when I want the coconut flavor to be present in the recipe

Kate's Healthy Cupboard - Gluten Free Recipes
In Breakfasts, Desserts, Snacks and Appetizers, Recipes Tags Almond flour, Almonds, Breakfast, Chocolate, coconut, Dehydrated, Egg White Protein, Granola, Paleo, Primal
8 Comments

Grain-Free Banana Nut Granola

January 7, 2012 Kate
Banana Nut Granola
Banana Nut Granola

When you think of granola, you think of oats.  It's hard to find recipes without the use of oats.  I know there's gluten free oats, but since going grain-free, those are not an option.  So many recipes for grain-free granola seem more like trail mix to me.  I wanted to create something that was crunchy, but at the same time didn't taste like a pile of nuts and dried fruits.

I came across a recipe from Maria Emmerich that caught my attention.  It had psyllium husk in it and it seemed like that would give it a great texture and hold it all together.  I liked her recipe, but I will be very honest with you about something.  Psyllium husk is fiber and when a recipe calls for 2 cups of it, the result is simply not pretty the next day.  If you suffer from constipation, then feel free to add lots more of it to my recipes!  I like to include it for some texture and added fiber, but certainly not 2 cups!!  I took her idea but completely changed the recipe to my own flavors and liking.  The result...some very addicting, crunchy and tasty treats!!!   I had to hurry up and take these photos before I ate it all!  Hope you enjoy it as much as I do!

Recipe: Grain-Free Banana Nut Granola
Ingredients
  • 2 cups raw almonds
  • 1 1/2 cups raw walnuts
  • 1/2 cup psyllium husk (could replace with more flour)
  • 1 cup almond flour*
  • 1 cup coconut chips, flakes or shreds (optional)
  • 1/2 cup vanilla egg white protein*
  • 1/8 cup roasted almond butter
  • 3/4 cup honey* (I used Nature's Hollow Xylitol Honey)
  • 1 tsp vanilla
  • 3/4 cup over ripe banana, mashed or pureed (about 2 small)
  • dash of sea salt
Instructions
  1. In a food processor or hand chopper, grind nuts down to desired chunkiness. I prefer smaller pieces.
  2. In a large bowl, combine the nuts, husk, flour, coconut chips, protein powder and salt
  3. In a small bowl, combine bananas, almond butter, vanilla and honey
  4. Pour the banana mixture over the nut mixture and stir until nut mixture is coated
  5. Place mixture on dehydrator sheets and place in dehydrator at 115 degrees overnight or until desired crunchiness.
  6. For oven method, place the mixture in a thin layer on parchment lined baking sheets. Bake at 175 degrees for 4 hours. Turn the oven off and let granola sit for another 4 hours or overnight to help it dry out. Depending on desired crunchiness, you may cook it less
Quick notes

*I normally use Honeyville Almond Flour, but used Bob's Red Mill in this and it will work just fine!

*I like Jay Robb's Vanilla Egg White Protein. You can certainly use a vanilla whey in place of. I like the added protein and think it gives a little flavor, but feel free to leave it out.

*I use Nature's Hollow Xylitol Honey but regular honey will work, maybe add a bit less and taste before adding more.

Variations

I do not eat peanuts, but here is an option. Replace some of the nuts for unsalted peanuts and replace the almond butter for peanut butter.

Enjoy as a cereal with unsweetened almond, coconut or hemp milk or just as a crunchy snack!

Kate's Healthy Cupboard - Gluten Free Recipes
In Breakfasts, Snacks and Appetizers, Recipes Tags Almond flour, Almonds, Breakfast, coconut, Dehydrated, Egg White Protein, Granola, Paleo, Primal
7 Comments
download.jpeg

Welcome to Kate's Healthy Cupboard! A place for healthy, grain free recipes, some low carb recipes, safe beauty and products for the home  and more...


>>  CONNECT WITH KATE  <<

pinterest.png
facebook.png
instagram.png

>>  SUBSCRIBE  <<

Success! Now check your email to confirm your subscription.

There was an error submitting your subscription. Please try again.


>>  SEARCH RECIPES  <<


Copyright 2016 Kate's Healthy Cupboard  ||  Website Design