• Blog
  • Recipes
  • Lifestyle
  • Safer Skincare
  • About
  • Contact
Menu

Kate's Healthy Cupboard

Street Address
City, State, Zip
Phone Number
Healthy Lifestyle, Healthy Grain Free Recipes

Your Custom Text Here

Kate's Healthy Cupboard

  • Blog
  • Recipes
  • Lifestyle
  • Safer Skincare
  • About
  • Contact

Coconut Curry Cauliflower (Red Ape Cinnamon Giveaway)

March 27, 2014 Kate
Coconut Curry Cauliflower Recipe

I'm taking roasted cauliflower to a whole different level!  Instead of using an oil or butter to roast the cauliflower, I decided to use full fat coconut milk for the fat and for flavor.  I also used Organic Buddha Shake Curry Mix from Red Ape Cinnamon company for the curry powder.  To read more about Red Ape Cinnamon and enter to win a bunch of their awesome cinnamon and spices, including the curry mix I used, head over to my previous post.  While you're there, check out the delicious Flourless Snickerdoodle Cookie Recipe if you haven't yet!!

Coconut Curry Cauliflower
Ingredients
  • 1 head of cauliflower, cut into pieces
  • 1/2 cup full fat coconut milk*
  • 1 1/2 tsp or more Red Ape Cinnamon Organic Buddha Shake Curry Mix (or any curry blend)
  • sea salt to taste
Instructions
  1. Whisk together the coconut milk and curry powder in a bowl
  2. Place 1/3 of the cauliflower pieces in the milk mixture and coat.
  3. Place the cauliflower onto a parchment lined cookie sheet and repeat the process with the remaining cauliflower. Pour the remaining milk over top and sprinkle with sea salt
  4. Bake at 425 for about 25 minutes or until the cauliflower starts to brown
  5. Serve hot
Quick notes

*Use a milk that tends to be thicker so it doesn't completely run off the cauliflower. I prefer Whole Foods brand or Thai Kitchen in the red and black can.

If you are an Amazon shopper, would you be so kind to use my affiliate link to make your purchases.  It is at no cost to you, it does provide a tiny kickback to Kate’s Healthy Cupboard.  This allows me to continue making and testing recipes for free.  Thanks so much!!

Kate's Healthy Cupboard - Gluten Free Recipes
In Vegetables, Recipes Tags Coconut Milk, Egg-Free, Nut-Free, Paleo, Vegan, Vegetables
Comment

Cracked Pepper Cashew Crackers

February 25, 2014 Kate
Grain Free Crackered Pepper Cashew Crackers Recipe

The Whole Foods I shop at used to have Cracked Pepper and Sea Salt Cashews in the bulk section...and I loved them!!  Unfortunately you know they were roasted in crappy vegetable oil and would be very easy to make yourself!  They no longer carry them, I could make them or I could get a bit more creative and make a cracker recipe out of cashews in the same flavor. Let this recipe be a template for you to make any cracker flavor you'd like with any nut you'd like!  I loved the spiciness of the pepper and couldn't get enough of these!!!  This could easily be turned into a sweet cracker with a touch of sweetener and cinnamon in place of the salt and pepper.  Looking for other grain free cracker ideas, I have a bunch of different recipes for you!

Cracked Pepper Cashew Crackers
Ingredients
  • 2 generous cups raw cashews
  • 1 pastured egg
  • 1 tbsp coconut oil, butter or ghee*
  • 1 tsp sea salt
  • 1 tsp cracked black pepper
Instructions
  1. In a food processor, grind the cashews into a flour. Make sure not to over blend into cashew butter, but you want it as fine as possible
  2. Add in the salt and pepper and pulse to combine
  3. In a mixing bowl, whisk the egg and oil together and stir in the flour mixture until combined
  4. Place the ball of dough in the center of a large piece of parchment paper with an additional piece of paper over top
  5. Roll out to desired thickness, about 1/8 - 1/4 inch
  6. Using a sharp knife or pizza cutter, cut into desired size.  You may want to sprinkle more salt and pepper over the top of dough
  7. Bake at 350 for 12-15 minutes or until a bit brown
  8. Store in an airtight container
Quick notes

*I used expeller pressed coconut oil. Macadamia nut oil would be great here too!

If you are an Amazon shopper, would you be so kind to use my affiliate link to make your purchases.  It is at no cost to you, it does provide a tiny kickback to Kate’s Healthy Cupboard.  This allows me to continue making and testing recipes for free.  Thanks so much!!

*I have recently switched all of my skincare and makeup to a company that is free of 1,500 chemicals!!  I am so particular about what goes into my body, I need to be just as picky as to what goes on my body!  Your skin is your largest organ and absorbs chemicals into the bloodstream faster than the gut does!  I am vain when it comes to my skin and was so thrilled to find products that are anti-aging and work!!!  Check out BeautyCounter for more info!!  You will love it!!

Kate's Healthy Cupboard - Gluten Free Recipes
In Recipes, Snacks and Appetizers3 Tags Cashews, Crackers, Dairy Free, Paleo, Vegan
Comment

Chocolate Strawberry Coconut Bark

February 11, 2014 Kate
Chocolate Strawberry Coconut Bark Recipe

I'm excited to bring you this fun Valentine's Day Treat!  I had a bunch of chocolate recipes planned, but truth be told, I didn't want a bunch of chocolate around!  When it comes to chocolate, I just don't have any will power...sorry you guys have to pay the price.

How did I get these to look pink and taste like strawberries...with freeze dried strawberries!  Freeze dried is very different than dehydrated, they are hard and like the texture of a Cheeto...not that I have had them lately!  When you blend these in a food processor, you are left with powdered strawberry dust.  You can find many different fruits that have been freeze dried, but strawberries are the lowest sugar fruit (12 grams in the entire bag)and obviously I needed a red fruit.  Raspberries or cranberries would work as well.  I ordered mine form Tropical Traditions, but Whole Foods sells the Organic Freeze Dried Strawberries I used and they also sell Just Strawberries that can be found in their produce section.  I know Trader Joe's also sells them, but they are not organic and I personally won't eat berries unless they are organic.  Strawberries are one of the worst in terms of pesticides.

I also use Confectioner's Swerve in this recipe to add a bit more sweetness...and I have a "sweet" give away from Swerve Sweeteners! I am giving away 3 bags (2 granulated and 1 confectioners of Swerve to 3 lucky winners...that's 9 free bags of Swerve!!!  To enter this giveaway you must go like Swerve on Facebook and Pinterest and also comment on this blog post.  Please tell us what Kate's Healthy Cupboard Recipe you want to try if you win the Swerve!  The winners will be selected on Valentine's Day!!!!

Recipe: Chocolate Strawberry Coconut Bark

Ingredients

  • 4 cups coconut chips

  • 1/4 cup cacao butter (see variations below for substitution)

  • 2 tbsp coconut butter/creme

  • 2 tbsp grass-fed butter

  • 2 tbsp full fat coconut milk cream (the hard cream found on the top of a refrigerated can of milk)

  • 1/4 cup powdered freeze dried strawberries* (about 3/4 of 1.2 ounce bag)

  • 1/2 cup powdered sweetener* (I used Confectioner's Swerve)

  • 1/2 cup dark chocolate chips

Instructions

  1. Place coconut chips in a large mixing bowl and set aside

  2. Combine the cacao butter, butter, coconut cream and coconut milk in a double broiler and melt

  3. Pour the mixture over the coconut and stir to coat completely

  4. Combine the powdered strawberries and sweetener in a large ziploc bag

  5. Pour the coconut into the bag and shake well to coat

  6. Spread out on a parchment lined cookie sheet. You want it in one big pressed down clump so it will stick together as it cools

  7. Place the cookie sheet in the frig to let harden

  8. Melt the chocolate chips in a double broiler and drizzle over the bark once it's cooled and hard

  9. Place back into the frig to let the chocolate harden

  10. Break into pieces and store in the refrigerator in an airtight container

Variations

I used the cacao butter to give this another element of chocolate flavor. I believe you could try this with coconut oil, but I would maybe reduce the amount by a tablespoon. Cacao butter completely hardens in cold and coconut oil isn't as hard but should work just fine. I suggest the cacao butter for more flavor!!

Notes

Run the strawberries in your food processor until completely powdered.  A blender like the Vitamix or spice grinder may also work.

If you are an Amazon shopper, would you be so kind to use my affiliate link to make your purchases.  It is at no cost to you, it does provide a tiny kickback to Kate’s Healthy Cupboard.  This allows me to continue making and testing recipes for free.  Thanks so much!!

*I have recently switched all of my skincare and makeup to a company that is free of 1,500 chemicals!!  I am so particular about what goes into my body, I need to be just as picky as to what goes on my body!  Your skin is your largest organ and absorbs chemicals into the bloodstream faster than the gut does!  I am vain when it comes to my skin and was so thrilled to find products that are anti-aging and work!!!  Check out BeautyCounter for more info!!  You will love it!!

Kate's Healthy Cupboard - Gluten Free Recipes
In Recipes, Desserts3 Tags Chocolate, coconut, Coconut Milk, Holiday, Swerve, Vegan
25 Comments

Sauteed Radishes

February 8, 2014 Kate
Sauteed Radishes Recipe

How about a savory Valentine's Recipe!!!  Don"t worry, more chocolate and sweets to come!!! It's so funny how much more attention my treat recipes get than recipes like these radishes!

I bought the Easter Egg Radishes that are bright pink, red and white for this dish, but the color diminishes a ton when you cook them.  These are so pretty and could be served cold drizzled with a dressing for your Valentine's Day dinner as an alternative.

radishes
radishes

I had never tried cooking radishes until today...yum!!  You don't even have to be a radish fan to like this recipe.  So much of the "spiciness" is removed and they almost taste like little potatoes, maybe that's because of the butter.  I think radishes would add a lot of flavor to roasted vegetables, so next time you roast a chicken with veggies, add some radishes.  This is an easy recipe and can be seasoned to your liking!  And, as an added bonus, radishes contain nutrients that detoxify and nourish the body!!!

Sauteed Radishes
Ingredients
  • 2 bunches of radishes
  • 2-3 tbsp grass-fed butter, ghee or coconut oil
  • 1-2 tsp sage (I used dried)
  • sea salt and pepper to taste
Instructions
  1. Wash and remove the leaves and stems from the radishes. Cut in half or quarters depending on the size of the radishes
  2. Melt the butter over medium high heat in a skillet and toss in the radishes
  3. Let cook for about 6-7 minutes or until soft and browned, stir occasionally
  4. Sprinkle the sage, salt and pepper
Variations

Diced onions and/or garlic would also be good in this recipe.

If you are an Amazon shopper, would you be so kind to use my affiliate link to make your purchases.  It is at no cost to you, it does provide a tiny kickback to Kate’s Healthy Cupboard.  This allows me to continue making and testing recipes for free.  Thanks so much!!

*I have recently switched all of my skincare and makeup to a company that is free of 1,500 chemicals!!  I am so particular about what goes into my body, I need to be just as picky as to what goes on my body!  Your skin is your largest organ and absorbs chemicals into the bloodstream faster than the gut does!  I am vain when it comes to my skin and was so thrilled to find products that are anti-aging and work!!!  Check out BeautyCounter  for more info!!  You will love it!!

Kate's Healthy Cupboard - Gluten Free Recipes
In Vegetables, Recipes Tags Dairy Free, Egg-Free, Nut-Free, Paleo, Vegan, Vegetables
2 Comments

Peach Cookie Bars

September 13, 2013 Kate
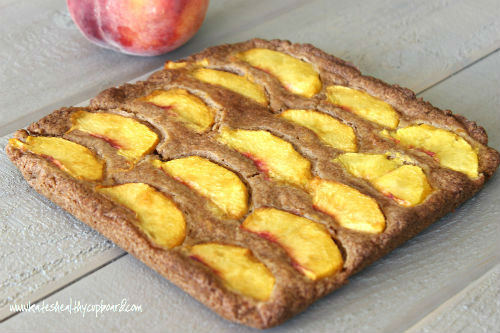
Peach Cookie Bars
Peach Cookie Bars

Peach's are still piled high at my local Whole Foods!  Hopefully your local farmer's market or natural grocery store is well stocked too.  I wanted to do something different with peaches and came up with this yummy cookie bar recipe.  I wanted a dense, crispy, but gooey moist bar.  I think I got it!

You could certainly make these more cake-like if you wanted to by adding an egg.  I haven't tried this so I don't know how it would turn out.  I would eliminate the milk to keep it from being soggy.  If anyone tries this, let us all know how it turns out!  I have always been a gooey brownie or bar person, never a cakey brownie person.  I guess that's why I never liked cake...I was the one asking for a corner piece scraping the frosting off to enjoy and leaving the cake behind!

Peach Cookie Bars

Ingredients

  • 2 cups Honeyville Almond Flour*
  • 1/2 cup arrowroot flour
  • 1/4-1/2 cup granulated sweetener ( I used 1/2 cup of mostly Swerveand a bit of coconut palm sugar)
  • 1 peach, peeled and sliced (the more unripe the peach is, the better)
  • 2 tbsp grass-fed butter, softened and cut into pieces
  • 1-2 tbsp non-dairy milk
  • 1 tbsp vanilla extract
  • 1- 1 1/2 tsp cinnamon
  • 1/2 tsp baking soda
  • 1/4 tsp sea salt

Instructions

  1. Line an 8×8 baking dish with parchment paper, this makes it really easy to get the bars out in one piece
  2. Place all of the dry ingredients into a food processor and combine
  3. Add in the butter, vanilla and 1 tbsp of milk and pulse until a dough forms
  4. The dough should form a ball and be wet, Add more milk if needed
  5. Press the dough into the baking dish until fully covered, then place the peach slices on top of the dough
  6. Bake at 350 for 32-35 minutes or until the top is golden
  7. Let cool, remove the bars from the pan by pulling up on the sides of the parchment paper. Cut into desired size bars
  8. Store in an airtight container. These are great at room temp, but as with all almond flour goodies, I think they are best out of the freezer!!! Let them sit for a minute or two out of freezer to thaw the peach.

Quick notes

*I suggest using Honeyville Almond Flour, Bob’s Red Mill does not absorb moisture like the more finely ground flours.

Variations

Softened coconut oil should work in place of the butter for those that are dairy free.


These are even more delicious with Dairy Free Vanilla Bean Ice Cream on top!!  Also if you have been wanting to try Swerve, the confectioner's Swerve is $2 off right now!!  If your order is over $30, shipping is free and you can use coupon code kate10 for an additional 10% off!!!

Kate's Healthy Cupboard - Gluten Free Recipes
In Recipes, Desserts3 Tags Almond flour, Dairy Free, Egg-Free, Swerve, Vegan
Comment

Homemade Creamy Coconut Milk

September 9, 2013 Kate
Homemade Creamy Coconut Milk2

I have tried to like homemade coconut or almond milk, but just can't give up my store bought milks.  They are creamy and seem thicker than homemade versions.  I imagine if you add dates to sweeten your milk, they may make it thicker, but I don't want that much sugar added to my milk.

The ingredient that is responsible for the creaminess in the box varieties is carrageenan or sometimes guar gum.  Carrageenan is from red seaweed that acts is a thickener or emulsifier.  It's what gives many ice creams a good mouth feel.  You'd think that seaweed would be safe or even beneficial, but studies show it may be hard on the gastrointestinal tract.  It may be fine for some of you, but my thought is that if possible, remove it from my diet.  There is more and more talk about the dangers of it, enough to make food manufacturers remove it.  Califia (my favorite brand found in the refrigerate section in a plastic bottle) and So Delicious are in the process of removing carrageenan.  In the meantime, I have found a way to make a creamy homemade version!

Th secret ingredient, kelp noodles!!  Kelp is a brown seaweed full of nutrients!  Some people take kelp for it's iodine content.  Many of you have probably had these noodles in stir fry, as pasta or in a salad.  Most natural grocery stores sell them or you can find them on Amazon, but they are much less expensive at your local store.  They are usually found in the refrigerator section, often times near fermented foods or vegetarian cheeses and tofu (don't be buying any of these).  I rinse the noodles well and store it in an airtight container.  I promise you would never taste or even know the noodles are in the milk!!

Recipe: Homemade Creamy Coconut Milk

Ingredients

  • 1/2 cup kelp noodles (loose, don't pack them)*
  • 1/2 tsp vanilla extract
  • dash of sea salt
  • sweetener (optional, I use liquid stevia or Swerve for no sugar option)

Instructions

  • Blend the coconut and water on high until smooth. Pour through a Nut Milk Bag or cheesecloth into a pitcher, drain all of the liquid out of the bag
  • Pour the mixture back into the blender and add the kelp noodles, vanilla, salt and sweetener. Blend on high until smooth.
  • Store in an airtight container in the refrigerator

Quick notes

*Make sure you rinse and drain the noodles before you use them.

Variations

Add kelp noodles to any homemade nut milk to make it creamier. Increase the amount of noodles if you prefer thicker milk.

Kate's Healthy Cupboard - Gluten Free Recipes
In Beverages, Recipes Tags coconut, Coconut Milk, Dairy Free, Nut-Free, Vegan
4 Comments

Dairy Free White Chocolate Ice Cream

August 27, 2013 Kate
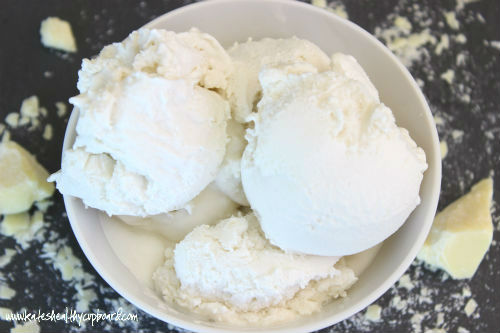
Dairy Free White Chocolate Ice Cream

Labor Day Weekend is here and so is one of my favorite ice cream recipes to date!!!  Remember TCBY's white chocolate mousse frozen yogurt?  It was my favorite!  This ice cream doesn't taste exactly like it, but it's pretty darn good and quite addicting!

White Chocolate is a tough one to recreate since it contains milk powder.  It really isn't even chocolate!  The secret ingredient in this recipe to get it to taste chocolatey, is raw cacao butter.  I'm sure you have all heard of cocoa butter, often times found in body lotions and butters.

"Cacao butter is a stable fat that is pressed out of cacao beans. It has been used for ages as the solid to make white chocolate, as well as other chocolate bars. It holds together at room temperature providing that ideal candy bar crispness. It has a mild chocolate taste and flavor, and carries only trace amounts of the caffeine compared to what's found in chocolate. Cocoa butter is ideal for beauty care products as well since it stays solid at room temperature, has naturally occurring antioxidants which prevent rancidity"

Some health food stores sell Raw Cacao Butter in their raw section or you can order it online (make sure it's food grade cacao butter).  I think www.nuts.com has one of the best prices and ships out quickly so you can make this for your weekend BBQ!!

Dairy Free White Chocolate Ice Cream

Ingredients

  • 2 cans full fat coconut milk
  • 2 pasture raised egg yolks (optional, makes it creamier))
  • 1 cup cacao butter, shaved and melted
  • 1/4-1/2 cup sweetener (I used 1/2 cup Swerve for a sugar free option. If using a liquid sweetener, start with 1/4 cup)*
  • 1 1/2 tbsp vanilla extract
  • 1/4 tsp sea salt

Instructions

  1. Place all of the ingredients into a blender and combine
  2. Pour mixture into an Ice Cream Maker and follow the instructions for the machine. You can also freeze it in a loaf pan if you don’t have an ice cream maker.

Variations

*Using honey or maple syrup is going to give this a bit of a different taste.

Consuming raw eggs is not a concern of mine since I buy farm fresh eggs from Tropical Traditions.  You can certainly leave them out or temper the eggs.


This is my Cuisinart Ice Cream Maker that I love!  If you want to try Swerve, use coupon code KATE10 to enjoy 10% off!

Kate's Healthy Cupboard - Gluten Free Recipes
In Recipes, Desserts3 Tags Chocolate, Coconut Milk, Dairy Free, Ice Cream, Nut-Free, Vegan
5 Comments

Coconut "Rice"

June 4, 2013 Kate
Coconut Cauliflower Rice

Summer is here....hence why I have been absent in the kitchen lately.  I am trying to get outside more and get off of the computer.  Don't worry, I still have lots of recipes in the pipeline!

This recipe is inspired by a recipe from The Joy of Cooking, one of my favorite cookbooks.  The original recipe was made with jasmine rice, but I chose to make it with cauliflower "rice" and loooooved how it turned out.  I could have eaten the entire head of cauliflower!

Coconut “Rice”

Ingredients

  • 1 cup full fat coconut milk
  • 1/2 cup water
  • 1 large head of cauliflower, trimmed and washed
  • 2 slices of fresh ginger, peeled (about inch in size)
  • 1/2 tsp sea salt
  • 1-2 tbsp toasted unsweetened coconut shreds (optional)

Instructions

  1. Place raw cauliflower in a food processor and pulse until rice size pieces are formed
  2. Using a Nut Milk Bag or kitchen towel, drain the excess water out of the cauliflower, set aside
  3. In a saucepan, combine the coconut milk, water and ginger and bring to a boil
  4. Add the cauliflower and simmer for 30 minutes uncovered
  5. Remove from heat and discard the pieces of ginger, add in the salt. Do not add it beforehand, it pulls water out vegetables.
  6. Serve with the toasted coconut sprinkled over top

This could easily be sweetened with something like Swerve and reduce the amount of salt to make it a sweet treat.  Another idea is to add protein powder of choice and eat it like a hot breakfast cereal (maybe even add some grass-fed butter).  You could also do something similar to my Pumpkin Spice Cream Of "Wheat Recipe and add in eggs.

Kate's Healthy Cupboard - Gluten Free Recipes
In Side Dishes, Vegetables, Recipes Tags Coconut Milk, Egg-Free, Low Carb, Nut-Free, Paleo, Vegan
1 Comment

Vanilla Bean Macaroons (Egg-Free)

April 29, 2013 Kate
Vanilla Macaroons
Vanilla Macaroons

If you are a coconut person, these bite size treats are the perfect remedy for your sweet tooth.  Most macaroon recipes are made with egg whites and can have a bit of a spongy or eggy texture that I can do without.  I decided to try a different binding agent and make these egg-less.

The secret ingredient, gelatin!  Gelatin can act like a binder (since it gels) in gluten free products and I plan to experiment with this more.  I use Great Lakes Gelatin that is sourced from grass-fed cows (Now Foods is also a great brand of gelatin).  An added bonus is all of the health benefits gelatin provides, this is a big component of bone broth.  Not only is it great for skin, hair and nails, but it is great for your gut and joints.  I actually add a spoonful of this to my cup of broth everyday!  It is flavorless and you will never know it's in these cookies!

Vanilla Macaroons

Ingredients

  • 2 cups unsweetened coconut
  • 1/4 cup virgin coconut oil, melted
  • 2 tbsp full fat coconut milk cream (cream at top of refrigerated can)
  • 1/4 – 1/2 cup granulated sweetener*
  • 3/4 tsp gelatin
  • 1/4 tsp vanilla beans (1-2 beans)
  • 1/8 tsp sea salt

Instructions

  1. Combine all ingredients in a food processor and blend until a dough forms
  2. With a small cookie scoop, form macaroons and place on a parchment lined cookie sheet. You could also roll into balls and slightly press them down on cookie sheet
  3. Bake at 350 for about 8 minutes or until very slightly brown
  4. Let cookies cool to set up, they will fall apart when warm
  5. These can be stored at room temperature or for a harder cookie, store in the refrigerator

Quick notes

*I used Swerve (erythritol) for a low sugar option along with 2 tsp coconut palm sugar. I have not tried this with a liquid sweetener. You would need to reduce the amount to 1/4 cup or less and it may make the dough too runny. If that happens, just add more coconut until the dough is thick enough to form.

These could also be done in a food dehydrator and would turn out just as yummy!!

Kate's Healthy Cupboard - Gluten Free Recipes
In Recipes, Desserts3 Tags coconut, Coconut Milk, Egg-Free, Gelatin, Nut-Free, Paleo, Swerve, Vegan
1 Comment

Balsamic Roasted Asparagus

April 23, 2013 Kate
Basalmic Roasted Asparagus

Happy Earth Day!!!  Asparagus is in season and on sale!!!  I love asparagus simply roasted or sauteed with sea salt.  The one downfall...why does it have to make your pee smell immediately?? Did you know you either have the gene or not that allows you the pleasure ofsmelling it?  I thought the gene determined if the pee actually smelled, but apparently everyone's smells.  Who knew?

Enough about that!!!  Here is a little twist on roasting asparagus if you're looking for a new way to fix it!  I made this about 6 months ago and am just getting around to posting it...I like creating and posting baked goods so much more!

Basalmic Roasted Asparagus

Ingredients

  • 1 bunch asparagus, trimmed
  • 1 tablespoon oil (melted coconut oil, olive oil or toasted sesame oil for a bit of spice)
  • 2 tsp toasted sesame seeds
  • 1 tbsp balsamic vinegar
  • 1 tbsp coconut aminos
  • sprinkle of crushed red pepper flakes

Instructions

  1. Spread oil onto a parchment lined cookie sheet and roll the asparagus in the oil
  2. Place the asparagus in a single layer and sprinkle the sesame seeds over them
  3. Roast in the oven at 425 for about 10 minutes, check frequently to make sure it’s not getting over cooked and too tender
  4. While that is roasting, combine the vinegar, coconut aminos and red pepper flakes in a small bowl
  5. Remove asparagus and drizzle it with mixture and serve
bundle
bundle
Kate's Healthy Cupboard - Gluten Free Recipes
In Vegetables, Recipes Tags Paleo, Primal, Vegan, Vegetables
1 Comment

Grain Free "Cheez-Its" Crackers

March 22, 2013 Kate
Grain Free Dairy Free Cheez-Its Crackers www.kateshealthycupboard.com

Have you seen how many varieties of Cheez-Its there are now?  I'm rarely at any store other than Whole Foods and Natural Grocers, so when I am, I am always in awe at all the new junk food...it really isn't worthy of being called food!  Is anyone else guilty of looking at other people's carts and wondering what they are thinking and how did they miss that soda, boxed fake meals and corn syrup laden goodies are so horrible for you!!!   I realize not everyone is so fortunate to shop at Whole Foods, but come on, make better choices with what is available to you!!!

OK, enough of my rant!  Here is a recipe that uses nutritional yeast for a dairy free cheesy cracker recipe that you can feel good about eating!  I almost didn't get a chance to take a picture of these before they were gone.  Someone was sneaking them off the pile of my setup for the picture...they are that good!!!  These are the perfect cracker to dip or break up into my Bacon Chili Recipe!!!

Grain Free “Cheez-Its”

Ingredients

  • 1 3/4 cup almond flour*
  • 3 tbsp Nutritional Yeast
  • 1/2 tsp sea salt, plus more for sprinkling on top
  • 1 egg
  • 1 tbsp butter or coconut oil, melted
  • 2 tbsp lemon juice

Instructions

  1. Combine the flour, salt and yeast in a bowl
  2. In a small mixing bowl, whisk the egg with the melted butter/oil and lemon juice
  3. Combine the two bowls and stir until dough forms
  4. Place the dough between two sheets of parchment paper and roll out to about 1/8 inch thickness
  5. With a sharp knife or pizza cutter, cut dough into desired cracker size (I use a ruler with a pizza slicer to get them straight and even) and sprinkle the top with more sea salt
  6. Slide the bottom piece of parchment and crackers onto a cookie sheet
  7. Bake at 350 for 15-20 minutes until golden (the crispier they will be in you let them golden)
  8. The outer crackers will brown the fastest, remove those and continue to cook the remaining crackers

Quick notes:  *Honeyville or Bob’s Redmill will work just fine for these crackers.

Variations:  I used melted butter to make these a bit “creamier” tasting, but expellor pressed coconut oil will work for dairy free option.

Enjoy!


In Recipes, Snacks and Appetizers3 Tags Crackers, Dairy Free, Nutritional Yeast, Paleo, Primal, Vegan
29 Comments

Cinnamon Maple Coconut Bites

October 5, 2012 Kate
Cinnamon Maple Coconut Bites

Tiss the season for lots of cinnamon...and pumpkin spices!  Here is another easy recipe for a quick sweet treat similar to my Coconut Vanilla Bean Dough Bites Recipe and the Coconut Brownie Bites Recipe.  I used a dehydrator, but it's not necessary.  If you have been thinking of buying one though, I'd bite the bullet and do it, so worth it!!

Cinnamon has some amazing health benefits so why not incorporate it into your day!  A few of those benefits include:  regulates blood sugar, reduces LDL cholesterol levels, has natural anti-infectious compounds, reduces pain linked to arthritis, may reduce the proliferation of cancer cells, serves as a natural food preservative, contains fiber, calcium, iron, and manganese, can be effective for menstrual pain and infertility.  Wow, I might have to make more of these bites or another batch of my Apple Cinnamon Upside Down Cakes!

Cinnamon Maple Coconut Bites

Ingredients

  • 1 1//2 cups unsweetened shredded coconut
  • 1/4 cup vanilla protein powder (I used Jay Robb’s Vanilla Egg White Protein), sub for almond flour if you prefer
  • 1 tbsp coconut oil
  • 3-4 tbsp maple syrup*
  • 1/2 tsp vanilla extract
  • 1 tbsp lucuma powder (optional)
  • 2 tsp cinnamon
  • dash of sea salt

Instructions

  1. Pour the coconut into a food processor and blend until small pieces are produced
  2. Add all of the remaining ingredients and blend well.
  3. Using a small cookie scoop, place each bite onto dehydrator sheets
  4. Dehydrate at 125 for 2-4 hours depending on how soft you want them
  5. Oven option: Set temp to lowest possible setting or use dehydrator setting. Bake for 1-2 hours depending on heat setting

Quick Notes

*I used Xylitol Maple Syrup as a reduced sugar option.

*For more information on Lucuma, read this post

I like to reheat mine each time I treat myself to one or two or maybe three!!  Store in an airtight container.

Kate's Healthy Cupboard - Gluten Free Recipes
In Breakfasts, Recipes, Snacks and Appetizers2 Tags coconut, Dehydrated, Desserts, Egg White Protein, Nut-Free, Paleo, Primal, Vegan
3 Comments

Raw Beet and Sunflower Seed Crackers

September 24, 2012 Kate
Raw Beet and Sunflower Seed Crackers

This may sound very similar to a recipe from a few months back, cause it is.  I basically took my recipe for my Raw Beet Sunflower Seed Pesto and made a few changes to create this delicious cracker!  If you are a beet person, this is a must try!  I used my dehydrator, but I believe this should work just fine in the oven.  Many ovens have a dehydrator option or just bake these at the lowest possible setting.

 Raw Beet and Sunflower Seed Crackers

Ingredients

  • 2 large beets, peeled and chopped (about 5 cups)
  • 4 garlic cloves
  • 3/4 – 1 cup fresh basil leaves
  • 1 cup raw sunflower seeds
  • 2 tbsp balsamic vinegar
  • 1 tbsp psyllium husk*
  • 1 tsp sea salt

Instructions

  1. Place the chopped beets into a food processor and blend until pureed
  2. Add in the remaining ingredients excluding the sunflower seeds and blend until well combined
  3. Add the seeds to the mixture and combine. Do not let the seeds get so small they disappear.
  4. Dehydrate at 145 for 2 hours. Reduce the temp to 105 and dehydrate until crisp. Once the top is completely dry, I flip the crackers to finish. this is the best time to cut or score the “dough” into desired cracker size.
  5. Oven Method: Bake on a parchment lined cookie sheet at lowest temperature setting or dehydrator setting until desired crunch. You may want to turn the crackers over part way through to cook evenly. You can try cutting or scoring the crackers at that time as well.

Quick notes

*Psyllium husk powder helps to bind the ingredients, like an egg does or flax meal mixed with liquid does. It can be found at most health food stores in the supplement section. It is a powder that is high in fiber and when consumed in high amounts, it can cause intestinal distress. I promise the one tablespoon of it in this entire recipe will not cause a problem for you!!

Kate's Healthy Cupboard - Gluten Free Recipes
In Recipes, Snacks and Appetizers2 Tags Crackers, Dehydrated, Nut-Free, Paleo, Primal, Raw, Sunflower Seeds, Vegan
1 Comment

Dairy Free Lime Sherbet Popsicles

August 8, 2012 Kate
Dairy Free Lime Sherbet

First full week of August already....how did that happen!!  I feel like summer will be coming to an end in no time and I better get this recipe out before it's too cool for these treats!  If you like the taste of sour limes, these are for you!!  Get ready to pucker up!!!

I made these so long ago that I forgot about my hot pink popsicle sticks!  I have stainless steel molds and wooden sticks now, thank goodness.  This picture would look so much better with wood sticks, oh well!

Recipe: Dairy Free Lime Sherbet Popsicles

Ingredients

  • 1/4 - 1/2 cup sweetener (I used 1/2 cup erythritol)
  • 1 can full fat coconut milk
  • 1/8 tsp sea salt

Instructions

  1. Combine the zest with all the remaining ingredients in a blender and blend until zest is in tiny pieces
  2. Pour into molds and freeze (makes 4-6)
  3. You could make this into sherbet by using an ice cream machine instead of popsicles

An option would be to add some berries to the mixture after it has been blended.  I think strawberries, raspberries or cherries would be awesome with the lime!

Kate's Healthy Cupboard - Gluten Free Recipes
In Recipes, Desserts2 Tags Coconut Milk, Ice Cream, Paleo, Primal, Vegan
Comment

Spicy Collard Greens Chips

August 2, 2012 Kate
Collard Green Spicy Chips

This is hardly a recipe but I wanted to share it.  I am sure you have seen all the hoopla around kale chips.  There are so many recipes out there for different variations and now you can find them in the raw food section of many health food stores.  I looove them and can eat an entire batch of them in one sitting.

Collards greens make for an incredibly tasty chip as well!  I really like using these greens for the ease of spreading flavors and oils on them.  Collards are huge flat leaves so they are easier to clean and work with.  They are part of the cruciferous vegetable family such as, broccoli, kale and cabbage,  I am sure you have heard all of the health benefits of cruciferous vegetables, so add collard greens to the mix for some variety!

Recipe: Spicy Collard Green Chips
Ingredients
  • 1 bunch of collard greens
  • 1 tbsp olive oil
  • 1-2 tbsp hot sauce
Instructions
  1. Tear the greens into pieces (they will decrease in size as they cook so don't tear them too small)
  2. Combine the leaves, oil and hot sauce in a bowl and massage the greens with the mixture so each piece is covered
  3. Spread single layer onto a parchment lined cookie sheet
  4. Bake at 350 for about 6-8 minutes or until a hint of brown
  5. Let cool completely before storing. Do not pile on top of each other to cool, they will retain moisture and become soggy
  6. Store in a glass container

It's ok if you eat the entire batch, for reals!!

Kate's Healthy Cupboard - Gluten Free Recipes
In Vegetables, Recipes, Snacks and Appetizers3 Tags Paleo, Primal, Vegan, Vegetables
1 Comment

Raw Beet Sunflower Seed Pesto

June 4, 2012 Kate
Beet Pesto
Beet Pesto

If you like beets...yum is all I can say!!!  I think beets are very polarizing, you either love them or hate them.  I personally love them!  I got the inspiration to make this recipe from a restaurant in Denver, Root Down.  For those of you that live here, it's a must for dinner and brunch!  It is a laid back atmosphere with very unique dishes designed to appeal to just about anyone.  From the meat eater to the vegan, you can find something fantastic on their menu.  They cater to food allergies and offer many different variations to most items.  They try to use almost all local food companies for their menu items and create their menu to reflect the season.  I Highly recommend it!

They have a beet arugula salad that I love to get for brunch.  Along with the beets, arugula, toasted hazelnuts, it includes a beet-sunflower seed pesto dolloped next to the salad.  I mix it right in to the salad as a dressing along side the basil vinaigrette and the balsamic reduction that is drizzled around the plate.  I don't think I had ever really read the description of the salad until this past weekend when I ordered it.  Beet-sunflower seed pesto...that's all I needed to read to realize I could recreate something similar.  I decided to take the entire salad, excluding the nuts and arugula, and make a pesto from the remaining items.  Here is what I came up with and I hope you enjoy it as much as I did!!

Recipe: Raw Beet Pesto
Ingredients
  • 2 large beets, peeled and chopped (about 5 cups)
  • 4 garlic cloves
  • 3/4 - 1 cup fresh basil leaves
  • 3/4 cup raw sunflower seeds
  • 2 tbsp balsamic vinegar
  • 1 tbsp olive oil (or more if you prefer)
  • 1 tsp sea salt
Instructions
  1. Place the chopped beets into a food processor and blend until pureed
  2. Add in the remaining ingredients and blend until well combined
Variations

If you can tolerate cheese, you could certainly add some cheese chunks to this as well.

This could be enjoyed in so many different ways.  You could use it as a sauce over pasta, meats or spaghetti squash like traditional pesto.  It can also be served as a dip or spread for vegetables, crackers or chips.  I would even use it as a salad dressing!!!  I have two more recipes in the making that will incorporate this raw nut-free pesto deliciousness!!!

Kate's Healthy Cupboard - Gluten Free Recipes
In Dips and Spreads, Vegetables, Recipes, Snacks and Appetizers2 Tags Dairy Free, Nut-Free, Paleo, Primal, Raw, Sunflower Seeds, Vegan
2 Comments

Kale Chips

May 10, 2012 Kate
Kale Chips
Kale Chips

One of my favorite greens and one of the most nutrient rich greens...Kale!!!  I figured I better post a vegetable recipe before I post anymore sweet treats.  I need to get better about providing more savory recipes and more vegetable ideas, but I really enjoy baking and not to mention taste testing those recipes.  I love kale chips and all, but the cookies I'm perfecting are far more exciting!!

Kale is full of carotenoids and flavonoids, two powerful antioxidants that protect our cells from free radicals that cause oxidative stress. The key flavonoids are kaempferol and quercitin and there are  45 others!  With the addition of high doses of vitamin C, vitamin A, and manganese, kale is certainly a smart choice to battle against cellular oxidation.  Kale also acts as a natural anti-inflammatory, it provides omega-3 fatty acids that helps regulate the body’s inflammation. Many other health aspects of Kale include, the high fiber content that can possibly lower cholesterol, the isothiocyanates from glucosinolates (whatever that is) found in kale can aid in both phases I and II of the body’s detoxification process and Kale is very high in Vitamin K.  Vitamin K can help strengthen our bones, prevents calcium buildup in our tissues that can lead to atherosclerosis, cardiovascular disease and stroke.  And there's more...Kale contains high levels of vitamin A and C, both of which are effective antioxidants that boost immunity.

So do I have you convinced to either try kale or eat more of it yet?  Kale chips are an easy way to enjoy kale and believe it or not, most people find them addicting.  I could eat the entire batch and the best part is, I don't feel a bit guilty about it!!  The options are endless  as to how you could season these chips.  I am pretty simple and just enjoy olive oil and sea salt, but feel free to get creative.

Recipe: Kale Chips
Ingredients
  • One bunch of Dino Kale, washed and dried
  • 1 tbsp extra virgin olive oil or melted coconut oil
  • sea salt to taste
Instructions
  1. Tear the Kale into pieces (they will decrease in size as they cook so don't tear them too small)
  2. Combine the kale and oil in a bowl and massage the kale with the oil so each piece is oiled
  3. Spread single layer onto a parchment lined cookie sheet
  4. Bake at 350 for about 6-8 minutes or until a hint of brown
  5. Let cool completely before storing. Do not pile on top of each other to cool, they will retain moisture and become soggy
  6. Store in a glass container

There are quite a few types of organic kale including red, green curled and lacinato better known as dinosaur kale.  I prefer to use the dino kale for chips because the leaves are flatter and easier to get oil onto.  I do love the curly green kale sauteed or steamed with a little oil and sea salt.  There are so many ways to spice up kale chips and steamed kale.  I like toasted sesame oil with a bit of red pepper flakes and sea salt on my steamed kale.  Another option is to use a bit of raw apple cider vinegar in this kale chip recipe to make salt and vinegar chips.

Kate's Healthy Cupboard - Gluten Free Recipes
In Side Dishes, Vegetables, Recipes, Snacks and Appetizers2 Tags Kale, Low Carb, Paleo, Primal, Vegan
2 Comments

Plantain Tortilla Chips

May 7, 2012 Kate
Plantain Tortilla Chips

I am so excited about this recipe!  This would have been the perfect Cinco de Mayo recipe, but I am a few days late.  I was attempting crackers and loved the result, but realized they tasted like corn chips so I had to make another batch that looked like chips (bummer, I have to eat another batch).

I was once a tortilla chipaholic, it was bad!  I think when going gluten free, that was the only thing I could have that was cracker like so I turned to that bag quite often.  I have chosen to no longer eat corn as of a year ago, so to create a replacement that is grain free...gets me excited!

There are many reasons why I have chosen to give up corn, most importantly because it's a grain.  Sorry folks, it is not a vegetable, it is a grain.  A grain that is one of the number one GMO foods out there.  It can cause intestinal distress much like gluten and cause silent inflammation just like gluten.  That's all I need to hear to quite eating something.  Now if only someone would tell me dark chocolate does the same thing!!!  I need an intervention...but it's so darn good!

I have been into plantains for a while now and am waiting on the arrival of plantain flour!!!   What the heck is a plantain, a big banana?  Plantains tends to be firmer and lower in sugar than bananas. Bananas are almost always eaten raw, while plantains tend to be cooked either when green or unripe (starchy) or overripe (sweet).  They are a good source of potassium, fiber and starchy carbohydrates (perfect for endurance athletes).

Plantains are a staple in tropical regions of the world, much the same way as potatoes are here.  They have a pretty neutral flavor, the unripe fruit is typically cooked by steaming, boiling or frying.  I buy or make plantain chips myself that are just sliced plantains that have been roasted or baked.  They satisfy the crunch, but this recipe is even better and partners up well with guacamole or fresh salsa!

Recipe: Plantain Tortilla Chips
Ingredients
  • 3 unripe (green) plantains, peeled*
  • 2 tbsp refined coconut oil
  • 1/2 tsp sea salt
  • coarse sea salt to sprinkle
Instructions
  1. Peel and slice the plantains into about 1/4 inch slices and lay flat on a cookie sheet for about an hour (this can be skipped if plantains don't seem very moist, wet on the fresh slice side)
  2. Add the plantains and oil to a food processor and combine until smooth
  3. Once all the lumps are gone, add the sea salt and quickly combine
  4. Place the mixture on a sheet of greased parchment paper the size of your cookie sheet
  5. If the dough is dry enough, place another piece of parchment over the top and with a rolling pin, roll out to about 1/8 inch thick rectangle. If the dough seems too wet, spread out evenly with a spatula (I have had dry and I have had wet plantains, not sure what contributes to that)
  6. Using a sharp knife or pizza cutter, cut into the shape and size of chip you prefer
  7. Sprinkle coarse sea salt or regular sea salt over the top of the dough and slide the paper onto a cookie sheet
  8. Bake at 400 for 25-30 minutes until golden brown. You may need to remove some chips as you go that brown faster than the others.  Make sure to cook them long enough or they will be chewy instead of crunchy
  9. Remove cookie sheet and let chips cool
  10. You may need to re-cut the chips or you can break them along the cut lines
  11. Store in an airtight container, glass is my favorite
Quick notes

*The easiest way to peel a plantain is to first cut off the ends. Then with a knife, slice along the pronounced ridges (about 3 of them). Don't worry if you cut into the plantain, it won't matter. Peel one section at a time, it should come off pretty easily.

Unripe (green) plantains can be hard to find.  I prefer the green for their no sugar content and they have less moisture in them.  I have had the best luck going to Sprouts or Sunflower Market and asking if they have any unripe green plantains in the back, they usually do.  Asian markets carry them as well and they are always green there since they go through so many of them.  Whole Foods sells them but they tend to be very yellow and brown, it can be hit or miss there.

If you are an Amazon shopper, would you be so kind to use my affiliate link to make your purchases.  It is at no cost to you, it does provide a tiny kickback to Kate’s Healthy Cupboard.  This allows me to continue making and testing recipes for free.  Thanks so much!!

*I have recently switched all of my skincare and makeup to a company that is free of 1,500 chemicals!!  I am so particular about what goes into my body, I need to be just as picky as to what goes on my body!  Your skin is your largest organ and absorbs chemicals into the bloodstream faster than the gut does!  I am vain when it comes to my skin and was so thrilled to find products that are anti-aging and work!!!  Check out BeautyCounter for more info!!  You will love it!!

Kate's Healthy Cupboard - Gluten Free Recipes
In Dips and Spreads, Side Dishes, Recipes, Snacks and Appetizers2 Tags Nut-Free, Paleo, Plantains, Primal, Vegan
36 Comments

Raw Coconut Cookie Bites

May 3, 2012 Kate
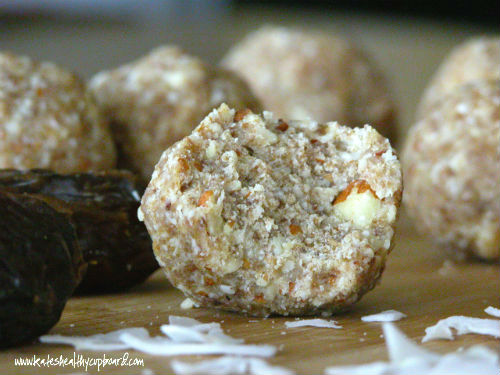
Raw Coconut Cookie Balls

In case you haven't noticed, I like making sweet treats!!  I was recently told I should open a gluten free bakery...and the idea keeps crossing my mind!!  I love the creative side of making treats and have always enjoyed baking, even as a kid.  Once you have to eliminate gluten in your diet, traditional baked goods are not an option.  That's a good thing in the sense that it makes you eliminate processed junk and goodies with added sugar, but it's a bad thing when you have a sweet tooth!

I am a person of balance and if I want something sweet, I will eat something sweet.  It's when we tell ourselves we can't have something that that something becomes our battle constantly and something we tend to over eat.  I allow myself a Double Chocolate Gooey Brownie, a Grain Free Cinnamon Roll or a Chocolate Peanut Butter Protein Ball when I feel like it and will have no regret!  So I will continue to create sweet treats that are far better for you than just about anything you can buy off a store shelf.  I try to always include a healthy fat or protein source in my sweet recipes to make any sugar/insulin response that much less.  Many times I also suggest safe alternative sweeteners to decrease the sugar content in a recipe.  You can read more about those on my Ingredients Page or shop for them in the Amazon store link.

With that said, here is a yummy treat if you are a coconut fan!!  This raw coconut cookie recipe is sweetened with fruit only, packed with healthy fats and gives an option to add extra protein to them.

Recipe: Raw Coconut Cookie Bites
Ingredients
  • 3 cups Medjool Dates* (de-pitted)
  • 1 3/4 cup unsweetened coconut, medium shreds or chips (may need to add about 1/4 cup more if not using protein powder)
  • 4 tbsp coconut creme/butter*, softened
  • 2 tbsp virgin coconut oil, softened*
  • 1 1/2 cups raw almonds
  • 1/3 cup vanilla egg white protein (optional but adds some vanilla flavoring to the cookies)
Instructions
  1. Once the dates have soaked for a couple hours, add them to a food processor along with the coconut creme/butter and coconut oil (add protein at this time)
  2. Process until mixture is well combined and creme and oil are fully melted
  3. Add in the coconut and blend until consistency is doughy and moldable
  4. Add the almonds at this time and blend until almonds are well incorporated
  5. Pack the dough into balls, you may need to press firmly
  6. I prefer to store in the refrigerator in an airtight container. The coconut creme and oil will harden when cooled and allow for a harder ball
Quick notes

*You can find Medjool Dates in the produce section of most grocery stores or the bulk section of Whole Foods. Don't forget to de-pit them!!

*You can find Coconut Butter at most Whole Foods or Vitamin Cottage or Coconut Creme online at Tropical Traditions

*Make sure to use Virgin Coconut Oil, not Refined or Expeller Pressed, you want the coconut flavor!

Kate's Healthy Cupboard - Gluten Free Recipes
In Desserts, Recipes Tags coconut, Dehydrated, Desserts, Egg White Protein, Paleo, Vegan
2 Comments
download.jpeg

Welcome to Kate's Healthy Cupboard! A place for healthy, grain free recipes, some low carb recipes, safe beauty and products for the home  and more...


>>  CONNECT WITH KATE  <<

pinterest.png
facebook.png
instagram.png

>>  SUBSCRIBE  <<

Success! Now check your email to confirm your subscription.

There was an error submitting your subscription. Please try again.


>>  SEARCH RECIPES  <<


Copyright 2016 Kate's Healthy Cupboard  ||  Website Design