• Blog
  • Recipes
  • Lifestyle
  • Safer Skincare
  • About
  • Contact
Menu

Kate's Healthy Cupboard

Street Address
City, State, Zip
Phone Number
Healthy Lifestyle, Healthy Grain Free Recipes

Your Custom Text Here

Kate's Healthy Cupboard

  • Blog
  • Recipes
  • Lifestyle
  • Safer Skincare
  • About
  • Contact

Faux Baked Cinnamon Apples

January 27, 2014 Kate
Faux Baked Cinnamon Apples Recipe

Nothing against apples, but I'm trying to eat less carbs and certainly less sugar.  Yes, I know there are nutrients in apples and it's natural sugar...sugar is sugar is sugar and I can find those same nutrients in vegetables!!!  For me personally, I do better without fructose and fruit in my diet.  For that reason, I have been using jicama in place of apples and potatoes in many recipes.  In case you missed it, this Sausage and Fauxtato Frittata Recipe is awesome!!!  Grab yourself some jicama, cause I've got some more low carb recipes coming soon!!!

Jicama is very crunchy, full of water and stays hard even when cooked.  I have found that you have to boil the jicama for a while before you use it in recipes if you want it to soften up like it does in this baked apple recipe.  It's easy to do and can be done ahead of time, just store in an air tight container in the fridge until you are ready to use them.

Faux Baked Cinnamon Apples

Serves: 3-4

Ingredients

  • 3 cups jicama, cubed and boiled* (1 small jicama)
  • 2 tbsp grass-fed butter or coconut oil
  • 1-2 tsp cinnamon (I like them with 2 tsp)
  • sweetener of choice (I used 2 tbsp of Swerve)
  • dash of sea salt

Instructions

  1. Heat the oven to 350
  2. Place the jicama in a casserole dish
  3. Cut the butter into pieces and place over the jicama. Sprinkle with cinnamon, sweetener and salt
  4. Bake covered for 30-40 minutes or until soft, stir after 20 minutes. I removed the lid for the last 10 minutes to remove the moisture
  5. Serve hot with some Dairy Free Vanilla Ice Cream.

Quick notes

*To boil the cubed jicama, cover it with water and boil for 30-45 minutes (depends on size of cubes) until soft. This can be done ahead of time, store in an airtight container in the refrigerator.

Variations

You could combine some almond flour, pieces of butter or coconut oil and sweetener to make a topping. I’d add the topping once you have removed the lid to finish cooking.  You could turn on the broiler for a few seconds to brown the topping too!

If you are an Amazon shopper, would you be so kind to use my affiliate link to make your purchases.  It is at no cost to you, it does provide a tiny kickback to Kate’s Healthy Cupboard.  This allows me to continue making and testing recipes for free.  Thanks so much!!

I have switched all of my skincare and makeup to a company that is free of 1,500 chemicals!  The European Union bans about 1,400 chemicals and the US bans 11 in an unregulated industry!  I am so particular about what goes into my body, I need to be just as picky as to what goes on my body!  Your skin is your largest organ and absorbs chemicals into the bloodstream faster than the gut does!  I am vain when it comes to my skin and was so thrilled to find products that are safe, non toxic, but are still anti-aging and work!!!  The makeup is chic, on trend and high performing! Check out Beautycounter for more info!!  Their mission is to get safe products into the hands of everyone!  I feel compelled to help educate and share this mission!  

Kate's Healthy Cupboard - Gluten Free Recipes
In Recipes, Desserts4 Tags Desserts, Low Carb, Paleo
14 Comments

Chocolate Cherry Blondies

February 13, 2013 Kate
Chocolate Cherry Blondies

Chocolate covered cherries may be a favorite Valentine's treat for some of you, and if so, you will love these.  You don't have to like chocolate covered cherries to like these blondies!  Blondies, what the heck is that really?  Basically they are brownies without the cocoa.  According to wikipedia:

A blondie (also known as a "blond[e] brownie" or "blondie bar") is a rich, sweet dessert bar.  It is made fromflour, brown sugar, butter, eggs, baking powder and vanilla and may also contain walnuts or pecans Chocolate chip blondies may contain white or dark chocolate chips. A blondie may have a taste reminiscent of butterscotch.

Blondies resemble the traditional chocolate brownie, but are based on brown sugar instead of cocoa; they are sometimes referred to as blonde brownies. They are baked in a pan in the oven similar to how traditional brownies are baked, then cut into rectangular shapes for serving.

Like brownies, blondies may include chocolate chips. They may also contain coconut, nuts, toffee, or any other chunky candy for added texture. Blondies aren't usually frosted; the brown sugar flavor tends to be sweet enough.

Technically I think these could be called Chocolate Cherry Cookie Bars as well, but I like blondie for this recipe.  Since brown sugar is an ingredient in blondies, I had to come up with an alternative.  I chose to add a bit of coconut palm sugar to give it that caramel, molasses taste.  Another option would be to add a bit of molasses to granulated sugar since that's basically what brown sugar is.  I used Swerve for my sweetener to keep these low sugar and added just a bit of coconut palm sugar.  They turned out perfect, moist but with a crisp crackly top!

Chocolate Cherry Blondies

Ingredients

  • 2 cups Honeyville Almond Flour
  • 5 tbsp grass-fed butter or coconut oil, softened
  • 1/2 – 3/4 cup granulated sweetener (I used almost 3/4 cupSwerve*and 2 tbsp coconut palm sugar)
  • 1 egg
  • 2 tsp vanilla extract
  • 1/2 tsp baking soda
  • 1/4 tsp sea salt
  • 1/2 cup dark chocolate chips (use Enjoy Life Choclate Chips orEnjoy Life Chocolate Chunks
    to make dairy free)
  • 1/2 – 3/4 cup cherries (cut into fourths)**

Instructions

  1. Place the softened butter/oil and sugar in a mixing bowl and cream with a hand mixer or in a stand up mixer until fluffy
  2. Add the egg and vanilla and continue to blend
  3. In a mixing bowl, combine the flour, soda and salt
  4. Slowly add the flour mixture as you continue to beat until well combined
  5. Fold in the chocolate chips and lastly, fold in the cherries
  6. Bake at 350 for about 25 minutes until slightly brown
  7. Let cool for 30 minutes before cutting into them (I prefer these out of the refrigerator cold)

Quick notes

*If you want to order Swerve, they have given my readers an extra 10% off your online order with code KATE10.

**It is almost impossible to find fresh cherries this time of year, so frozen is what you will use. They tend to be very dark in color and that is why this looks like a blueberry blondie. It is best to keep them frozen until you have added the chocolate chips so they do not melt and bleed into the dough.

As Wikipedia says above, any nut or candy can be used in blondie recipes.  Use this as a base and add what ever nuts, fruits, chocolates you would like!

If you want to try Swerve or need to order more, use coupon code KATE10 for a 10% discount.  Swerve is my favorite sugar replacement.  It is the only sugar alcohol that will not cause tummy troubles and it does not raise blood glucose levels.


If you are an Amazon shopper, would you be so kind to use my affiliate link to make your purchases.  It is at no cost to you, it does provide a tiny kickback to Kate’s Healthy Cupboard.  This allows me to continue making and testing recipes for free.  Thanks so much!!

*I have recently switched all of my skincare and makeup to a company that is free of 1,500 chemicals!!  I am so particular about what goes into my body, I need to be just as picky as to what goes on my body!  Your skin is your largest organ and absorbs chemicals into the bloodstream faster than the gut does!  I am vain when it comes to my skin and was so thrilled to find products that are anti-aging and work!!!  Check out BeautyCounter for more info!!  You will love it!!

Kate's Healthy Cupboard - Gluten Free Recipes
In Recipes, Desserts2 Tags Almond flour, Cherries, Chocolate, Desserts, Holiday, Swerve
Comment

Chocolate Peppermint Cookie Bars

December 5, 2012 Kate
Chocolate Peppermint Cookie Bars

This cookie recipe turned out better than I could have imagined!  I think I have become slightly addicted to them...hence eating them as part of my breakfast and lunch today!  They are basically sugar free, but still, it's time to give the rest away before I eat the entire pan!  'Tis the season!!!

The bottom of these remind me of an Oreo like cookie.  I made them to be more like a crust rather than a soft cookie.  If you prefer soft, even though I think the way they are is amazing, you could probably add an egg to the recipe and a bit of baking soda.  This has given me a couple of other ideas of bars to make, so expect another one this month!

As you can see the candy on top isn't a bright red like traditional peppermint candies.  Well, that's what happens when things are colored naturally and not with RED #40!  I found these candy canes at Whole Foods, yes they have cane sugar, but at least they don't have high fructose corn syrup and red dye!  You could certainly leave the candy off, but it does add some crunch and additional peppermint flavor.  The red, or should I say pink frosting color is also natural and I will share my trick below!  I have a special ingredient for green as well that will be revealed in my Sugar Cookie Recipe!!

Chocolate Peppermint Cookie Bars

Ingredients

Cookie

  • 1 cup Honeyville Almond Flour
  • 1/2 cup cocoa powder
  • 1/2 cup grass-fed butter or coconut oil, melted (I used a mixture)
  • 1/3-1/2 cup granulated sweetener (I used 1/2 cup Swerve for a sugar free option)
  • 1/2 tsp vanilla extract
  • 1/4 tsp sea salt

Frosting

  • 1 cup powdered sweetener* (I used Swerve Confectioners for sugar free option)
  • 2 tbsp coconut cream (the cream that rises to the top of a can of full fat coconut milk when it is refrigerated)
  • 2 tbsp full fat coconut milk (shake the remaining can of milk and use two additional tablespoons)
  • 2 tbsp grass-fed butter**
  • 1/2 tsp peppermint flavor
  • 1 small beet root
  • 4 natural candy canes, crushed (optional)

Instructions

Cookie

  1. Mix the melted butter/oil with the vanilla
  2. Combine the flour, cocoa, salt and sweetener
  3. Add the dry ingredients to the wet and stir until combined
  4. Press the batter into an 8×8 greased pan
  5. Bake at 350 for 25 minutes
  6. Let cool completely

Frosting

  1. Place the butter and sweetener in a pan on medium heat until butter starts to melt. Remove from heat and stir well
  2. Pour the mixture into a Vitamix or blender with the coconut cream, coconut milk and peppermint flavoring. Blend until smooth
  3. Peel the small beet root and place in a saucepan with about 2 tbsp water and cook over medium heat until the water is red.
  4. Pour some of the red water into your frosting and stir until desired color is reached.
  5. Place the frosting in the refrigerator to set if it’s runny
  6. Once the cookie has cooled, spread the frosting evenly and sprinkle the crushed candy over the wet frosting
  7. Place in the frig to let the frosting set.
  8. Store in the refrigerator (I think these taste best straight out of the refrigerator!)

Quick notes

*You can powder any sweetener by placing it in a coffee grinder or in a blender. The frosting will be grainy if you skip this step and that may not bother you.

**You may be able to use 2 additional tablespoons of coconut cream instead of butter in thefrosting.  I haven’t tried it but it should work.  It may just make it more coconuty and more peppermint extract may be needed.

Variations

For those that do not like peppermint, try any other flavor extract or simply use vanilla.  Add 1/4 tsp to start in case it’s a stronger extract.

Snow is headed our direction and I think these would be delicious served with some Dairy Free Hot Chocolate!!!

Happy Holidays!

KATE-SIGNATURE small.png
Affiliate Banners_Generic_728x90-1.jpg


*I have recently switched all of my skincare and makeup to a company that is free of 1,500 chemicals!!  I am so particular about what goes into my body, I need to be just as picky as to what goes on my body!  Your skin is your largest organ and absorbs chemicals into the bloodstream faster than the gut does!  I am vain when it comes to my skin and was so thrilled to find products that are anti-aging and work!!!  Check out BeautyCounter for more info!!  You will love it!!

In Breakfasts, Recipes Tags Almond flour, Coconut Milk, Cookies, Desserts, Egg-Free, Holiday, Swerve
15 Comments

Cinnamon Maple Coconut Bites

October 5, 2012 Kate
Cinnamon Maple Coconut Bites

Tiss the season for lots of cinnamon...and pumpkin spices!  Here is another easy recipe for a quick sweet treat similar to my Coconut Vanilla Bean Dough Bites Recipe and the Coconut Brownie Bites Recipe.  I used a dehydrator, but it's not necessary.  If you have been thinking of buying one though, I'd bite the bullet and do it, so worth it!!

Cinnamon has some amazing health benefits so why not incorporate it into your day!  A few of those benefits include:  regulates blood sugar, reduces LDL cholesterol levels, has natural anti-infectious compounds, reduces pain linked to arthritis, may reduce the proliferation of cancer cells, serves as a natural food preservative, contains fiber, calcium, iron, and manganese, can be effective for menstrual pain and infertility.  Wow, I might have to make more of these bites or another batch of my Apple Cinnamon Upside Down Cakes!

Cinnamon Maple Coconut Bites

Ingredients

  • 1 1//2 cups unsweetened shredded coconut
  • 1/4 cup vanilla protein powder (I used Jay Robb’s Vanilla Egg White Protein), sub for almond flour if you prefer
  • 1 tbsp coconut oil
  • 3-4 tbsp maple syrup*
  • 1/2 tsp vanilla extract
  • 1 tbsp lucuma powder (optional)
  • 2 tsp cinnamon
  • dash of sea salt

Instructions

  1. Pour the coconut into a food processor and blend until small pieces are produced
  2. Add all of the remaining ingredients and blend well.
  3. Using a small cookie scoop, place each bite onto dehydrator sheets
  4. Dehydrate at 125 for 2-4 hours depending on how soft you want them
  5. Oven option: Set temp to lowest possible setting or use dehydrator setting. Bake for 1-2 hours depending on heat setting

Quick Notes

*I used Xylitol Maple Syrup as a reduced sugar option.

*For more information on Lucuma, read this post

I like to reheat mine each time I treat myself to one or two or maybe three!!  Store in an airtight container.

Kate's Healthy Cupboard - Gluten Free Recipes
In Breakfasts, Recipes, Snacks and Appetizers2 Tags coconut, Dehydrated, Desserts, Egg White Protein, Nut-Free, Paleo, Primal, Vegan
3 Comments

Raw Coconut Cookie Bites

May 3, 2012 Kate
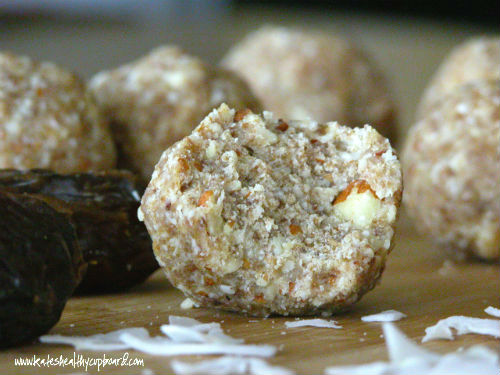
Raw Coconut Cookie Balls

In case you haven't noticed, I like making sweet treats!!  I was recently told I should open a gluten free bakery...and the idea keeps crossing my mind!!  I love the creative side of making treats and have always enjoyed baking, even as a kid.  Once you have to eliminate gluten in your diet, traditional baked goods are not an option.  That's a good thing in the sense that it makes you eliminate processed junk and goodies with added sugar, but it's a bad thing when you have a sweet tooth!

I am a person of balance and if I want something sweet, I will eat something sweet.  It's when we tell ourselves we can't have something that that something becomes our battle constantly and something we tend to over eat.  I allow myself a Double Chocolate Gooey Brownie, a Grain Free Cinnamon Roll or a Chocolate Peanut Butter Protein Ball when I feel like it and will have no regret!  So I will continue to create sweet treats that are far better for you than just about anything you can buy off a store shelf.  I try to always include a healthy fat or protein source in my sweet recipes to make any sugar/insulin response that much less.  Many times I also suggest safe alternative sweeteners to decrease the sugar content in a recipe.  You can read more about those on my Ingredients Page or shop for them in the Amazon store link.

With that said, here is a yummy treat if you are a coconut fan!!  This raw coconut cookie recipe is sweetened with fruit only, packed with healthy fats and gives an option to add extra protein to them.

Recipe: Raw Coconut Cookie Bites
Ingredients
  • 3 cups Medjool Dates* (de-pitted)
  • 1 3/4 cup unsweetened coconut, medium shreds or chips (may need to add about 1/4 cup more if not using protein powder)
  • 4 tbsp coconut creme/butter*, softened
  • 2 tbsp virgin coconut oil, softened*
  • 1 1/2 cups raw almonds
  • 1/3 cup vanilla egg white protein (optional but adds some vanilla flavoring to the cookies)
Instructions
  1. Once the dates have soaked for a couple hours, add them to a food processor along with the coconut creme/butter and coconut oil (add protein at this time)
  2. Process until mixture is well combined and creme and oil are fully melted
  3. Add in the coconut and blend until consistency is doughy and moldable
  4. Add the almonds at this time and blend until almonds are well incorporated
  5. Pack the dough into balls, you may need to press firmly
  6. I prefer to store in the refrigerator in an airtight container. The coconut creme and oil will harden when cooled and allow for a harder ball
Quick notes

*You can find Medjool Dates in the produce section of most grocery stores or the bulk section of Whole Foods. Don't forget to de-pit them!!

*You can find Coconut Butter at most Whole Foods or Vitamin Cottage or Coconut Creme online at Tropical Traditions

*Make sure to use Virgin Coconut Oil, not Refined or Expeller Pressed, you want the coconut flavor!

Kate's Healthy Cupboard - Gluten Free Recipes
In Desserts, Recipes Tags coconut, Dehydrated, Desserts, Egg White Protein, Paleo, Vegan
2 Comments

Strawberry Lime Sorbet

April 30, 2012 Kate
Strawberry Lime Sorbet

It's warming up again and I have been busy experimenting with the ice cream maker!!  I love my Cuisinart, it's so easy!  We had one as a kid that was this huge, noisy wooden thing.  I have seen similar versions today that you have to put ice all around it and rock salt and whatever else it entails...too much trouble!  Now I know why it was only used for special occasions, like twice a year.  The Cuisinart is small, quick and inexpensive for a delicious easy treat.  It's something you could easily get in the habit of pulling out every night during the summer.  Good thing all my recipes are lower in sugar and dairy free (except when dark chocolate is added)!

The first round of this sorbet made us all pucker up a little too much!  I added more strawberries and took down the lime juice and it seems to be perfect...in our opinion.  Feel free to add more strawberries or simply leave out the lime but we think the tart compliments the berries well.  This is very refreshing and reminds me of a daiquiri, I think it would be excellent with a little rum stirred in and umbrella on top!

Recipe: Strawberry Lime Sorbet
Ingredients
  • 4 cups frozen strawberries
  • 1/4-1/3 cup lime juice
  • 1/2 cup water
  • 1/2 tbsp lime zest
  • 1/8-1/4 cup honey*
Instructions
  1. Throw everything into a high powered blender (I used a Vitamix) and blend until smooth
  2. The consistency may be perfect as is to serve or for a more frozen treat, run it through an ice cream maker
  3. Store in an airtight container in the freezer and let it sit our for about 15 minutes before serving
Quick notes

*I used Nature's Hollow Honey made with Xylitol to lower the sugar amount

Kate's Healthy Cupboard - Gluten Free Recipes
In Desserts, Recipes, Snacks and Appetizers2 Tags Dairy Free, Desserts, Ice Cream, Nut-Free, Paleo, Primal, Sorbet
10 Comments

Dairy Free Cherry Chocolate Chip Ice Cream

April 23, 2012 Kate
Cherry Chocolate Chip Ice Cream

It could reach 90 degrees tomorrow in Denver and it's still April!  When it's that hot, ice cream is on the menu around here!!!  Its only going to get warmer, so there will be plenty of cold treat recipes coming your way!!

I have so many ice cream ideas and wasn't sure what to try first!  The challenge is that to make it dairy free, the main ingredient is full fat coconut milk.  Coconut milk tends to have a coconut taste to it and I want to hide that in most of the flavors.  It's a hard thing to do and most of you will still taste a bit of it.

This Dairy Free Cherry Chocolate Chip Ice Cream recipe was VERY well received by my mom's husband...who I would consider an ice cream addict!  He said he could easily eat it in place of the real deal.  It's not as creamy, but don't you worry, I have plans to make some of the other flavors a bit creamier tasting.  Besides, once you add all the goodies, like the chocolate chips, nuts, nut butters or fruit, you have forgotten it's dairy free and realize how good it really is!!

I bought an ice cream maker last year and love it!!  I have the Cuisinart ICE-21 that can be used for ice cream, sorbet, and frozen yogurt.  It's so easy and quick to use!  It can be found online or at Bed, Bath and Beyond for a very reasonable price, plus you can use a 20% off coupon on it!  It's worth it!  I used it for this recipe but I think you can just freeze this in a bowl and have a similar experience!

Recipe: Dairy Free Cherry Chocolate Chip Ice Cream
Ingredients
  • 1 can full fat coconut milk
  • 1/3 cup unsweetened vanilla coconut or almond milk from carton
  • 10 oz bag frozen cherries
  • 1/4 cup honey
  • 1/4 tsp vanilla beans
  • 1 tbsp vanilla extract
  • 1 cup dark chocolate chips or broken chocolate bar pieces or Enjoy Life Dairy Free Chips for complete dairy free option
Instructions
  1. Combine all of the ingredients except chocolate in a Vitamix or high powered blender
  2. Blend until completely smooth
  3. Transfer mixture to ice cream maker and follow the machines instructions.  If you don't have an ice cream maker, pour into an airtight container
  4. Add in the chocolate pieces when there's about 5 minutes left in the process or stir into mixture before freezing if you do not have an ice cream maker
Notes:

Ice cream will be like soft serve from the ice cream maker.  If you want it harder, place in the freezer until desired consistency is reached.  Store in an airtight container and let it sit out for about 15 minutes before serving.

Kate's Healthy Cupboard - Gluten Free Recipes
In Desserts, Recipes Tags Cherries, Chocolate, Coconut Milk, Dairy Free, Desserts, Ice Cream, Nut-Free, Paleo, Primal
2 Comments

White Chocolate Macadamia Nut Cookies

February 22, 2012 Kate
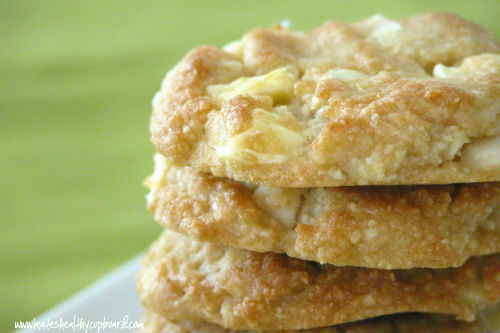
White Chocolate Macadamia Nut Cookies

This cookie combination is one of my favorites!  White chocolate doesn't have the health benefits that dark chocolate has but, it was necessary for this recipe!  In Fact, white chocolate really isn't chocolate.  It contains cocoa butter, a product of the cocoa bean that is also used to produce chocolate. The cocoa butter, which does have a faint chocolate flavor is combined with milk, sugar and often other flavoring ingredients such as vanilla in order to create white chocolate.  With that said, white chocolate contains far more sugar and dairy than dark chocolate.  The darker you get, the less dairy and sugar content the chocolate will have.

Macadamia nuts are one of my favorite nuts for taste and health benefits.  Most nuts are typically higher in omega 6 fats, macadamia nuts being one of the lowest.  Most of us get too many 6's and that is a pro-inflammatory fat when it is out of balance with omega 3's.  Omega 3's are your anti-inflammatory fat that is typically low in the typical diet.  Macadamia nuts have had a bad reputation for a long time, mostly because they are high in fat. However, between 78 to 86 percent of the fat is monounsaturated, the good for you, heart-healthy kind of fat.  In addition, macadamia nuts are one of the only food sources that contain palmitoleic acid (a type of monounsaturated fatty acid that may speed up fat metabolism, thus reducing the body’s ability to store fat).

So the white chocolate may be higher in sugar, but at least the nuts in this recipe are one of the best nuts for you!

This recipe was adapted from cookie recipes from Elana's Pantry

Recipe: White Chocolate Macadamia Nut Cookies
Ingredients
  • 2 1/2 cups almond flour*
  • 1/2 tsp baking soda
  • 1/2 cup vegan organic palm oil shortening
  • 1/4 cup honey*
  • 1 tbsp vanilla extract
  • 2/3 cup toasted macadamia nuts
  • 2/3 cup white chocolate chips or chunks
  • 1/4 tsp sea salt
Instructions
  1. Place the nuts in a dry skillet over medium high heat and lightly toast, let cool
  2. Add the shortening, honey and vanilla to a bowl and cream with a hand held mixer
  3. In another bowl, combine the flour, soda and salt
  4. Combine the two bowls together and mix well
  5. Fold in the chips and nuts until well combined
  6. Using a cookie scoop, place cookies on a parchment lined cookie sheet
  7. Use your palm and flatten the cookies out
  8. Bake at 350 for about 8 minutes
Quick notes

*I used Bob's to see if it would work and it did. I know that Honeyville will absorb a bit more of the shortening and possibly work even better.

*This can be made with less sugar using Nature's Hollow Honey made with Xylitol.  I did that and it tasted great!

Makes about 18 cookies depending on the size.

I recently decided to freeze these, so delicious right out of the freezer!

Typing this recipe makes me want to make more of these since they disappeared so fast!!!

Kate's Healthy Cupboard - Gluten Free Recipes
In Desserts, Recipes, Snacks and Appetizers2 Tags Almond flour, Cookies, Dairy Free, Desserts, Egg-Free, Macadamia Nuts
17 Comments
download.jpeg

Welcome to Kate's Healthy Cupboard! A place for healthy, grain free recipes, some low carb recipes, safe beauty and products for the home  and more...


>>  CONNECT WITH KATE  <<

pinterest.png
facebook.png
instagram.png

>>  SUBSCRIBE  <<

Success! Now check your email to confirm your subscription.

There was an error submitting your subscription. Please try again.


>>  SEARCH RECIPES  <<


Copyright 2016 Kate's Healthy Cupboard  ||  Website Design