• Blog
  • Recipes
  • Lifestyle
  • Safer Skincare
  • About
  • Contact
Menu

Kate's Healthy Cupboard

Street Address
City, State, Zip
Phone Number
Healthy Lifestyle, Healthy Grain Free Recipes

Your Custom Text Here

Kate's Healthy Cupboard

  • Blog
  • Recipes
  • Lifestyle
  • Safer Skincare
  • About
  • Contact

Cardamom Carrot Pudding

June 20, 2013 Kate
Cardamom-Carrot-Pudding_Copy_2

I am so excited to share this guest post with you!  This delicious pudding recipe was created by Abby from the Yes to Yummy Blog.  Abby is a 15 year old girl (yes, just a teenager) that decided to take her health into her own hands...literally!  She went from being a bit overweight to a bit compulsive with her eating.  She was tired of her calorie restrictive diet and eating chicken breasts everyday.  This led her down the Paleo road and to renewed health from eating grain free and enjoying high amounts of healthy fats.  She took an interest in healthy cooking and enjoys sharing her recipes with others.  I know I can learn a thing or two from her.  She visits a butcher regularly and is far more versed in meats than myself!  Check out her recipes ranging from lamb kebabs, pork carnitas, duck breasts to parsnip hash, arugula pesto and cauliflower couscous!!  She has numerous other sweet treats as well and today she is sharing one of them with us!

Below is a small blurb about her journey and her mission.  You can read more about her and her story on the blog.

I've always loved food, although not always of the healthiest sort. After being a little overweight for years, I decided to experiment with cooking nutritiously in an attempt to improve my eating habits. I wound up losing some weight, but more importantly, I felt so much healthier as a whole. Now, I want to show people that conscious eating can be exciting, creative, and above all delicious with my recipes. If a teenager can live happily and healthfully without eating processed food, I think anyone can.

Summer is finally upon us, and I couldn't be happier. I love stepping outside and feeling the sun on my arms, then being wrapped in a blanket of perfect warmth. Sure, only about 20% of summer days are actually like that where I live, but a girl can idealize.

When the weather heats up, the last thing you want is a big, heavy breakfast. Unfortunately, eggs don't often qualify as light, cool, and refreshing. They get pretty boring after a while, too, and aren't the best choice for those with autoimmune conditions or problems with inflammation.

This breakfast pudding is the solution to all of your problems. It's gluten-free, grain-free, casein-free, nut-free, and paleo, and can easily be made completely dairy-free and vegan. It's simple to prepare and is mostly hands-off. You can whip up a big batch on the weekend and have a healthy, delicious breakfast available all week long.

First, grate three large carrots in the food processor or with a box grater. I'm lazy; I used my food processor.

Grated-Carrots_Copy
Grated-Carrots_Copy

Heat 1 1/2 tablespoons of ghee or coconut oil (for dairy-free and vegan) in a large non-stick skillet over medium heat. When hot, add the carrots, and saute for 5 minutes, stirring frequently. Afterwards, cover with a lid, reduce the heat to low, and cook until soft and beginning to brown, about 30 to 35 minutes more. Give it a shake or stir every 5 minutes or so to prevent burning.

Once the carrots are done, add them to a blender or food processor with 1 14-ounce can of full-fat coconut milk, 2 teaspoons of ground cardamom, 1 tablespoon of ground cinnamon, 1 tablespoon of vanilla extract, and 1/4 teaspoon of liquid stevia OR 1-2 tablespoons of honey or maple syrup. Blend until completely liquefied, about 2 to 3 minutes.

Chia-Seeds_copy
Chia-Seeds_copy

Pour the carrot and coconut mixture into a large container, and stir in 3 tablespoons of chia seeds. You can ground them if you want, but I like leaving them whole.

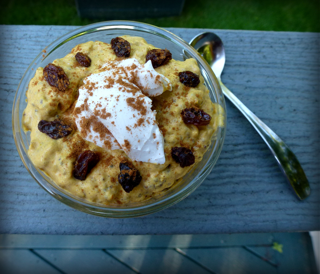
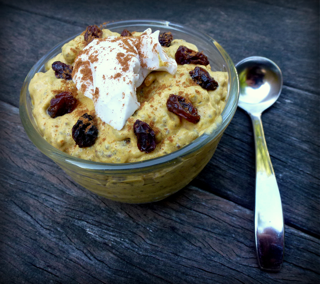
Put the pudding container in the fridge, and wait at least 4 hours (preferably overnight) before eating. Garnish with raisins, a little more cinnamon and/or cardamom, and a dollop of coconut cream, if you like.

So, why chia seeds? Well, they're high in omega-3 fatty acids, are excellent sources of manganese, calcium, phosphorus, and magnesium, and have a boatload of digestible fiber. They're everywhere these days--I've even seen them at Stop and Shop--but if you can't find them, you can always order some off of Amazon for a fairly low price.

Cardamom-Carrot-Pudding_Copy

It's as easy as that to have a sweet, nutritionally-sound breakfast. So, what are you waiting for

Cardamom Carrot Pudding

Ingredients

  • 3 large carrots, shredded
  • 1 1/2 tablespoons of ghee OR coconut oil
  • 1 14-ounce can of full-fat coconut milk
  • 2 teaspoons of ground cardamom, plus additional for garnish
  • 1 tablespoon of ground cinnamon, plus additional for garnish
  • 1/4 teaspoon of liquid stevia OR 1-2 tablespoons of honey OR maple syrup
  • 3 tablespoons of chia seeds, whole or ground*
  • Unsweetened raisins, for garnish (optional)

You can also find Abby on Facebook, go like her page so you don't miss any of her recipes!!!

Kate's Healthy Cupboard - Gluten Free Recipes
In Breakfasts, Recipes, Desserts3
4 Comments

Grain Free German Pancake

March 19, 2013 Kate
Grain Free German Pancake Recipe

I recently purchased The Joy of Cooking and am slowly making my way thru this enormous cookbook.  It is an incredible cookbook and should be in every cooks kitchen!  It is full of recipes, tips, tricks and explanations. I have quite a few ideas that were inspired by this book and can't wait to get cooking!

I came across this German Pancake recipe and knew I had to recreate it grain free!  This turned out so darn good and was a huge hit at Sunday brunch.  This would make for a perfect addition to your Easter menu and can be enjoyed with numerous toppings....and it's easy to make!

Grain Free German Pancake

Ingredients

  • 4 large pastured eggs, yolks and whites separated
  • 3 tbsp granulated sweetener (I used Swerve for sugar free option)
  • 1/4 cup non-dairy milk (I used unsweetened vanilla coconut milk)
  • 1/4 cup lukewarm water
  • 1/2 cup arrowroot powder
  • 1/4 tsp vanilla extract
  • 1/8 tsp sea salt
  • 3 tbsp grass-fed butter (coconut oil should work fine for dairy free option)

Instructions

  1. Preheat oven to 400
  2. Combine 4 yolks, sweetener and salt in a bowl and whisk until thick and lemon color (about 1-2 minutes)
  3. Whisk in the milk, water and vanilla. Add in the arrowroot and whisk until smooth
  4. In a separate bowl, beat the egg whites until stiff peaks form, but not dry
  5. Add the whites to the yolk mixture, gently whisk until the whites are incorporated, but not deflated. Light foam is what you want
  6. Melt 3 tbsp of butter in a 10 inch oven safe skillet (I prefer cast iron) over medium heat
  7. Once the bubbles have subsided, pour the batter into the skillet and cook until the bottom is golden (about 2 minutes)
  8. Place the skillet in the oven and bake until it puffs up and the top is golden and feels dry and set (about 5 minutes)
  9. Slide onto a plate and serve hot with grass-fed butter and syrup (we use Xylitol Maple Syrup to make these sugar free), fresh fruit sauce or warm preserves

Quick Notes:

I wanted to take the photo of the pancake in the skillet so I poured syrup on it immediately and it made the bottom carmelize a bit since it ran down the sides to the bottom of the hot pan.  We loved it and will always do that instead of placing it on a plate first

On the same page as this pancake recipe were a Dutch Pancake recipe and Austrian Pancakes recipe.  Austrian pancakes will be my next breakfast recipe this weekend and I will let you all decide which one you prefer.  They both use eggs as their base and use the skillet to oven technique, but do have different ingredients.  Can't wait to try these to see how they compare!!

Kate's Healthy Cupboard - Gluten Free Recipes
In Breakfasts, Recipes Tags Brunch, Dairy Free, Holiday, Nut-Free, Paleo, Primal
7 Comments

Sausage and Mushroom Frittata

January 14, 2013 Kate
Sausage and Mushroom Frittata

A frittata is an Italian omelet and is often confused for a quiche.  A frittata does not have a crust like most quiches do and it also starts on the stove and ends in the oven.  I find frittatas to be so easy, and like quiches, can be made with so many different ingredient combinations. Here is a basic frittata recipe that certainly has more than just a basic taste!  It will give you an idea of how to create whatever frittata you'd like!

A couple of things to consider as you create your ideal frittata recipe:

Typically you use two eggs per person and the total number of eggs determines the skillet size.  An eight egg frittata will be cooked in an eight in skillet and ten eggs cooked in a ten inch and so on.  If you prefer a thicker frittata, use a smaller skillet than number of eggs.  Make sure the skillet is oven safe, I prefer cast iron for this.

A frittata cooks fairly quickly and most raw ingredients won't have enough time to fully cook.  Saute vegetables and meat before adding the eggs.  This also allows for moisture to be drawn out of the vegetables.  Raw vegetables will release too much moisture and leave your frittata soggy.  This is why tomatoes are not a good option since they have a high water content when raw and cooked.

Add salt to the whisked eggs, not to the vegetables, salt draws out moisture.  Before you salt and pepper the eggs, consider your ingredients and their saltiness.  For instance, sausage, ham and bacon are salty, therefore you will not need as much salt as you would if you are making an all vegetable frittata.

Recipe: Sausage and Mushroom Frittata

Ingredients

  • 8 pastured eggs
  • 1/2 lb breakfast sausage*
  • 8oz sliced mushrooms
  • 1/2 an onion, diced
  • 1 tsp fennel seeds
  • couple dashes of paprika and garlic powder
  • salt and pepper
  • 1/2 - 3/4 cup cheese, grated or diced (optional)

Instructions

  1. Turn oven onto broil and position the racks in the bottom portion of the oven
  2. Whisk the eggs with salt and pepper (add cheese to mixture if desire), set aside
  3. Brown the sausage in an 8 inch skillet(or smaller for thicker frittata) and add in the onions and mushrooms
  4. Continue to saute until most of the moisture is cooked off, turn heat down to medium low
  5. Pour in the egg mixture and scrape the sides as the eggs cook
  6. Continue scraping as egg curds begin to form, you want the frittata to be cooked about half way through
  7. Once it’s cooked half way through, place the skillet under the broiler for about 3-5 minutes until it begins to brown
  8. Remove from heat and serve hot

Quick notes

*I used Whole Foods Ground Breakfast Pork Sausage. If you buy plain pork sausage, you will need to season it more since the one I used is already seasoned. You could certainly do bacon or ham instead.

Let us know what flavor combinations you come up with!!!

Kate's Healthy Cupboard - Gluten Free Recipes
In Breakfasts, Recipes Tags Breakfast, Brunch, Dairy Free, Low Carb, Mushrooms, Nut-Free, Paleo, Primal, Sausage
1 Comment

Apple Pie Cookie Bars

December 19, 2012 Kate
Apple Pie Cookie Bars

After making the Chocolate Peppermint Cookie Bars....I immediately thought about all of the other bar recipes I could create.  These Apple Pie Cookie Bars are perfect for this time of year!  I originally wanted to make a dairy free caramel sauce to drizzle over these, but I haven't perfected it yet and wanted to get this recipe out to you!  These are the perfect addition to your Holiday breakfast menu or dessert menu!!!

Apples can shrivel up when used in baking, such as in pies.  The type of apple can contribute to this, that is why I included Granny Smiths since they hold up well when baked. They also add a bit of tartness paired with a sweeter apple like the Fuji.  Feel free to use whatever variety you want or have on hand.

To help retain the apple's structure, I have pre-cooked the apples before placing them in the oven.  This allows the pectin to go to work and hold the apple's structure.  Pectin is like the mortar that holds the bricks (cellulose) together.  If either one of them is destroyed, the apple collapses, loses volume, and releases liquid. The lemon juice is added to the apples to keep them from turning brown.

Apple Pie Cookie Bars

Ingredients

Crust

  • 1 1/4 cups Honeyville Almond Flour
  • 1/2 cup grass-fed butter or coconut oil, melted (I used a mix of both)
  • 1/2 cup granulated sweetener (I used Swerve for a sugar free option)
  • 1 tsp vanilla extract
  • 1 tsp cinnamon
  • dash of sea salt

Topping

  • 3 small apples, peeled and diced (I used a mixture of Granny Smith for tart and Fuji for sweet)
  • 2 tsp sweetener (I used 1 tsp palm sugar and 1 tsp Swerve)
  • 1 tsp cinnamon
  • 1 tsp lemon juice

Instructions

  1. Place the diced apples in a saucepan with the cinnamon and the two teaspoons of sweetener, stir until apples are coated
  2. Cover the pan and cook over medium heat for about 8 minutes until apples are soft
  3. Remove from heat and place in a single layer on a piece of parchment paper to cool
  4. While the apples are cooling, combine the flour, sweetener, cinnamon and salt in a mixing bowl
  5. Mix the melted butter/oil with the vanilla and pour into the flour mixture, combine
  6. Pour the batter into a greased 8×8 pan and bake at 350 for 20 minutes
  7. While crust is baking, place apples in a bowl and mix in the lemon juice
  8. Once the crust is done, spread the apples on top of the crust and return it to the oven, bake for an additional 10 minutes
  9. Serve hot and store in the refrigerator

If I can perfect the caramel sauce, I will certainly share it!  In the meantime, these are fantastic just the way they are!!!

If you are an Amazon shopper, would you be so kind to use my affiliate link to make your purchases.  It is at no cost to you, it does provide a tiny kickback to Kate’s Healthy Cupboard.  This allows me to continue making and testing recipes for free.  Thanks so much!!

*I have recently switched all of my skincare and makeup to a company that is free of 1,500 chemicals!!  I am so particular about what goes into my body, I need to be just as picky as to what goes on my body!  Your skin is your largest organ and absorbs chemicals into the bloodstream faster than the gut does!  I am vain when it comes to my skin and was so thrilled to find products that are anti-aging and work!!!  Check out BeautyCounter for more info!!  You will love it!!

Kate's Healthy Cupboard - Gluten Free Recipes
In Breakfasts, Recipes, Desserts2 Tags Cookies, Holiday, Paleo, Primal, Swerve
Comment

Chocolate Peppermint Cookie Bars

December 5, 2012 Kate
Chocolate Peppermint Cookie Bars

This cookie recipe turned out better than I could have imagined!  I think I have become slightly addicted to them...hence eating them as part of my breakfast and lunch today!  They are basically sugar free, but still, it's time to give the rest away before I eat the entire pan!  'Tis the season!!!

The bottom of these remind me of an Oreo like cookie.  I made them to be more like a crust rather than a soft cookie.  If you prefer soft, even though I think the way they are is amazing, you could probably add an egg to the recipe and a bit of baking soda.  This has given me a couple of other ideas of bars to make, so expect another one this month!

As you can see the candy on top isn't a bright red like traditional peppermint candies.  Well, that's what happens when things are colored naturally and not with RED #40!  I found these candy canes at Whole Foods, yes they have cane sugar, but at least they don't have high fructose corn syrup and red dye!  You could certainly leave the candy off, but it does add some crunch and additional peppermint flavor.  The red, or should I say pink frosting color is also natural and I will share my trick below!  I have a special ingredient for green as well that will be revealed in my Sugar Cookie Recipe!!

Chocolate Peppermint Cookie Bars

Ingredients

Cookie

  • 1 cup Honeyville Almond Flour
  • 1/2 cup cocoa powder
  • 1/2 cup grass-fed butter or coconut oil, melted (I used a mixture)
  • 1/3-1/2 cup granulated sweetener (I used 1/2 cup Swerve for a sugar free option)
  • 1/2 tsp vanilla extract
  • 1/4 tsp sea salt

Frosting

  • 1 cup powdered sweetener* (I used Swerve Confectioners for sugar free option)
  • 2 tbsp coconut cream (the cream that rises to the top of a can of full fat coconut milk when it is refrigerated)
  • 2 tbsp full fat coconut milk (shake the remaining can of milk and use two additional tablespoons)
  • 2 tbsp grass-fed butter**
  • 1/2 tsp peppermint flavor
  • 1 small beet root
  • 4 natural candy canes, crushed (optional)

Instructions

Cookie

  1. Mix the melted butter/oil with the vanilla
  2. Combine the flour, cocoa, salt and sweetener
  3. Add the dry ingredients to the wet and stir until combined
  4. Press the batter into an 8×8 greased pan
  5. Bake at 350 for 25 minutes
  6. Let cool completely

Frosting

  1. Place the butter and sweetener in a pan on medium heat until butter starts to melt. Remove from heat and stir well
  2. Pour the mixture into a Vitamix or blender with the coconut cream, coconut milk and peppermint flavoring. Blend until smooth
  3. Peel the small beet root and place in a saucepan with about 2 tbsp water and cook over medium heat until the water is red.
  4. Pour some of the red water into your frosting and stir until desired color is reached.
  5. Place the frosting in the refrigerator to set if it’s runny
  6. Once the cookie has cooled, spread the frosting evenly and sprinkle the crushed candy over the wet frosting
  7. Place in the frig to let the frosting set.
  8. Store in the refrigerator (I think these taste best straight out of the refrigerator!)

Quick notes

*You can powder any sweetener by placing it in a coffee grinder or in a blender. The frosting will be grainy if you skip this step and that may not bother you.

**You may be able to use 2 additional tablespoons of coconut cream instead of butter in thefrosting.  I haven’t tried it but it should work.  It may just make it more coconuty and more peppermint extract may be needed.

Variations

For those that do not like peppermint, try any other flavor extract or simply use vanilla.  Add 1/4 tsp to start in case it’s a stronger extract.

Snow is headed our direction and I think these would be delicious served with some Dairy Free Hot Chocolate!!!

Happy Holidays!

KATE-SIGNATURE small.png
Affiliate Banners_Generic_728x90-1.jpg


*I have recently switched all of my skincare and makeup to a company that is free of 1,500 chemicals!!  I am so particular about what goes into my body, I need to be just as picky as to what goes on my body!  Your skin is your largest organ and absorbs chemicals into the bloodstream faster than the gut does!  I am vain when it comes to my skin and was so thrilled to find products that are anti-aging and work!!!  Check out BeautyCounter for more info!!  You will love it!!

In Breakfasts, Recipes Tags Almond flour, Coconut Milk, Cookies, Desserts, Egg-Free, Holiday, Swerve
15 Comments

Breakfast Meatza Pizza

December 3, 2012 Kate
Breakfast Meatza
Breakfast Meatza

I decided to throw this Breakfast Meatza Pizza together for Sunday Brunch over the Thanksgiving Weekend.  Looking at what it has in it, how could you go wrong regardless of what it looked like as a finished product!  I mean bacon, eggs, sausage, avocado, who wouldn't like it!  This breakfast pizza was a hit and who says it can only be eaten for breakfast!  It tastes just as good the next day for leftovers and is the perfect on the go meal!!!

Sausage Recipe inspired by Make It Paleo

Recipe: Breakfast Meatza

Serves: 4

Ingredients

Crust:

  • 1 lb pork sausage*
  • 1 egg
  • 1 tsp garlic powder or two garlic cloves, minced
  • 2 tsp fennel seeds
  • 1 tsp paprika
  • 1/2 tsp sage
  • 1/4 tsp pepper
  • 1/2 tsp sea salt
  • 1/2 tsp red pepper flakes
  • 1/4 tsp cayenne pepper (optional for spicy)

Toppings

  • 4 eggs
  • 2 pieces bacon
  • 1 avocado, sliced
  • 8 oz mushrooms, sliced
  • 1/4 cup onions, diced
  • 1 garlic clove, minced
  • sea salt and pepper

Instructions

  1. In a mixing bowl, combine the crust ingredients and mix well
  2. Press the sausage mixture onto a pizza pan, cast iron pan or on a cookie sheet.
  3. Bake at 425 for 20-25 minutes
  4. Place the bacon in a skillet and cook until just slightly under cooked. Remove from pan and set aside
  5. Place the mushrooms, onions and garlic in the pan with bacon grease and saute over medium heat until tender
  6. Once the crust is done, remove it from the oven and crack the 4 eggs onto it.
  7. Place the mushroom mixture, avocado and bacon pieces onto the pizza and sprinkle with salt and pepper
  8. Return to the oven and bake for 10 minutes longer

Quick notes

The yolks will be slightly under cooked. If you prefer runny yolks, reduce the time or add time if you prefer yolks that are cooked all the way through.

Variations

*This could certainly be made with any other ground meat, the sausage is just the perfect breakfast meat!

If you can tolerate cheese, certainly add some to the toppings!


Get creative, there are so many options for toppings!

Kate's Healthy Cupboard - Gluten Free Recipes
In Breakfasts, Recipes Tags Breakfast, Brunch, Low Carb, Nut-Free, Paleo, Primal, Sausage
6 Comments

Cinnamon Apple Granola

November 27, 2012 Kate
Cinnamon Apple Granola

I have been sitting on this recipe for quite some time.  It is one of my favorite granola recipes, but I get hesitant to share my recipes that I use a dehydrator.  I know only a few of you have one and this can certainly be done in the oven, but the dehydrator always tastes best.

This is the perfect flavor for this time a year and can be enjoyed plain or with milk!  The added protein powder makes this the perfect high fat and moderate protein breakfast!!!  You may also like to try my other grain free granola recipes, Almond Nut Joy, Banana Nut and Pumpkin Spice.

Maybe a dehydrator should be on your holiday wish list!!!  The Nesco that I have is very reasonably priced.

Cinnamon Apple Granola

Ingredients

  • 2 1/2 cups raw nuts, chopped (I used almonds and walnuts)
  • 1 apple, diced
  • 1/3 cup almond flour
  • 1/4 cup vanilla protein powder* (I used Jay Robb’s Vanilla Egg White Protein)
  • 2 1/2 tsp cinnamon
  • 1 tsp lucuma powder, optional
  • 1/2 cup apple sauce
  • 1/4 cup honey
  • 2 tbsp almond butter
  • 1/2 tsp vanilla extract
  • couple dashes of sea salt

Instructions

  1. Combine the chopped nuts, apple pieces, protein powder, almond flour, lucuma, cinnamon and salt in a bowl and mix well
  2. In a separate bowl, combine the apple sauce, almond butter, honey and vanilla
  3. Combine the two bowls and stir until all the dry ingredients are coated
  4. Place on dehydrator sheets in clumps and dehydrate at 145 for 2 hours, then turn down to 115 until desired crunch is obtained. I left it in there for 24 hrs.
  5. For oven method, place on a parchment lined cookie sheet and bake at 175-200 until desired crunch is obtained. Stir every so often to cook evenly

Quick notes

*Substitute the protein powder for an additional 1/4 cup almond flour.

I used Nature’s Hollow Xylitol Honey for a lower sugar option.


For those of you that try this in the oven, let us all know how it turned out!

Kate's Healthy Cupboard - Gluten Free Recipes
In Breakfasts, Recipes, Snacks and Appetizers2 Tags Almond Butter, Almond flour, Almonds, Breakfast, Dairy Free, Egg White Protein, Egg-Free, Granola, Holiday
8 Comments

Cranberry Pecan Muffins

November 19, 2012 Kate
Cranberry Pecan Muffins

Looking for something sweet to make for your Thanksgiving breakfast?  These muffins are the perfect combination of tart with a bit of sweetness.  I saw this muffin recipe from Cook's Illustrated...made with tons of gluten of course...and I was up for the challenge to make it grain free.  It worked and needless to say, two batches were gone in a matter of days around here!  The crumbly topping turns crisp once they are cooked and adds so much flavor along with the ground up pecans that make up some of the batter!

Grian Free Cranberry Pecan Muffins

Ingredients

Topping:

  • 1/4 cup pecans
  • 1 tbsp almond flour
  • 1 1/2 – 2 1/2 tbsp granulated sweetener (I used 2 tbsp Swerve plus 1/2 tbsp coconut palm sugar to help it get crisp and add a brown sugar taste to it)
  • 1 tbsp cold grass-fed butter*

Muffins:

  • 1 1/3 cups almond flour
  • 3/4 cup raw pecans, roasted
  • 2 eggs
  • 1/3 – 1/2 cup granulated sweetener (I used 1/2 cup Swerve to reduce sugar amount)
  • 3 tbsp grass-fed butter or coconut oil, melted and cooled
  • 1 tsp lemon juice
  • 1/2 tsp baking soda
  • 1/4 tsp sea salt
  • 1 cup fresh cranberries
  • 1/2 tbsp additional sweetener (I used Swerve)

Instructions

  1. Preheat oven to 350 so it’s ready to go. When combining an acid (lemon juice) with baking soda as a leavening agent, you need to get the item in the oven as soon as you mix those two ingredients together.
  2. In a dry skillet, roast the pecans. Remove from heat and place single layer in freezer for later. This is important or pecans will turn to butter if you try to food process them when they are warm
  3. In a Food Processor, combine all of the topping ingredients and pulse a few times until the mixture looks like coarse sand.  Pour into bowl and set aside
  4. In a large mixing bowl, combine the almond flour, sweetener, salt and soda, set aside
  5. In a small mixing bowl, whisk the eggs with the butter or oil and lemon juice, set aside
  6. Place the pecans in the Food Processor and pulse until it looks like coarse sand. It may look a bit wet, that’s ok, just don’t let it turn to pecan butter
  7. Add the pecans to the flour mixture and set aside
  8. Place the cranberries and additional sweetener in the Food Processor
    and pulse until the cranberries are in small pieces
  9. Make sure your muffin pan is lined and ready to go as you start to combine the wet with the dry ingredients
  10. Pour the egg mixture into the flour mixture and combine. Fold in the cranberries
  11. Spoon batter into muffin tins, you should get 9-10 muffins
  12. Place a spoonful of the topping onto each muffin, spread it out and press down a bit
  13. Bake for 25-28 minutes until a hint of brown on top

Quick notes

*Coconut oil would work, but butter is what gives it the brownie and crispiness as well.


These are so good they could be served for dessert!!!

If you want to try Swerve or need to order more, use coupon code KATE10 for a 10% discount.  Swerve is my favorite sugar replacement.  It is the only sugar alcohol that will not cause tummy troubles and it does not raise blood glucose levels.

If you are an Amazon shopper, would you be so kind to use my affiliate link to make your purchases.  It is at no cost to you, it does provide a tiny kickback to Kate’s Healthy Cupboard.  This allows me to continue making and testing recipes for free.  Thanks so much!!

*I have recently switched all of my skincare and makeup to a company that is free of 1,500 chemicals!!  I am so particular about what goes into my body, I need to be just as picky as to what goes on my body!  Your skin is your largest organ and absorbs chemicals into the bloodstream faster than the gut does!  I am vain when it comes to my skin and was so thrilled to find products that are anti-aging and work!!!  Check out BeautyCounter for more info!!  You will love it!!

Kate's Healthy Cupboard - Gluten Free Recipes
In Breads and Muffins, Breakfasts, Recipes, Desserts2 Tags Brunch, muffins, Paleo, Pecans, Primal, Thanksgiving
4 Comments

Grain Free Pumpkin Bars

November 14, 2012 Kate
wdd150
wdd150

Today is World Diabetes Day and the month of November is Diabetes Awareness month.  I was asked to partake in a food bloggers event today that Carolyn from All Day I Dream About Food is hosting.  She is doing a giveaway for a Kitchen-Aid Mixer.  Head over to her page to enter to win and check out all of her low carb recipes while you are there!!!

Did you know that Type 2 Diabetes is no longer known as adult on-set, we are seeing so many cases in young children!  This is just one more reason for you and your family to eat a low starch/sugar diet.  At the end of the day, carbs are sugar...yes that includes fruits, sweet potatoes, etc.  This is why I try to create recipes that are low starch and make going grain free that much easier.  I have a sweet tooth so I also always give the option for a natural sugar replacement (my favorite that does not raise blood sugar levels is Swerve...and it's on sale the entire month of November)!  There are essential amino acids (from proteins) and essential fatty acids that the body must have, but there is no carbohydrate that is essential!  "What about fruit, it has so many nutrients?"  I hear this often!  There is a vegetable out there that can provide the same amount or more of the same nutrients without raising insulin levels.  We just don't need them to thrive and survive!

Grain Free Pumpkin Bars

I was asked to make my Pumpkin Butter Truffles for a family dinner this past weekend.  I had some pumpkin leftover and a desire to bake leftover as well.  I threw together this recipe and hoped for a delicious result as I stuck them in the oven.  The batter tasted fantastic, so I knew they would taste good, but just didn't know if they would rise, fall or something in between!  The result...huge hit!!!  These are so moist and not to sweet.

Grain Free Pumpkin Bars

Ingredients

  • 2/3 cup Honeyville Almond Flour
  • 1/2 cup pumpkin
  • 2 eggs
  • 3/4 cup almond butter (I use the roasted self grind at Whole Foods)
  • 1/2 cup Swerve (Palm sugar* works here if you prefer or a combo of both)
  • 1 -2 tsp pumpkin spice to taste
  • 1/4 tsp cinnamon
  • 1/8 tsp sea salt
  • 1/2 tsp soda

Instructions

  1. Place the pumpkin, eggs, spice and almond butter in a food processor and blend for 1 minute
  2. Add the remaining ingredients and pulse until combined
  3. Pour the batter into a 9×9 greased pan
  4. Bake at 350 for 25-30 minutes

Quick Notes

Palm sugar is not necessarily diabetic friendly so use sparingly!

Enjoy!  Don't forget to go register to win the Kitchen Aid Mixer!!!

If you want to try Swerve or need to order more, use coupon code KATE10 for a 10% discount.  Swerve is my favorite sugar replacement.  It is the only sugar alcohol that will not cause tummy troubles and it does not raise blood glucose levels.

If you are an Amazon shopper, would you be so kind to use my affiliate link to make your purchases.  It is at no cost to you, it does provide a tiny kickback to Kate’s Healthy Cupboard.  This allows me to continue making and testing recipes for free.  Thanks so much!!

*I have recently switched all of my skincare and makeup to a company that is free of 1,500 chemicals!!  I am so particular about what goes into my body, I need to be just as picky as to what goes on my body!  Your skin is your largest organ and absorbs chemicals into the bloodstream faster than the gut does!  I am vain when it comes to my skin and was so thrilled to find products that are anti-aging and work!!!  Check out BeautyCounter for more info!!  You will love it!!

Kate's Healthy Cupboard - Gluten Free Recipes
In Breads and Muffins, Breakfasts, Recipes, Desserts2 Tags Almond flour, Holiday, Paleo, Primal, Pumpkin, Swerve, Thanksgiving
16 Comments

Pumpkin Spice Cream of "Wheat"

October 24, 2012 Kate
Pumpkin Spice Cream of Wheat

One of the most common complaints I hear from clients is, "what can I eat for breakfast now that I can't have cereal, a bagel or pancakes.  I can't eat eggs everyday!"  I can rattle off numerous things other than starchy high carb foods...and something besides eggs.  Too many of us have gotten in the mindset that breakfast has to be a "breakfast" food, and that is not the case.  Get creative and don't hesitate to eat leftovers from the previous nights dinner.  I personally love my protein smoothie that's full of fat and spinach (you wouldn't know it's in there if the shake wasn't green!) that I make every morning and look forward to it everyday...and it doesn't even have fruit in it!!!

I am on a mission to create some low starch breakfast options that will make you think you're getting the carbs you are so used to eating.  The best part is, you won't be hungry an hour later!  There are numerous breakfast recipes on my site that are higher in fat, lower in starch and supply a good amount of protein.  Some of my favorites include:  Coconut Pancakes and Strawberry Syrup, Banana Bread French Toast, Egg Muffins,Banana Pancakes,Grain Free Thin Pancakes, Almond Nut Joy Granola,Grain Free Banana Nut Granola and Pumpkin Spice Granola.  And for all of you cold cereal people, I'm working on a recipe, but the bad news is, it has to be done in a dehydrator.  I tried it in the oven and it just doesn't work.  When it comes to granolas, my cookie bites and some cracker recipes, a dehydrator is so worth it!!!

I recently had the idea of making a hot cereal, but didn't want it to be an entire bowl of mushed nuts.  I somehow wanted to incorporate mashed cauliflower with protein in the form of powder.  About a month ago, I came across this recipe for Faux "Oat" Meal and loved how she used real eggs for the protein!  You would never guess that eggs or cauliflower were in this cream of "wheat" recipe!  I did things a little differently and loved what I came up with!  There are many flavor options for those of you that don't like pumpkin.

Pumpkin Spice Cream of “Wheat”

Serves: 2-3

Ingredients

  • 1 medium head of cauliflower, steamed
  • 4 eggs
  • 1 1/4 cups non-dairy milk (I love So Delicious unsweetened vanilla)
  • 4 tbsp coconut cream (The cream that rises to the top of a can of full fat coconut milk that has been refrigerated)
  • 1/4 cup pumpkin
  • 1/2 tsp maple flavor (vanilla should work too)
  • 1-3 tbsp sweetener (I used 3 tbsp of Swerve which is erythritol.)
  • 1 tsp cinnamon
  • 1/2 tsp ground ginger
  • 1/2 tsp ground cloves
  • 1/2 tsp nutmeg
  • couple dashes of salt
  • grass-fed butter (optional)

Instructions

  1. Place the steamed cauliflower in a food processor and pulse until it’s “riced”
  2. Whisk the 4 eggs in a large mixing bowl and set aside
  3. In a medium sized saucepan, combine the milk, cream, pumpkin and cauliflower and slowly bring to a boil. Reduce heat to a simmer and cook for 1-2 minutes
  4. Remove the pan from heat and add a 1/4 cup at a time to the eggs, whisking the entire time you add the hot mixture. The eggs will start to cook if you aren’t careful. This process makes the eggs safe to eat for those concerned with eating raw eggs
  5. Pour the mixture back in to the food processor, add the maple extract, spices, salt and sweetener and pulse until well combined
  6. Serve hot with a dollop of grassfed butter (optional)

Quick notes

Since all cauliflower heads are different sizes, you may want to add milk if it seems to thick or add some almond flour to thicken it up.

Variations

Serve with nuts, coconut or fresh fruit on top. Another variation would be to replace the pumpkin with applesauce and just use cinnamon for the spice.  You could also add just cocoa powder or simply leave it as a maple nut version.


I still think adding a vanilla protein powder would work just fine in place of the eggs.  Add it at the time you would add in the spices.

Kate's Healthy Cupboard - Gluten Free Recipes
In Breakfasts, Vegetables, Recipes Tags Breakfast, Coconut Milk, Holiday, Nut-Free, Paleo, Pumpkin
7 Comments

Pumpkin Spice Scones

October 15, 2012 Kate
Pumpkin Spice Scones

It's that time of year when people get all excited about Pumpkin Lattes and Pumpkin Scones from Starbucks!  I have to say I have not tried either one, not a coffee person and have been gluten free for years so the scone was never an option.

What is a scone?  They originated in Britain and are thought of as individual light quick breads, made with a small proportion of butter and a high proportion of raising agent. Some may include dried fruit or chocolate chips. Traditionally they were served with butter or cream along side a morning or afternoon tea.  My recipe does not include butter or oil, the pumpkin takes the place of that.  You will also notice that I use 1 tsp of baking soda (rising agent) which is about double what I would use in a typical baked good.

I'm not tying to recreate the Starbuck's Scone, but here is a recipe that I think you will enjoy!  I made a maple almond butter drizzle for the top of mine, but you could simply enjoy these warm with grass-fed butter.

Pumpkin Spice Scones

Ingredients

  • 1 1/2 cups almond flour (I used Honeyville*)
  • 1/2 cup coconut flour
  • 1/3-1/2 cup granulated sweetener (coconut palm sugar)* (I used 1/2 cup erythritol for low sugar option)
  • 2 eggs
  • 1/3 cup canned pumpkin (makes sure it’s not puree or these will be too moist)
  • 1 1/2 tsp cinnamon (measure all spices as heaping)
  • 1/2 tsp nutmeg
  • 1/4 tsp ginger
  • 1/4 tsp cloves
  • 1 tsp soda
  • 1 tsp vanilla
  • 1/4 tsp sea salt
  • 1/4 cup nuts or chocolate chips (optional)

Instructions

  1. With a handheld mixer, beat the eggs, sugar and pumpkin. Stir in the vanilla after.
  2. In a mixing bowl, combine the flours, spices, salt and soda
  3. Combine the two bowls and mix well. Make sure the coconut flour is mixed in, it tends to clump
  4. Fold in the nuts or chocolate chips
  5. Dough should be stiff enough to form into two equal balls. Place on a parchment lined cookie sheet
  6. Form into two round loaves about 3/4 to 1 inch in thickness
  7. Cut each loaf into 4 pieces and separate the pieces so they cook evenly
  8. Bake at 350 for 20 minutes or until browned
  9. Remove from heat and place on a wire cooling rack so they can dry out. Scones should not be real moist

Quick notes

*I suggest using Honeyville, Bob’s may make these too moist.  They’ll still be good but not scone like.

*If you want to use less sugar, increase the almond flour amount by the amount of sugar you leave out.

I have found that baked goods that have coconut flour in them are better once they have been refrigerated. Coconut flour absorbs moisture and needs time to set in recipes. I have heard that the cold will condense some moisture onto the baked good. Whatever it is, I suggest doing it!!! Store baked goods in an airtight container,

Variations

For the glaze, I put almond butter, some maple syrup (I used Xylitol Maple Syrup for low sugar option) and a bit of unsweetened vanilla coconut milk (to thin it out) into a blender. Pour the mixture into a small ziploc bag and cut a very small hole in the corner of the bag. This makes drizzling easy and pretty!

If you are an Amazon shopper, would you be so kind to use my affiliate link to make your purchases.  It is at no cost to you, it does provide a tiny kickback to Kate’s Healthy Cupboard.  This allows me to continue making and testing recipes for free.  Thanks so much!!

*I have recently switched all of my skincare and makeup to a company that is free of 1,500 chemicals!!  I am so particular about what goes into my body, I need to be just as picky as to what goes on my body!  Your skin is your largest organ and absorbs chemicals into the bloodstream faster than the gut does!  I am vain when it comes to my skin and was so thrilled to find products that are anti-aging and work!!!  Check out BeautyCounter for more info!!  You will love it!!

Kate's Healthy Cupboard - Gluten Free Recipes
In Breads and Muffins, Breakfasts, Recipes, Desserts2 Tags Coconut Flour, Holiday, Paleo, Primal, Pumpkin, Thanksgiving
Comment

Cinnamon Maple Coconut Bites

October 5, 2012 Kate
Cinnamon Maple Coconut Bites

Tiss the season for lots of cinnamon...and pumpkin spices!  Here is another easy recipe for a quick sweet treat similar to my Coconut Vanilla Bean Dough Bites Recipe and the Coconut Brownie Bites Recipe.  I used a dehydrator, but it's not necessary.  If you have been thinking of buying one though, I'd bite the bullet and do it, so worth it!!

Cinnamon has some amazing health benefits so why not incorporate it into your day!  A few of those benefits include:  regulates blood sugar, reduces LDL cholesterol levels, has natural anti-infectious compounds, reduces pain linked to arthritis, may reduce the proliferation of cancer cells, serves as a natural food preservative, contains fiber, calcium, iron, and manganese, can be effective for menstrual pain and infertility.  Wow, I might have to make more of these bites or another batch of my Apple Cinnamon Upside Down Cakes!

Cinnamon Maple Coconut Bites

Ingredients

  • 1 1//2 cups unsweetened shredded coconut
  • 1/4 cup vanilla protein powder (I used Jay Robb’s Vanilla Egg White Protein), sub for almond flour if you prefer
  • 1 tbsp coconut oil
  • 3-4 tbsp maple syrup*
  • 1/2 tsp vanilla extract
  • 1 tbsp lucuma powder (optional)
  • 2 tsp cinnamon
  • dash of sea salt

Instructions

  1. Pour the coconut into a food processor and blend until small pieces are produced
  2. Add all of the remaining ingredients and blend well.
  3. Using a small cookie scoop, place each bite onto dehydrator sheets
  4. Dehydrate at 125 for 2-4 hours depending on how soft you want them
  5. Oven option: Set temp to lowest possible setting or use dehydrator setting. Bake for 1-2 hours depending on heat setting

Quick Notes

*I used Xylitol Maple Syrup as a reduced sugar option.

*For more information on Lucuma, read this post

I like to reheat mine each time I treat myself to one or two or maybe three!!  Store in an airtight container.

Kate's Healthy Cupboard - Gluten Free Recipes
In Breakfasts, Recipes, Snacks and Appetizers2 Tags coconut, Dehydrated, Desserts, Egg White Protein, Nut-Free, Paleo, Primal, Vegan
3 Comments

Grain Free Pumpkin Spice Granola

September 21, 2012 Kate
Pumpkin Spice Granola

Happy Fall!!  Tomorrow is the first day of fall so bring on the pumpkin!

I think one of the biggest concerns for people going grain free is, "what will I eat for breakfast?" We have been so trained to eat cereals, toast, pancakes and waffles with an occasional egg for breakfast, carbs and more carbs!  If you are missing your morning cereal, here's the solution!  This granola recipe along with my other granola recipes (Banana Nut Granola and Almond Nut Joy Granola) are the perfect high fat and moderate protein breakfast!  Enjoy them with unsweetened almond or coconut milk or on top of greek yogurt, if you tolerate dairy or just plain.

If you would prefer to make soft cookies out of this recipe as opposed to crunchy granola, that is an option.  I personally like the granola best for the crunch, the cookies are soft and I prefer my nuts crunchy.  Dehydration is recommended but certainly not required.  If you have been thinking of getting a dehydrator, the one I have is very reasonable and so worth it!  I have quite a few recipes that I use it for including, beef jerky, cookies and crackers.  So if you have been contemplating, get it!!!

Grain Free Pumpkin Spiced Granola

Ingredients

  • 2 1/2 cups raw nuts, chopped (I used almonds, pecans and walnuts)
  • 1/3 cup pumpkin seeds
  • 3/4 cup coconut chips (optional, replace with nuts or it may be too soupy)
  • 2/3 cup almond flour
  • 1/4 cup vanilla protein powder (optional or add more flour. I usedJay Robb’s Vanilla Egg White Protein)
  • 1 tsp lucuma (optional)
  • 1/2 tsp vanilla
  • 1/4 cup maple syrup, honey or coconut nectar*
  • 1/2 cup pumpkin puree
  • 1/8 cup almond butter
  • 11/2 -2 tsp cinnamon
  • 1/2 tsp ginger
  • 1/2 tsp cloves
  • 1/2 tsp nutmeg
  • couple dashes of sea salt

Instructions

  1. Combine the chopped nuts, seeds, coconut, protein powder, almond flour, lucuma and all the spices and salt in a bowl and mix well
  2. In a separate bowl, combine the pumpkin puree, almond butter, liquid sweetener and vanilla
  3. Combine the two bowls and stir until all the dry ingredients are coated
  4. Place on dehydrator sheets in clumps and dehydrate at 145 for 2 hours, then turn down to 115 until desired crunch is obtained. I left it in there for 24 hrs.
  5. For oven method, place on a parchment lined cookie sheet and bake at 175-200 until desired crunch is obtained. Stir every so often to cook evenly

Quick notes

* I used Xylitol Maple Syrup which is far less sweet than regular syrup and honey. I added 1/4 cup of erythritol as well. If you want it sweeter, make sure to add a granulated sweetener, not more liquid. It will make the granola too soupy.

Variations

If you prefer a soft cookie instead of crunchy granola, spoon out the “dough” onto a parchment lined cookie sheet and bake at 200 for 2 hours

Kate's Healthy Cupboard - Gluten Free Recipes
In Breakfasts, Recipes, Desserts2 Tags Almond Butter, Almond flour, Almonds, Breakfast, Egg White Protein, Paleo, Primal
Comment

Apple Cinnamon Upside Down Cakes

September 12, 2012 Kate
Cinnamon Apple Upside Down Cakes

A few months ago I posted a recipe for Cherry Almond Upside Down Cakes...well it's time for a fall version!  I first thought about trying to do this with pumpkin and pecans, but decided I just can't go wrong with apples and cinnamon.  The recipes are very similar and super easy!!  These have been a huge hit around here and do not last long after they come out of the oven!  I suggest adding a scoop of my Dairy Free Vanilla Bean Ice Cream to the top of them while they are warm...yum!

Apple Cinnamon Upside Down Cakes

Makes 6 large cakes

Ingredients

Cakes:

  • 1 1/4 cups almond flour*
  • 2 eggs
  • 1/4 cup grass-fed butter or coconut oil, melted
  • 1/4 cup honey (I used Xylitol honey for lower sugar, or Swerve would also work)
  • 1 tbsp vanilla extract
  • 1/4 tsp sea salt
  • 1/4 tsp baking soda
  • 1 tsp cinnamon
  • dash of nutmeg

Topping:

  • 3/4 cup apples, skinned and diced (1 apple)
  • 1 tbsp grass-fed butter or coconut oil
  • 1 tsp cinnamon
  • 1 tsp coconut palm sugar or try Swerve

Instructions

  1. Combine diced apples, 1 tbsp butter/oil, 1 tsp cinnamon and 1 tsp coconut palm sugar in a bowl and mix well
  2. In a different bowl, whisk the eggs, melted butter/oil, 1/4 cup honey and the vanilla extract
  3. In another bowl, combine the flour, salt, 1 tsp cinnamon, nutmeg and soda
  4. Add the dry ingredients into the bowl of egg mixture and stir until combined
  5. Pour the apple mixture into the bottom of 6 holes of a greased muffin tin.
  6. Pour the batter over the apple mixture, it will come close to the top
  7. Bake at 350 for 20 minutes or until brown
  8. Remove from the tins with a big spoon.

Quick notes

*I used Honeyville Almond Flour. these are already pretty moist so Bob’s Red Mill may make them REALLY moist but still delicious!


Let me know which one you like better, the apple or the cherry.  I can't decide, they are both pretty darn good!

If you want to try Swerve or need to order more, use coupon code KATE10 for a 10% discount.  Swerve is my favorite sugar replacement.  It is the only sugar alcohol that will not cause tummy troubles and it does not raise blood glucose levels.

If you are an Amazon shopper, would you be so kind to use my affiliate link to make your purchases.  It is at no cost to you, it does provide a tiny kickback to Kate’s Healthy Cupboard.  This allows me to continue making and testing recipes for free.  Thanks so much!!

Kate's Healthy Cupboard - Gluten Free Recipes
In Breads and Muffins, Breakfasts, Recipes, Desserts2 Tags Almond flour, Breakfast, Brunch, Paleo, Primal, Swerve
15 Comments

Grain Free Coconut Sweet Bread

July 30, 2012 Kate
Coconut Sweet Bread
Coconut Sweet Bread

As many of you know, a good grain free bread recipe is hard to find!  Elana from Elana's Pantry has a few grain free recipes as well as Against all Grains that use nut butter for their base.  I wanted to create something with minimal amounts of nuts.  Using coconut as my filler, this came out GREAT!!!  Coconut is a bit sweet so I went towards a sweeter bread.  It probably turned out sweeter than I plained, but there was no complaining by anyone!!!  Feel free to decrease the sweetener or leave it out completely.  This bread comes out super moist and would be a real treat with some melted grass-fed butter on top!!!

Recipe: Coconut Sweet Bread
Ingredients
  • 1/2 cup coconut flour
  • 1/4 cup almond flour
  • 1/2 cup shredded coconut
  • 1/4 - 1/2 cup granulated sweetener such as coconut palm sugar (I used 1/2 cup Swerve for low sugar option)
  • 1/2 tsp baking soda
  • 1/4 tsp sea salt
  • 3 eggs
  • 3/4 cup full fat canned coconut milk
  • 1 1//2 tsp vanilla extract
  • 1/2 tsp apple cider vinegar
Instructions
  1. Combine the first 6 dry ingredients in a large mixing bowl. Use a fork to get rid of the clumps from the coconut flour
  2. In a small bowl, whisk the eggs, coconut milk, vanilla and vinegar
  3. Combine the two bowls and stir until well combined and smooth
  4. Pour the batter into a greased bread pan
  5. Bake at 350 for 45 minutes
Quick notes

Baking soda and vinegar is what is the rising agent in this. They begin to act as soon as they are combined and you will want to get the bread in the oven as soon as you pour the batter into pan. Make sure your oven is preheated and ready to go!!

Enjoy!!!

If you want to try Swerve or need to order more, use coupon code KATE10 for a 10% discount.  Swerve is my favorite sugar replacement.  It is the only sugar alcohol that will not cause tummy troubles and it does not raise blood glucose levels.

If you are an Amazon shopper, would you be so kind to use my affiliate link to make your purchases.  It is at no cost to you, it does provide a tiny kickback to Kate’s Healthy Cupboard.  This allows me to continue making and testing recipes for free.  Thanks so much!!

*I have recently switched all of my skincare and makeup to a company that is free of 1,500 chemicals!!  I am so particular about what goes into my body, I need to be just as picky as to what goes on my body!  Your skin is your largest organ and absorbs chemicals into the bloodstream faster than the gut does!  I am vain when it comes to my skin and was so thrilled to find products that are anti-aging and work!!!  Check out BeautyCounter for more info!!  You will love it!!

Kate's Healthy Cupboard - Gluten Free Recipes
In Breads and Muffins, Breakfasts, Recipes Tags coconut, Coconut Flour, Coconut Milk, Paleo, Primal, Swerve
2 Comments

Cherry Almond Upside Down Cakes

July 12, 2012 Kate
Cherry Almond Upside Down Cake

It's cherry season and I can't get enough of them!  The season seems to go by way too fast, so I am enjoying plenty of them while I can!  I need to get creative and think of some more recipes to incorporate fresh cherries in.  If you haven't tried it yet, my Dairy Free Cherry Chocolate Chip Ice Cream would be great made with fresh cherries!

Cherries are full of beneficial nutrients.  They have anti-inflammatory benefits, which can help with arthritis and many risk factors associated with heart disease.  They contain Anthocyanin, a nutrient that is beneficial for the brain and can improve memory.  Cherries are also high in beta carotene, containing 19 times more than blueberries or strawberries.  Trouble sleeping, cherries contain melatonin, a hormone that regulates the body's sleep cycles.  That's just a few reasons, but enough for me to keep indulging in them!

This recipe was inspired by a similar upside down cake recipe, but I can not remember where I saw it.  From what I remember, it used cranberries, lemon zest, orange zest, cinnamon and spices.  I think that sounds great for the fall, but for now, cherries are a must!  I don't think I have ever had upside down cake before.   I know pineapple is typically what you hear of, but I guess I have never been tempted by it.  After trying these, I'm thinking anything you pour this batter over and call an upside down cake would be fantastic!  I'm trying to think of a way to do something chocolatey and nutty...stay tuned!!!

Recipe: Cherry Almond Upside Down Cakes

Makes 6 Large Cakes

Ingredients
  • 1 1/4 cups Honeyville almond flour (Bob's may work, but these are already really moist)
  • 3/4 cup cherries, pitted and diced
  • 1/4 cup plus 2 tbsp honey (1/4-1/2 cup Swerve can be used)
  • 1/4 cup grass-fed butter or coconut oil, melted (used refined so there's no coconut flavor)
  • 2 eggs
  • 1/4 tsp vanilla bean powder (2-3 beans)
  • 2 tsp almond extract
  • 1/4 tsp celtic sea salt
  • 1/4 tsp baking soda
Instructions
  1. Combine diced cherries, 2 tbsp honey and 1/8 tsp of the vanilla beans in a bowl and mix well
  2. In a different bowl, whisk the eggs, melted butter/oil, 1/4 cup honey and the almond extract
  3. In another bowl, combine the flour, salt, 1/8 tsp vanilla beans and soda
  4. Add the dry ingredients into the bowl of egg mixture and stir until combined
  5. Pour the cherry mixture into the bottom of 6 holes of a greased muffin tin.
  6. Pour the batter over the cherry mixture, it will come close to the top
  7. Bake at 350 for 20 minutes or until brown
  8. Remove from the tins with a big spoon.
Quick notes

I used Xylitol honey which is a bit less sweet than regular honey, so I added a tbsp of erythritol to the batter too.

These can be served warm or are just as good the next day or two.  They reminded us of strawberry shortcakes with how moist they are.  They would be even more delicious right out of the oven with a dollop of Dairy Free Vanilla Bean Ice Cream!!!

If you want to try Swerve or need to order more, use coupon code KATE10 for a 10% discount.  Swerve is my favorite sugar replacement.  It is the only sugar alcohol that will not cause tummy troubles and it does not raise blood glucose levels.

If you are an Amazon shopper, would you be so kind to use my affiliate link to make your purchases.  It is at no cost to you, it does provide a tiny kickback to Kate’s Healthy Cupboard.  This allows me to continue making and testing recipes for free.  Thanks so much!!

Kate's Healthy Cupboard - Gluten Free Recipes
In Breads and Muffins, Breakfasts, Recipes, Desserts2 Tags Almond flour, Cherries, Paleo, Primal
10 Comments

Perfect Hard Boiled Eggs

April 13, 2012 Kate
Hard Boiled Eggs
Hard Boiled Eggs

This may not be a very exciting post for most of you, but it is for me!  I get excited when food not only tastes good, but looks good!

I was not thrilled with the way my eggs looked in the Avocado Deviled Egg recipe, so I had some homework to do!  I want an egg that is fairly easy to peel and the yolk must show no signs of over cooking (gray edges).  I have read a few people's thoughts on how to boil the perfect egg and below is what worked for me.

Some people suggested using older eggs, I used new.  Maybe older would have worked even better, but this method should work either way.  Please keep in mind altitude may play a role.  Water boils faster at higher altitudes but takes longer to cook.  The water doesn't get as hot when it boils here compared to lower altitudes.  With that said, the time may need to be adjusted slightly.  I will try this method next time I'm in AZ and update this post as to what the results were.

Recipe: Perfect Hard Boiled EggsIngredients
  • 6-12 eggs, (pastured are the best for you)
  • 1/2 tsp baking soda
Instructions
  1. Place the eggs in a saucepan, add soda and water until the eggs are fully covered
  2. Use a pan large enough the eggs have a bit of wiggle room
  3. Place the pan on the stove and bring it to a boil, full boil
  4. Once the water reaches a full boil, turn off the stove and place the lid on the pan
  5. Let the eggs sit for 12 minutes
  6. Place a large bowl of ice and cold water in the sink
  7. Remove the eggs from the stove after 12 minutes and immediately rinse with cold water and place them in the ice bath
  8. Let the eggs sit for 5-10 minutes

Let me know if you have any other tricks or tips!

Kate's Healthy Cupboard - Gluten Free Recipes
In Breakfasts, Side Dishes, Recipes, Snacks and Appetizers2
2 Comments

Grain Free Cinnamon Rolls

April 5, 2012 Kate
Grain Free Cinnamon Rolls

Cinnamon rolls are the perfect treat to serve at Easter brunch or any breakfast...heck I just ate one with lunch!  When your gluten eating mother said they are awesome, you know you have a winner!!  There are so many options for the sweeteners and the frosting in this recipe.  I made a cream cheese frosting and also a dairy free coconut butter/creme frosting as well.  You can't go wrong either way!

I wish I could take full credit for this recipe, but I can only take partial.  Regardless, these are awesome!!!!  This is adapted from Urban Poser's cinnamon roll recipe.  When she posted her recipe last night, I knew I had to try them...as in make them immediately!  I basically used her dough recipe, but the filling and frosting are different than what she suggests.  I was not digging the idea of raisins in my cinnamon rolls and I wanted a different frosting.  I think you will be pleased.

Recipe: Grain Free Cinnamon Rolls
Ingredients
  • 3 1/8 cups almond flour (Honeyville)
  • 1/4 tsp soda
  • 1/4 tsp sea salt
  • 2 eggs room temperature
  • 1/4 cup refined coconut oil
  • 1/4-1/3 cup honey

Filling:

  • 4 tbsp pastured organic butter, melted (or melted refined coconut oil)
  • 2 tbsp cinnamon
  • 3-4 tbsp Lakanto, Wholesome Sweeteners or Coconut Palm Sugar (honey or maple syrup should work too)
  • 1/4-1/2 cup pecans. chopped (optional)

Frosting:

  • 3 tbsp pastured organic butter, melted (or melted refined coconut oil)
  • 5 tbsp cream cheese, softened or melted coconut butter/creme
  • 2 tbsp sweetener of choice, liquid or granulated (I used coconut palm sugar)
  • 1-2 tbsp coconut or almond milk (optional, depending on how running you want frosting)
Instructions
  1. Combine the almond flour, soda and salt in a bowl
  2. Lightly beat the eggs, oil and honey in a bowl and add to the flour mixture
  3. Mix until a smooth dough forms
  4. Place the dough on a piece of parchment paper and roll out to about a 9x13 rectangle (flour the rolling pin with almond flour if dough is sticking)

Filling:

  1. Combine all of the ingredients in a bowl and mix well
  2. Spread onto the dough covering the entire rectangle
  3. Roll the dough as tight as you can, use the parchment paper to help you
  4. Cut the dough with a bread knife in about 1 1/2 inch slices or larger if you want larger rolls but you will have to adjust cook time
  5. Bake at 350 on a greased cookie sheet for 10-13 minutes. They will start to get brown after about 10, but may still be too soft in the middle. They should be a bit soft and you certainly don't want to over cook them. I love doughy centers in cinnamon rolls so under cooked is best
  6. Let cool for 10 minutes before frosting

Frosting:

  1. Combine all of the ingredients in a bowl and cream with a hand mixer until smooth
  2. Add coconut milk or almond milk until desired consistency
  3. Spread or drizzle the frosting over the rolls. I use a ziploc and fill it with the frosting, cut off a bit of the corner and squeeze to drizzle

I think these would be awesome with maple syrup used in the filling and/or the frosting for a maple cinnamon roll.  Let me know what you think!!

Kate's Healthy Cupboard - Gluten Free Recipes
In Breads and Muffins, Breakfasts, Desserts, Recipes Tags Almond flour, Brunch
3 Comments

Avocado Deviled Eggs

April 2, 2012 Kate
Avocado Deviled Eggs

Deviled eggs may be something you traditionally serve at your Easter brunch.  How about switching it up a bit with Avocado Deviled Eggs.  Who doesn't like avocado! Eggs are a great source of protein and many other nutrients.  These are really an any time of the year great snack!  They are super easy and fulfilling with the heart healthy fat the avocado provides.  You can doctor up the egg yolk and avocado mixture any way you'd like.

Recipe: Avocado Deviled Eggs
Ingredients
  • 8 eggs, hard boiled and peeled
  • 1 large ripe avocado
  • 2-4 tbsp hot sauce
  • dash of sea salt
  • splash of lime juice
Instructions
  1. Slice the eggs lengthwise and remove the yolks
  2. Rinse the whites to get any leftover yolk out, pat dry
  3. Combine the yolks, avocado, hot sauce, salt and lime juice in a food processor
  4. Pulse until almost smooth
  5. Spoon the mixture into each egg white half
Quick notes

The amount of hot sauce will vary depending on how hot the sauce is. I used 4 tbsp of The Green from Horsetooth Hot Sauce. (local company sold at Whole Foods and Vitamin Cottage or from their website) It is pretty spicy but I love it. It's a mix of green habaneros, serranos, tomatillos, garlic and onion.

I am determined to get hard boiled eggs to come out perfect!  If you could see the eggs in the back of my picture, you'd say my egg skills need work!!!  Every cookbook seems to think they have the answer.  Our altitude makes a bit of a difference but I am going to figure it out!  If anyone knows the trick, please let me know!!!

Kate's Healthy Cupboard - Gluten Free Recipes
In Breakfasts, Dips and Spreads, Entrees, Side Dishes, Recipes, Snacks and Appetizers2 Tags Paleo, Primal
2 Comments

Strawberry Lemon Muffins

March 29, 2012 Kate
Lemon Strawberry Muffins

Easter is just about here, so it's time to share some brunch recipes with you.  This Strawberry Lemon Muffin recipe is quick and easy (except for the zesting of a lemon) and the muffins can be enjoyed hot out of the oven or a day or two later.  Warm and buttered or simply plain, you can't go wrong serving these at your Easter Brunch!

So often when you see lemon in the title of a muffin recipe, you think poppyseeds or blueberries are involved as well.  I decided to do something different and pair strawberries with the lemon.  I actually made these two different ways, one with lemon and one without.  The consensus was they were both great but the lemon had maybe a bit more flavor.  Feel free to leave out the lemon.  The cooking time may be a few minutes less since some moisture (lemon juice) is taken out.

Recipe: Strawberry Lemon Muffins
Ingredients
  • 2 cups almond flour (Honeyville)
  • 1/2 tsp celtic sea salt
  • 1/2 tsp baking soda
  • 2 eggs
  • 1/4 cup honey*
  • 1/4 cup coconut oil, melted (refined)
  • 1 tsp vanilla extract
  • 1 heaping tbsp lemon zest
  • 1 tsp lemon juice
  • 1 cup fresh organic strawberries, sliced
Instructions
  1. Combine the almond flour, salt and soda in a large mixing bowl
  2. In a different bowl, beat the eggs, honey and oil. Stir in the lemon juice, zest and vanilla
  3. Add the dry mixture to the wet, stir until combined
  4. Carefully fold in the strawberries
  5. Pour batter into lined muffin tin, fill to the top
  6. Bake at 350 for 25-30 minutes until tops are golden brown

Makes 6 large muffins

Quick Notes *I used Nature's Hollow Xylitol Honey for a lower sugar option and they tasted great!!!

Store in a tightly covered container, I like to use glass containers.  They should last for at least 5 days at room temperature.

Kate's Healthy Cupboard - Gluten Free Recipes
In Breads and Muffins, Breakfasts, Desserts, Recipes Tags Almond flour, muffins, Paleo
27 Comments
Older Posts →
download.jpeg

Welcome to Kate's Healthy Cupboard! A place for healthy, grain free recipes, some low carb recipes, safe beauty and products for the home  and more...


>>  CONNECT WITH KATE  <<

pinterest.png
facebook.png
instagram.png

>>  SUBSCRIBE  <<

Success! Now check your email to confirm your subscription.

There was an error submitting your subscription. Please try again.


>>  SEARCH RECIPES  <<


Copyright 2016 Kate's Healthy Cupboard  ||  Website Design