• Blog
  • Recipes
  • Lifestyle
  • Safer Skincare
  • About
  • Contact
Menu

Kate's Healthy Cupboard

Street Address
City, State, Zip
Phone Number
Healthy Lifestyle, Healthy Grain Free Recipes

Your Custom Text Here

Kate's Healthy Cupboard

  • Blog
  • Recipes
  • Lifestyle
  • Safer Skincare
  • About
  • Contact

Double Chocolate Orange Cookies

November 23, 2016 Kate Criswell

I hope you all had a Happy Thanksgiving!!  Now it's time to start thinking about holiday baking.  I love to bake, hence all the desserts I have on my website.  Check out all the holiday recipes here, including Peanut Butter Fudge, Macadamia Lace Cookies, Hazelnut Cranberry Chocolate Chip Cookies, Pizzelles, Mexican Wedding Cookies and so much more!!  These Flourless Chocolate Orange Cookies are fantastic and need to be added to your holiday baking list!!

Double Chocolate Orange Cookies

Ingredients

  • 1 cup cocoa/cacao powder
  • 1 cup granulated sweetener (I used Swerve for no sugar option)
  • 1/2 cup grass-fed butter, softened
  • 1 egg
  • 1 tsp vanilla extract
  • 2 drops of orange essential oil (I used Wild Orange from Doterra)
  • 1/2 tsp baking soda
  • 1/4 tsp sea salt
  • 1/2 cup chocolate chips (I used Enjoy Life dairy free chips)

Instructions

  1. Combine the cocoa, soda and salt in a bowl, set aside
  2. Place sweetener and butter in a food processor or a large bowl and mix well
  3. Add in the egg (whisk if using a mixing bowl), vanilla and orange oil
  4. Pour the dry ingredients into the wet and combine until mixed well
  5. Fold in chocolate chips (batter should be thick)
  6. Use a cookie scoop or roll dough into a ball and place dough on a parchment lined cookie sheet. Do not press down, they will spread
  7. Bake at 350 for about 8-10 minutes.
  8. Let cool on the cookie sheet before transferring to a cooling rack
  9. Store in a glass container 

Happy Holidays!!

KATE-SIGNATURE small.png
Affiliate Banners_Generic_728x90-1.jpg


In Desserts2 Tags Flourless, Cookies, Chocolate, Holiday, Grain Free, Nut Free, Low Carb, Swerve
Comment

Bacon Pecan Maple Mustard Chicken

September 30, 2015 Kate
Bacon Pecan Maple Mustard Chicken

I recently received a sampler pack of goodies from Steve's Paleo Goods.  The box was full of grain free granola, cookies, jerky's sauces, dried fruits and more!! The cool thing about this online paleo store, is that 15% of the proceeds go to Steve's Club National Program.  This is his 501c3 non-profit that brings fitness, nutrition guidance and mentorship to at-risk youth.  He works with CrossFit Affiliates across the country to start Steve’s Club Local Clubs in their own communities. This has always been his passion; and it continues to be the driving force behind Steve's PaleoGoods.  You can find these goodies along with nut butters, spice rubs, oils, cracklings and so much more at Whole Foods or online!!

 One smell of the two sauces I erceived and I knew I needed to create a savory recipe for you guys!  I was lucky enough to receive his Maple Mustard and Ginger Cilantro sauces.  These can be used for dressings, marinades, sauces and dips.  The best part is that they are made with olive oil and apple cider vinegar, unlike most sauces and dressings that are full of gmo canola oil!  I hope you enjoy this recipe as much as we did!!  It makes for great leftovers...even cold right out of the fridge!

Bacon Pecan Maple Mustard Chicken

Prep time: 10 mins
Cook time: 30 mins
Total time: 40 mins
Serves: 4

Ingredients

  • 4 chicken breasts, thinned out
  • 1/4 - 1/3 cup Maple Mustard*
  • 4-5 strips of bacon, cooked and cut into pieces
  • 1/4 cup pecans, chopped into pieces
  • Stone ground mustard

Instructions

  1. Place the chicken breasts in a greased baking dish
  2. Brush or spoon on about 1 tbsp of Maple Mustard onto the top of each breast to lightly coat. Reserve the rest of the sauce for later
  3. Sprinkle the bacon and pecan pieces over each breast
  4. Bake with a loose cover at 350 for 15 minutes. Remove the cover and bake an additional 15 minutes.
  5. Remove from the oven and drizzle the remaining Maple Mustard over each breast. Finish them off with another drizzle of stone ground mustard

Notes
*Maple Mustard sauce is from Steve's Paleo that can be found online (link in blog) or from Whole Foods.

xo,

In Recipes, Entrees2 Tags Bacon, Chicken, Dairy Free, Low Carb, Paleo
Comment

Double Chocolate Peanut Butter Truffles

February 8, 2015 Kate
Double Chocolate Peanut Butter Truffles2

You just can't ever mess up any recipe that includes peanut butter and chocolate!  I typically choose other nut butters over peanut butter, but I have been enjoying it lately.  This recipe can be made with any nut or seed butter, but there's just something about this combo that is hard to replace!

It's close to Valentine's Day and I wanted to give you some new chocolate recipes to enjoy, including these truffles.  I personally don't need a holiday or reason to have chocolate, it makes me happy everyday of the year!!  The best part is that when you choose dark chocolate, it's low in sugar and typically dairy free if it's really dark!  I used Swerve as the sweetener to make these low carb, but any sweetener will work.  I hope these last longer in your house than they did in mine!!

Double Chocolate Peanut Butter Truffles

Ingredients

  • 1 cup natural peanut butter (I prefer fresh grind that is chunky)
  • 2 tbsp butter, melted or softened (depends on how runny the peanut butter is)
  • 1/4 cup Swerve or other sweetener (I added a tiny bit of coconut palm sugar with the Swerve)
  • 2 tbsp cacao powder
  • 1 tsp vanilla
  • 1/2 tsp sea salt (omit if your PB is already salted)
  • 1/2 cup dark chocolate chips

Instructions

  1. Combine granulated sweetener, cacao powder and sea salt in a bowl and set aside
  2. Stir the peanut butter, butter and vanilla until combined
  3. Pour the cacao mixture into the peanut butter mixture, stir until combined
  4. Place the batter into the fridge or freezer to harden so you can form balls with it
  5. Place the chocolate chips in a double broiler over low heat and melt
  6. Once the dough is hard enough, roll the batter into balls about 1 inch in diameter and place on a parchment lined cookie sheet
  7. Dip each truffle into the chocolate with a slotted spoon and place back onto the cookie sheet
  8. Place cookie sheet back in the fridge or freezer to set up
  9. Store in a glass container in the fridge


Enjoy!

In Recipes, Desserts2, Desserts4 Tags Chocolate, Egg-Free, Holiday, Low Carb, Peanut Butter
5 Comments

Favorite KHC Low Carb Recipes

December 30, 2014 Kate
low carb collage
low carb collage

As the New Year is upon us, most are looking to clean up the damage from the Holidays!  One way to do this is to cut down on the amount of carbohydrates you are eating!  A lot of my recipes are low carb, especially when you use Swerve in the sweet treats.  I decided to share a few of my favorite with you all in one place!  Hope this helps you get your year started in the right direction!

Sausage Fauxtato Frittata

Breakfast Meatza Pizza

Bacon Meatloaf

Olive Garlic Meatballs

Chicken with Mushroom Cream Sauce

Italian Stuffed Spaghetti Squash

Bacon Chili

Italian Chicken Nut Rolls

Sauteed Radishes

Bacon Brussels Sprouts

Coconut Cauliflower Rice

Creamy Cauliflower Mushroom Soup

Spinach Avocado Dip

Cheddar Cheese Crackers

Olive Garlic Crackers

Cracked Pepper Cashew Crackers

Dairy Free "Cheez-its"

Sunflower Seed Herb Crackers

Flourless Snickerdoodles

Lemon Gelato

Peanut Butter Fudge

Faux Baked Cinnamon Apples

Brownie Fudge

Flourless Lemon Cookies

Dairy Free Peanut Butter Ice Cream Pie

Flourless Chocolate Chip Cookies

Coconut Cashew Cookies

Chocolate Drop Cookies

Wishing You Health and Happiness in 2015!

If you are an Amazon shopper, would you be so kind to use my affiliate link to make your purchases.  It is at no cost to you, it does provide a tiny kickback to Kate’s Healthy Cupboard.  This allows me to continue making and testing recipes for free.  Thanks so much!!

*I have recently switched all of my skincare and makeup to a company that is free of 1,500 chemicals!!  I am so particular about what goes into my body, I need to be just as picky as to what goes on my body!  Your skin is your largest organ and absorbs chemicals into the bloodstream faster than the gut does!  I am vain when it comes to my skin and was so thrilled to find products that are anti-aging and work!!!  Check out BeautyCounter for more info!!  You will love it!!

Kate's Healthy Cupboard - Gluten Free Recipes
In Uncategorized Tags Low Carb, Paleo
Comment

Cranberry Salsa

November 10, 2014 Kate
Cranberry Salsa
Cranberry Salsa

This is one of my favorite appetizers to serve during the holiday season!!!  The original recipe includes a cream cheese and goat cheese spread that you pour this over.  It is fantastic with tortilla chips and crackers!  I can no longer tolerate dairy so plain salsa is it for me...delicious on it's own as well!

I might actually use this on my turkey this year instead of gravy for Thanksgiving dinner.  It's almost like a cranberry relish and could be used over any meat or fish!  I made the salsa sugar free by using  Swerve instead of white sugar.  Cranberries are very low in sugar so they are perfect for those trying to stay as low carb as possible during the holidays.

Cranberry Salsa

Ingredients

  • 3 cups fresh or frozen cranberries (thawed)
  • 1 jalapeno, seeded and chopped
  • ½ cup cilantro, chopped
  • 1 bunch green onions, chopped (about 4-5)
  • 1/3-1/2 cup sugar (I used Swerve for no sugar option)
  • Juice of 2 limes

Instructions

  1. Place all of the ingredients in a food processor. Blend until desired consistency
  2. Refrigerate for an hour or overnight
  3. Serve with chips or crackers as salsa or pour over cheese ball (directions in the notes below)

Notes

Cheese Ball:
8oz Cream Cheese, softened (I prefer whipped so it spreads easier on crackers)
4oz butter, softened
2 oz goat cheese
Mix together in a food processor until smooth. Spoon into a bowl that is wrapped with plastic. Wrap and chill until set.

If you want to try Swerve or need to order more, use coupon code KATE10 for a 10% discount.  Swerve is my favorite sugar replacement.  It is the only sugar alcohol that will not cause tummy troubles and it does not raise blood glucose levels.

If you are an Amazon shopper, would you be so kind to use my affiliate link to make your purchases.  It is at no cost to you, it does provide a tiny kickback to Kate’s Healthy Cupboard.  This allows me to continue making and testing recipes for free.  Thanks so much!!

I have recently switched all of my skincare and makeup to a company that is free of 1,500 chemicals!!  I am so particular about what goes into my body, I need to be just as picky as to what goes on my body!  Your skin is your largest organ and absorbs chemicals into the bloodstream faster than the gut does!  I am vain when it comes to my skin and was so thrilled to find products that are anti-aging and work!!!  Check out BeautyCounter for more info!!  You will love it!!  Give the gift of safe skincare this holiday season, gift sets available

Kate's Healthy Cupboard - Gluten Free Recipes
In Dips and Spreads, Dressings and Condiments, Recipes, Snacks and Appetizers3 Tags Egg-Free, Holiday, Low Carb, Nut-Free
4 Comments

Flourless Pumpkin Cookies

October 6, 2014 Kate
Flourless Pumpkin Cookies

It is Pumpkin Palooza time!!!  Every recipe on Pinterest and Facebook seem to be fall related and involve a lot of pumpkin!!!  I have a couple of hopefully unique recipes to share this fall season...including these Flourless Pumpkin Cookies with a chocolate chip option!!  Many people have requested nut free recipes, hence my addiction to coconut butter based goodies!  I do have to admit, these would be darn good with almond butter too, so feel free to use it in place of the coconut butter.

These little good for you fat bombs can be enjoyed guilt free when you use my favorite sweetener Swerve!  My mom described these like taking a bite of pumpkin pie.  They are moist and melt in your mouth delicious!!   These cookies are super easy to make and have a short list of ingredients!  Enjoy

Flourless Pumpkin Cookies
Prep time: 5 mins
Cook time: 15 mins
Serves: 15-18

Ingredients

  • 1/2 cup Organic Coconut butter
  • 1/2 cup canned pumpkin, packed
  • 1 egg
  • 1/2 cup granulated sweetener (I used Swerve for no sugar option)
  • 2 tsp cinnamon
  • 3/4 tsp clove
  • 3/4 tsp ginger
  • 3/4 tsp nutmeg
  • 1/4 tsp sea salt
  • 1/2 cup dark chocolate chips, optional (Use Enjoy Life Semi Sweet Chocolate Chips) 

Instructions

  1. Place the coconut butter, pumpkin and egg in a food processor and combine until smooth
  2. Add in the sweetener, spices and salt and mix well
  3. Place the batter in a bowl and stir in chocolate chips (optional)
  4. Spoon the dough onto a parchment lined cookie sheet
  5. Slightly press down the dough since these will not spread. If dough is too sticky, bake for a few minutes, remove and then you will be able to press down
  6. Bake at 350 for about 15 minutes
  7. Remove cookies and place on a cooling rack to set up
  8. Store in an airtight container, I prefer a glass jar

Notes

*To soften the coconut butter, place the jar into a saucepan filed with water. Heat over medium heat until it has softened.
We like cinnamon and spice, you may start with less of each and increase to desired taste. Any nut butter will work in place of the coconut butter. Almond butter would be awesome!!

If you are an Amazon shopper, would you be so kind to use my affiliate link to make your purchases.  It is at no cost to you, it does provide a tiny kickback to Kate’s Healthy Cupboard.  This allows me to continue making and testing recipes for free.  Thanks so much!!

I have switched all of my skincare and makeup to a company that is free of 1,500 chemicals!  The European Union bans about 1,400 chemicals and the US bans 11 in an unregulated industry!  I am so particular about what goes into my body, I need to be just as picky as to what goes on my body!  Your skin is your largest organ and absorbs chemicals into the bloodstream faster than the gut does!  I am vain when it comes to my skin and was so thrilled to find products that are safe, non toxic, but are still anti-aging and work!!!  The makeup is chic, on trend and high performing! Check out Beautycounter for more info!!  Their mission is to get safe products into the hands of everyone!  I feel compelled to help educate and share this mission!  


Kate's Healthy Cupboard - Gluten Free Recipes
In Recipes, Desserts4 Tags Coconut Creme, Flourless, Holiday, Low Carb, Nut-Free, Pumpkin, Swerve
4 Comments

Faux Baked Cinnamon Apples

January 27, 2014 Kate
Faux Baked Cinnamon Apples Recipe

Nothing against apples, but I'm trying to eat less carbs and certainly less sugar.  Yes, I know there are nutrients in apples and it's natural sugar...sugar is sugar is sugar and I can find those same nutrients in vegetables!!!  For me personally, I do better without fructose and fruit in my diet.  For that reason, I have been using jicama in place of apples and potatoes in many recipes.  In case you missed it, this Sausage and Fauxtato Frittata Recipe is awesome!!!  Grab yourself some jicama, cause I've got some more low carb recipes coming soon!!!

Jicama is very crunchy, full of water and stays hard even when cooked.  I have found that you have to boil the jicama for a while before you use it in recipes if you want it to soften up like it does in this baked apple recipe.  It's easy to do and can be done ahead of time, just store in an air tight container in the fridge until you are ready to use them.

Faux Baked Cinnamon Apples

Serves: 3-4

Ingredients

  • 3 cups jicama, cubed and boiled* (1 small jicama)
  • 2 tbsp grass-fed butter or coconut oil
  • 1-2 tsp cinnamon (I like them with 2 tsp)
  • sweetener of choice (I used 2 tbsp of Swerve)
  • dash of sea salt

Instructions

  1. Heat the oven to 350
  2. Place the jicama in a casserole dish
  3. Cut the butter into pieces and place over the jicama. Sprinkle with cinnamon, sweetener and salt
  4. Bake covered for 30-40 minutes or until soft, stir after 20 minutes. I removed the lid for the last 10 minutes to remove the moisture
  5. Serve hot with some Dairy Free Vanilla Ice Cream.

Quick notes

*To boil the cubed jicama, cover it with water and boil for 30-45 minutes (depends on size of cubes) until soft. This can be done ahead of time, store in an airtight container in the refrigerator.

Variations

You could combine some almond flour, pieces of butter or coconut oil and sweetener to make a topping. I’d add the topping once you have removed the lid to finish cooking.  You could turn on the broiler for a few seconds to brown the topping too!

If you are an Amazon shopper, would you be so kind to use my affiliate link to make your purchases.  It is at no cost to you, it does provide a tiny kickback to Kate’s Healthy Cupboard.  This allows me to continue making and testing recipes for free.  Thanks so much!!

I have switched all of my skincare and makeup to a company that is free of 1,500 chemicals!  The European Union bans about 1,400 chemicals and the US bans 11 in an unregulated industry!  I am so particular about what goes into my body, I need to be just as picky as to what goes on my body!  Your skin is your largest organ and absorbs chemicals into the bloodstream faster than the gut does!  I am vain when it comes to my skin and was so thrilled to find products that are safe, non toxic, but are still anti-aging and work!!!  The makeup is chic, on trend and high performing! Check out Beautycounter for more info!!  Their mission is to get safe products into the hands of everyone!  I feel compelled to help educate and share this mission!  

Kate's Healthy Cupboard - Gluten Free Recipes
In Recipes, Desserts4 Tags Desserts, Low Carb, Paleo
14 Comments

Sausage Fauxtato Frittata Recipe

January 16, 2014 Kate
Sausage and Fauxtato Frittata

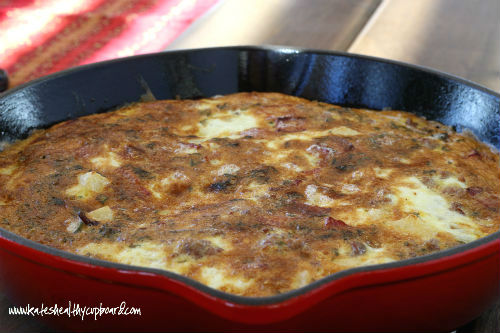
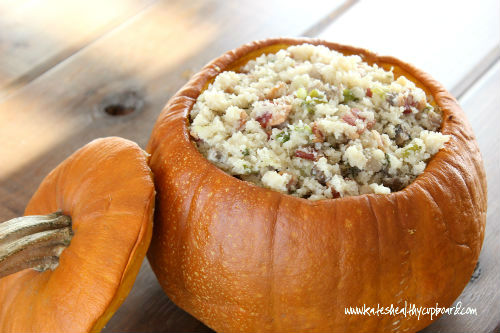
Fauxtato Frittata...say that 5 times fast!!!  As many of you know, I tend to eat a lower amount of carbs.  This means potatoes are not an item I consume regularly, white or sweet.  For those of you looking to stay away from starchy carbs or from nightshades (more on this below), this frittata recipe is for you!!

How did I replace the potatoes in this recipe...jicama!!  When you boil jicama prior to cooking with it, it softens up and tastes great!  I have been experimenting with jicama a lot lately, so get ready for more recipes that include it.  If you don't like jicama, I suggest you try this recipe and see if you change your mind!

Potatoes are avoided by some for the carbohydrate content and others avoid them due to the fact they are a nightshade.  What the heck is a nightshade (or moonshade as my sister likes to call them)?  If you suffer from any of the following, nightshades MIGHT be a problem for you.  Most common symptoms are: joint pain, stiffness upon waking, or stiffness after sitting for longs periods of time, muscle pain and tension, muscle tremors, sensitivity to weather changes, poor healing, insomnia, skin rashes, heartburn, stomach discomfort, digestive difficulties, headaches, mood swings depression, chronic pain, inflammation, arthritis, or rheumatism. They can also cause permeability in our intestinal membranes (known as leaky gut), all of which may contribute to autoimmune disease.   If someone is healthy, with low inflammation in their body, a balanced immune system, and a balanced and strong digestive tract, they can often eat nightshade vegetables without a problem.  However, people with autoimmune disease are vulnerable, as nightshades often exacerbate symptoms.

What are nightshade vegetables?Tomatoes, tomatillos, potatoes, eggplant, pimento, bell peppers (green, red, yellow, cherry), banana peppers, hot peppers of all kinds green, red, chili, paprika, cayenne, goji berries, ground cherries, ashwagandha (an ayurvedic herb), Tobacco is also a nightshade.  The Latin name for this family of plants is Solanaceae, because all of them produce an alkaloid compound called solanine. This chemical is part of these plants’ natural defense system, acting as a nerve poison on insects that try to eat the plants.

Sausage Fauxtato Frittata

Ingredients

  • 10 pasture raised eggs (I like Tropical Traditions soy free eggs)
  • 1/2 lb pork breakfast sausage
  • 5 slices bacon, sliced (about 1/2 inch pieces)
  • 1 1/2 cups jicama, cubed and boiled to soften*
  • 1/4 -1/2 of an onion, diced
  • 1 tbsp dry parsley
  • 3/4 tsp sea salt
  • couple dashes of pepper

Instructions

  1. Heat a 10 inch cast iron skillet over medium and cook the sausage. Remove the sausage once cooked and set aside
  2. Cook the bacon in the pan until about half way done. Add the onions and cooked jicama to the bacon and saute until onions are translucent
  3. While bacon is cooking, whisk the eggs in a bowl with the salt, pepper and parsley. Also turn your oven broiler on at this time
  4. Once the bacon, onion and jicama mixture is done, add in the sausage and turn the heat to medium low.
  5. Pour the egg mixture into the pan and cook until eggs start to form curds and edges look cooked. You want the frittata to be half way done before you put it under the broiler.
  6. Place the frittata on the lower shelf of the oven and let cook for 3-5 minutes or until top is golden brown
  7. Remove from heat and serve hot. This is also great as leftovers hot or cold!

Quick notes

*The jicama needs to boil for about 45 minutes (the smaller the pieces, the less time it takes them to get soft) before you add it to this recipe. This step can be done a day or two ahead of time or right before you make the frittata. Simply add the cubed jicama to a pan of boiling water and let boil for about 45 minutes. Drain off the water and store in the refrigerator.

For more information on how to create your own frittata recipe, check out my Sausage and Mushroom Frittata Recipe.

If you are an Amazon shopper, would you be so kind to use my affiliate link to make your purchases.  It is at no cost to you, it does provide a tiny kickback to Kate’s Healthy Cupboard.  This allows me to continue making and testing recipes for free.  Thanks so much!!

Kate's Healthy Cupboard - Gluten Free Recipes
In Recipes, Breakfasts2 Tags Bacon, Breakfast, Low Carb, Sausage
2 Comments

Bacon Brussel Sprouts

January 8, 2014 Kate
Bacon Brussel Sprouts

Happy New Year!  I hope everyone had a great holiday season and got a chance to enjoy a few of my treats.  I just finished off the last of the cookies I made for Christmas.  It's so nice to know almost all of my treats were free of sugar since I used Swerve (my favorite sugar alternative) in all my recipes.  If your resolutions include giving up or decreasing the sugar in your diet, I highly recommend trying Swerve!  They are running a special in January and always offer 10% off to my readers with coupon code KATE10.

Enough about the sweets, it's time for vegetables, dinners and breakfasts for a while...well until it's Valentine's recipe time!  We enjoyed this brussels sprout recipe for our Thanksgiving and Christmas dinner.  These were a huge hit by everyone, even the brussels sprout haters liked them...how can you not when bacon is included!   This recipe is not a lot of work and certainly isn't high maintenance!

Recipe: Bacon Brussels Sprouts

Ingredients

  • 3-4 slices bacon, sliced into 1/2 inch pieces
  • 1 lb brussels sprouts, halved or quartered depending on size
  • 1/4 cup onions, diced
  • 1/2 cup water
  • salt and pepper to taste

Instructions

  1. Place the sliced bacon in a skillet over medium heat and cook until tender but not full cooked
  2. Remove all but 2 tbsp of the bacon grease and toss in the onions, cook until onions are translucent and bacon is fully cooked
  3. Add the brussels sprouts, stir to coat with grease
  4. Stir in the water and sprinkle with some salt and pepper
  5. Turn temperature down to low and place a lid on the skillet
  6. Let cook for 30-60 minutes or until very tender. The longer they cook, the more the sprouts take on the bacon flavor
  7. Salt and pepper to taste

If you are an Amazon shopper, would you be so kind to use my affiliate link to make your purchases.  It is at no cost to you, it does provide a tiny kickback to Kate’s Healthy Cupboard.  This allows me to continue making and testing recipes for free.  Thanks so much!!

Kate's Healthy Cupboard - Gluten Free Recipes
In Side Dishes, Vegetables, Recipes Tags Bacon, Low Carb, Nut-Free, Paleo, Vegetables
3 Comments

Flourless Chocolate Almond Butter Cookies

December 16, 2013 Kate
Flourless Chocolate Almond Butter Cookies

Here is another super easy and super delicious cookie to add to your holiday baking list.  These disappeared very quickly around here!  This recipe can be made with any nut or seed butter of choice.  Peanut butter seems to always taste the best with chocolate, but unfortunately I don't eat peanuts, so almond butter it is...and I loved them!

Flourless Chocolate Almond Butter Cookies

Makes 12-14

Ingredients

  • 1 cup almond butter*
  • 1/2 cup cocoa/cacao powder
  • 3/4 -1 cup granulated sweetener (I used 1 cup of Swerve to make them sugar free)
  • 1 egg
  • 1 tbsp vanilla
  • 1 tsp baking powder (corn and gluten free baking powder)
  • 1/4 heaping tsp sea salt (omit if jar is already salted)

Instructions

  1. Place all ingredients in a food processor or stand up mixer and combine
  2. Use a cookie scoop or roll the dough into balls and place on a parchment lined cookie sheet
  3. Press down the dough with hand or use a fork to flatten the cookies (the baking powder keeps the cookies from spreading, but also makes them crispier than baking soda)
  4. Bake at 350 for 7-10 minutes. The cookies will look undercooked, but that’s the way you want them to look! They will set up perfectly once they have cooled.
  5. Remove from the oven and let sit for a few minutes before moving them to a cooling rack.
  6. Store in an airtight container, I prefer glass jars for storage.

Quick notes

*I used fresh grind almond butter that you grind yourself at natural grocery stores. It does not have any added oils, salt or sweeteners. If you are using jarred almond butter or other nut butters, I’d use closer to 3/4 cup. Jarred butters are thinner and may make these spread more.

If you are an Amazon shopper, would you be so kind to use my affiliate link to make your purchases.  It is at no cost to you, it does provide a tiny kickback to Kate’s Healthy Cupboard.  This allows me to continue making and testing recipes for free.  Thanks so much!!

*I have recently switched all of my skincare and makeup to a company that is free of 1,500 chemicals!!  I am so particular about what goes into my body, I need to be just as picky as to what goes on my body!  Your skin is your largest organ and absorbs chemicals into the bloodstream faster than the gut does!  I am vain when it comes to my skin and was so thrilled to find products that are anti-aging and work!!!  Check out BeautyCounter for more info!!  You will love it!!

Kate's Healthy Cupboard - Gluten Free Recipes
In Recipes, Desserts3 Tags Almond Butter, Chocolate, Cookies, Flourless, Low Carb, Paleo, Swerve
3 Comments

Coconut Curry Chicken Meatball Soup

December 3, 2013 Kate
Coconut Curry Meatball Soup

It's about to get REALLY cold here in Colorado...and snow a few inches.  I am actually excited for it to feel like winter and like the Holidays.  This soup is perfect for these next few days of below zero nights!

I used a crockpot to make this soup so that I could just throw it in and walk away from it.  I don't see why this wouldn't work in a large sauce pan or a soup pot like this Le Creuset Soup Pot that I would love to have!!

Coconut Curry Chicken Meatball Soup

Serves: 3-4

Ingredients

  • 1 lb ground chicken breast
  • 1 carton of mushrooms, shiitake or button
  • 1 bunch green onions
  • 1/2 pastured egg, beaten (save the other half to add into eggs or add to a smoothie)
  • 1 can full fat coconut milk
  • 1/2 cup chicken broth (preferably homemade)
  • 1 1-2 inch piece of peeled fresh ginger
  • 1 tbsp Coconut Aminos*
  • 1 1/2 tbsp red curry paste
  • 1 tsp salt
  • 1 garlic clove, finely minced

Instructions

  1. Chop the whites off of the onions and set the greens aside for the soup. Finely chop 1/2 cup of the mushrooms and save the rest for the soup
  2. Combine the chicken, egg, chopped whites, chopped mushrooms, minced garlic and sea salt in a bowl
  3. Form the meat into desired size meatballs and place in the bottom of the crockpot
  4. Combine the coconut milk, broth, coconut aminos and curry paste in a mixing bowl
  5. Add the remaining mushrooms and chopped greens from the onions
  6. Pour over the meatballs and place the piece of ginger into the liquid
  7. Cook on high for 2 1/2 to 3 hours, add salt if needed

Quick notes

*You could replace Coconut Aminos with tamari or Bragg’s, but both of those are saltier than the aminos so maybe use a bit less to start

Variations

I imagine this will work in a soup pot or could also be cooked on the low setting of your crockpot for longer if need be.  You could add some additional vegetables such as broccoli, red pepper and snow peas if you wanted to.  It may not be as soupy, but still good!!!  This would also be great served over cauliflower rice or white rice if you tolerate it.

I actually ate this as leftovers cold and loved it just as much!

Kate's Healthy Cupboard - Gluten Free Recipes
In Soups, Recipes Tags Chicken, Coconut Milk, Low Carb, Meatballs
Comment

"Rice" and Bacon Stuffed Pumpkin

November 14, 2013 Kate
Rice Stuffed Pumpkin2

Here's a fantastic and fun recipe to add to your Thanksgiving menu.  I originally had this dish with rice in place of cauliflower a couple years ago and loved it!!!  I figured I could recreate this to be grain free by using cauliflower rice.  My inspiration came from this recipe, Pumpkin Stuffed With Everything Good.  It was made with bread crumbs, but along the way it has been changed to rice (I include how to do that variation below).  I made my own additions and changes as well.  I had to make some adjustments after trying to cook the cauliflower in the pumpkin. I decided it gets way too much moisture (which is perfect for cooking rice), so it needed to be cooked in a casserole dish.  Also, through trial and error, I decided that sauteing the onions and mushrooms in the bacon grease added some additional flavor.  You certainly can leave the entire pumpkin part out (unless you are using rice), but it makes for such a great fall presentation!Instructions

Recipe: “Rice” Stuffed Pumpkin

Ingredients

  • 1 medium sized pumpkin, about 3 pounds
  • 1 medium head of cauliflower, riced (run though a food processor)
  • 4 pieces of bacon, cut into 1/2 inch pieces
  • 1 1/2 cups mushrooms, chopped
  • 3/4 cup sliced green onion, greens and whites (about 4 onions)
  • 1/4 cup unsweetened vanilla non-dairy milk
  • 2 tbsp grass-fed butter, melted (optional, see variation below)
  • 2-3 garlic cloves, minced
  • 1 tbsp fresh thyme, chopped
  • 1/2 tsp sea salt
  • 1/8-1/4 tsp nutmeg
  • Pepper to taste

Instructions

  1. Place the riced cauliflower in a large mixing bowl and set aside
  2. Cook bacon in a skillet until crispy, remove from grease and add to the cauliflower. Pour out all but 2 tablespoons of grease.
  3. Place the onions and mushrooms in the skillet of grease and saute over medium heat until the onion is translucent and mushrooms are tender
  4. Add the onion and mushroom mixture, garlic, butter, milk, thyme, salt, pepper and nutmeg to the cauliflower and mix well
  5. Place the mixture in a casserole dish and cover
  6. Bake at 350 for an hour
  7. While the cauliflower is baking, cut off the top of the pumpkin and remove the seeds and guts
  8. Once the cauliflower is done, spoon it into the pumpkin and place it on a cookie sheet. Return it to the oven with the lid on for another 15-30 minutes (make sure the oven shelf is low enough so the stem isn’t touching the burner).
  9. Remove the top after 15 minutes and remove from oven if cauliflower is done or cook another 15 minutes with lid off until done.
  10. Serve hot in the pumpkin

Variations

Butter makes everything better! You could substitute it with ghee as a dairy free option or increase the milk to 1/3 cup from 1/4 cup.

The original recipe calls for bread crumbs or rice. To make this with rice, sub the cauliflower with 2 cups of uncooked rice, use 1/3 cup milk and cook the entire dish inside the pumpkin from the start for 60-90 minutes with lid on.  Remove lid the last 15-30 minutes and cook until rice is done (Directions in link above for original recipe).


Holiday baking season is here!!  My favorite place to order all of my nut flours, nuts, chocolate, dried fruit, etc is www.nuts.com.  They have every kind of nut flour out there that is finely ground and sure to make your grain free baked goods perfect! They are certified gluten free so there is absolutely no cross contamination!!


Baking wouldn't be the same without a sweetener, but I prefer to use a sweetener that won't raise insulin levels, is natural, won't upset your belly and won't leave you feeling guilty!  Swerve is my go to...and you can enjoy 10% off as one of my readers with coupon code KATE10!

Kate's Healthy Cupboard - Gluten Free Recipes
In Side Dishes, Vegetables, Recipes Tags Bacon, Low Carb, Nut-Free, Paleo
1 Comment

Olive Garlic Meatballs

August 21, 2013 Kate
Olive and Garlic Meatballs

This may seem like a random recipe, but it's actually a similar recipe my mom made for us as kids.  It was one of my favorites...who doesn't like melted butter poured over food!  My moms recipe was made with flank steak or London broil placed under the broiler and sliced into thin pieces.  The olives were in the butter garlic sauce that you drizzled over the meat.  I thought meatballs would be a fun way to try to recreate this recipe.  They were a HUGE hit!  Tom, my boyfriend is not a huge green olive fan, but loooved these.  He also took some leftovers to his grandmother and she ate them all...she's 94 and doesn't seem to be eating huge portions, but she sure did enjoy a big helping!!  I hope you and your family enjoy this savory dish as much as we did!  These also work great as leftovers!

Olive Garlic Meatballs

Ingredients

  • 1 lb grass-fed ground beef
  • 1 cup green olives, diced*
  • 2 cloves of garlic, minced
  • 1/2 cup grass-fed butter (1 stick)
  • 1/4 tsp garlic powder
  • 1/4-1/2 tsp sea salt

Instructions

  1. Place the beef, minced garlic and olives in a bowl and mash together
  2. Form the mixture into balls and place on a greased baking dish with sides
  3. Bake at 400 for 16-18 minutes
  4. When the meatballs have a few minutes left to bake, place the butter in a skillet over medium heat
  5. Once the butter has melted, add in the garlic powder and sea salt and turn down to low or remove from heat
  6. Remove the meatballs and toss them into the butter mixture, coat each one well
  7. Serve with the excess butter mix drizzled over top

Quick notes

*I used olives from the olive bar that had pimentos in them. Any green olive from the bar will work.

Variations

You could try replacing the butter with olive oil, but everything is always better with butter!

Kate's Healthy Cupboard - Gluten Free Recipes
In Entrees Tags Beef, Low Carb, Meatballs, Primal
3 Comments

Coconut "Rice"

June 4, 2013 Kate
Coconut Cauliflower Rice

Summer is here....hence why I have been absent in the kitchen lately.  I am trying to get outside more and get off of the computer.  Don't worry, I still have lots of recipes in the pipeline!

This recipe is inspired by a recipe from The Joy of Cooking, one of my favorite cookbooks.  The original recipe was made with jasmine rice, but I chose to make it with cauliflower "rice" and loooooved how it turned out.  I could have eaten the entire head of cauliflower!

Coconut “Rice”

Ingredients

  • 1 cup full fat coconut milk
  • 1/2 cup water
  • 1 large head of cauliflower, trimmed and washed
  • 2 slices of fresh ginger, peeled (about inch in size)
  • 1/2 tsp sea salt
  • 1-2 tbsp toasted unsweetened coconut shreds (optional)

Instructions

  1. Place raw cauliflower in a food processor and pulse until rice size pieces are formed
  2. Using a Nut Milk Bag or kitchen towel, drain the excess water out of the cauliflower, set aside
  3. In a saucepan, combine the coconut milk, water and ginger and bring to a boil
  4. Add the cauliflower and simmer for 30 minutes uncovered
  5. Remove from heat and discard the pieces of ginger, add in the salt. Do not add it beforehand, it pulls water out vegetables.
  6. Serve with the toasted coconut sprinkled over top

This could easily be sweetened with something like Swerve and reduce the amount of salt to make it a sweet treat.  Another idea is to add protein powder of choice and eat it like a hot breakfast cereal (maybe even add some grass-fed butter).  You could also do something similar to my Pumpkin Spice Cream Of "Wheat Recipe and add in eggs.

Kate's Healthy Cupboard - Gluten Free Recipes
In Side Dishes, Vegetables, Recipes Tags Coconut Milk, Egg-Free, Low Carb, Nut-Free, Paleo, Vegan
1 Comment

Bacon Chili

January 16, 2013 Kate
Basic Chili
Basic Chili

What!!!  No beans in your chili?  Yep, no beans.  I have chosen to not eat beans and legumes for a couple of reasons.  For one, I don't eat much starch anymore, I have chosen a high fat eating plan.  Second, beans and legumes contain considerable amounts of phytates — anti-nutrients which bind to minerals in the legumes, making them unavailable to our bodies. (This means some of the minerals present in the legumes aren’t able to be accessed by our bodies).  Nuts also have some phytates, but I feel the beneficial fats far exceed any of the nutrients in beans and legumes.  With all of that said, please feel free to add beans to this recipe.

I remember as a kid I never really cared for chili, unless it was canned with meat and beans only.  I think too many chili's have too many tomatoes that over power the taste.  I just don't like biting into a spoonful of mushy tomatoes personally.  I did put tomatoes in this recipes, but next time may make it with even less.  Some of you may want even more and love the mushiness and flavor they add.

Bacon Chili

Ingredients

  • 1 lb grass-fed ground beef
  • 4 slices bacon
  • 1 onion, chopped
  • 1/2 red bell pepper, seeded and cut into 1/2 inch pieces (optional)
  • 3 garlic cloves, minced
  • 1/8 cup chili powder
  • 1/2 tbsp ground cumin
  • 1 tsp ground coriander
  • 1/2 tsp red pepper flakes
  • 1/2 tsp dried oregano
  • 1/4 tsp cayenne pepper
  • 1 (28oz) can diced tomatoes
  • 1/2 tsp sea salt (or more if tomatoes don’t have added salt)

Instructions

  1. Slice the bacon into 1/2 inch pieces and place in a large saucepan over medium heat
  2. Once the bacon is cooked though, pour off all but 2 tablespoons of the bacon grease and return pan to the heat with the bacon in it
  3. Add the onions, peppers, garlic and all of the spices except the salt and cook until the onions get tender and start to brown, about 10 minutes
  4. Increase the heat to medium high and add the beef, breaking it up into pieces with a spoon until no longer pink, about 3-4 minutes
  5. Add the tomatoes and salt and bring to a boil, then reduce heat to a simmer. Cover, stir occasionally and cook for about an hour
  6. Remove lid and let the chili cook for an additional hour to thicken up
  7. Add salt to taste

This is great without, but you could top with cheese if you can tolerate it!!  This is the perfect make ahead meal or double it to freeze for later!

If you are an Amazon shopper, would you be so kind to use my affiliate link to make your purchases.  It is at no cost to you, it does provide a tiny kickback to Kate’s Healthy Cupboard.  This allows me to continue making and testing recipes for free.  Thanks so much!!

*I have recently switched all of my skincare and makeup to a company that is free of 1,500 chemicals!!  I am so particular about what goes into my body, I need to be just as picky as to what goes on my body!  Your skin is your largest organ and absorbs chemicals into the bloodstream faster than the gut does!  I am vain when it comes to my skin and was so thrilled to find products that are anti-aging and work!!!  Check out BeautyCounter for more info!!  You will love it!!  Give the gift of safe skincare this holiday season, gift sets available.

Kate's Healthy Cupboard - Gluten Free Recipes
In Entrees, Soups, Recipes Tags Bacon, Beef, Dairy Free, Egg-Free, Low Carb, Nut-Free, Paleo, Primal
13 Comments

Sausage and Mushroom Frittata

January 14, 2013 Kate
Sausage and Mushroom Frittata

A frittata is an Italian omelet and is often confused for a quiche.  A frittata does not have a crust like most quiches do and it also starts on the stove and ends in the oven.  I find frittatas to be so easy, and like quiches, can be made with so many different ingredient combinations. Here is a basic frittata recipe that certainly has more than just a basic taste!  It will give you an idea of how to create whatever frittata you'd like!

A couple of things to consider as you create your ideal frittata recipe:

Typically you use two eggs per person and the total number of eggs determines the skillet size.  An eight egg frittata will be cooked in an eight in skillet and ten eggs cooked in a ten inch and so on.  If you prefer a thicker frittata, use a smaller skillet than number of eggs.  Make sure the skillet is oven safe, I prefer cast iron for this.

A frittata cooks fairly quickly and most raw ingredients won't have enough time to fully cook.  Saute vegetables and meat before adding the eggs.  This also allows for moisture to be drawn out of the vegetables.  Raw vegetables will release too much moisture and leave your frittata soggy.  This is why tomatoes are not a good option since they have a high water content when raw and cooked.

Add salt to the whisked eggs, not to the vegetables, salt draws out moisture.  Before you salt and pepper the eggs, consider your ingredients and their saltiness.  For instance, sausage, ham and bacon are salty, therefore you will not need as much salt as you would if you are making an all vegetable frittata.

Recipe: Sausage and Mushroom Frittata

Ingredients

  • 8 pastured eggs
  • 1/2 lb breakfast sausage*
  • 8oz sliced mushrooms
  • 1/2 an onion, diced
  • 1 tsp fennel seeds
  • couple dashes of paprika and garlic powder
  • salt and pepper
  • 1/2 - 3/4 cup cheese, grated or diced (optional)

Instructions

  1. Turn oven onto broil and position the racks in the bottom portion of the oven
  2. Whisk the eggs with salt and pepper (add cheese to mixture if desire), set aside
  3. Brown the sausage in an 8 inch skillet(or smaller for thicker frittata) and add in the onions and mushrooms
  4. Continue to saute until most of the moisture is cooked off, turn heat down to medium low
  5. Pour in the egg mixture and scrape the sides as the eggs cook
  6. Continue scraping as egg curds begin to form, you want the frittata to be cooked about half way through
  7. Once it’s cooked half way through, place the skillet under the broiler for about 3-5 minutes until it begins to brown
  8. Remove from heat and serve hot

Quick notes

*I used Whole Foods Ground Breakfast Pork Sausage. If you buy plain pork sausage, you will need to season it more since the one I used is already seasoned. You could certainly do bacon or ham instead.

Let us know what flavor combinations you come up with!!!

Kate's Healthy Cupboard - Gluten Free Recipes
In Breakfasts, Recipes Tags Breakfast, Brunch, Dairy Free, Low Carb, Mushrooms, Nut-Free, Paleo, Primal, Sausage
1 Comment

Creamy Roasted Cauliflower and Mushroom Soup

January 10, 2013 Kate
Creamy Roasted Cauliflower and Mushroom Soup

It seems that most of the west is about to experience a bit of a cold front.  I thought this would be the perfect time to share this recipe!  I'm fortunate enough to still be in Arizona where a cold front means it's going to be in the 50's!  I live in Colorado, so listening to the weather forecast here cracks me up!!  What these people think is cold is definitely a hot winter day at home!

Even if it's not cold where you are, this is a delicious soup recipe to enjoy for lunch or dinner.  I served it with bacon pieces and used the bacon grease for flavor.  If you'd prefer, you can certainly skip the bacon, but who skips bacon?  This would also be good with shredded chicken as well.

Creamy Roasted Cauliflower and Mushroom Soup

Ingredients

  • 1 head of cauliflower, cut into pieces
  • 2 tbsp coconut oil
  • 2-3 pieces of bacon (optional)
  • 2 tbsp bacon grease, butter or coconut oil
  • 1/4-1/2cup white onion, diced
  • 2 garlic cloves, minced
  • 1 tsp fresh thyme or 3 tsp dried
  • 8 oz mushrooms, sliced
  • 1/4 cup white wine
  • 3 cups homemade chicken broth (or canned)
  • 3/4 cup full fat coconut milk
  • 2 tbsp grass-fed butter (optional)
  • sea salt and pepper

Instructions

  1. Place the pieces of cauliflower in a bowl and coat with the 2 tablespoons of coconut oil. Place single layer on a parchment lined cookie sheet and sprinkle with salt and pepper and roast at 400 for 25-30 minutes
  2. Cook the bacon in a skillet, reserve the grease, cut the bacon into pieces and set aside
  3. Place the bacon grease, coconut oil or butter in a large sauce pan with the onion. Saute the onions until slightly browned
  4. Add the garlic, thyme and mushrooms. Saute until the mushrooms are tender, about 5-10 minutes
  5. Add the white wine and de-glaze the pan
  6. Add the chicken broth and cauliflower and bring to a boil. Reduce heat to a simmer for 5 minutes
  7. Place the soup, coconut milk and optional butter in a food processor or blender and combine until desired consistency
  8. Salt and pepper to taste
  9. Sprinkle the bacon pieces on top (optional)

I served this tonight and when I told Tom what I had made, this was his response: "If I saw that on the label ofa soup can, I would not think it sounded very good."  About two bites into it, he kept telling me how awesome it was!  I knew he was going to like it!  Butter, bacon and mushrooms, who wouldn't love this!!

Kate's Healthy Cupboard - Gluten Free Recipes
In Entrees, Side Dishes, Soups, Vegetables, Recipes, Snacks and Appetizers3 Tags Bacon, Coconut Milk, Dairy Free, Egg-Free, Low Carb, Mushrooms, Nut-Free, Paleo, Primal
4 Comments

Roasted Tomato Basil Meatballs

January 6, 2013 Kate
Tomato Basil Chicken Meatballs

Happy New Year to you all!!  Sorry I have been MIA lately.  My boyfriend had knee surgery before the holidays and it's been a bit crazy around here!

I wish I could come out with a bang to start the year off, but to me, baked goods are the way to do that and I am taking a break from those for a bit!  Don't worry, chocolate will be back in my ingredient lists soon, Valentine's Day is right around the corner!!!

This picture doesn't really do this justice, but it's the best I could do with the lighting, dishes and old camera I had.  I recently made this again with ground beef instead of ground chicken that I used in the original recipe.  I really liked both of them, you can't go wrong.

Most meatloaf and meatball recipes use breadcrumbs to hold it together.  I use mushrooms chopped up into little pieces to create the same effect, and they add some flavor.  I love mushrooms and can't believe I wouldn't touch them until a few years ago.  I can eat an entire 8 ounce container myself and always wish I had more!  It's so easy to saute them with butter and garlic and then do a white wine or sake reduction.  YUM!!!

This recipe also called for roasting your own tomatoes for the sauce.  Feel free to buy fire roasted tomatoes in the can if you don't have the time to do this.  I think the oven roasted tomatoes give it more flavor, but either way, this is delicious.  We just eat this plain, we're simple like that, but feel free to serve over spaghetti squash.

Adapted from One Lovely Life's Basil Chicken Meatballs in Roasted Tomato Basil Sauce


Roasted Tomato Basil Meatballs

Ingredients

Meatballs:

  • 1 lb ground meat (I’ve used chicken and beef, both are good!)
  • 1 egg, lightly beaten
  • 1/2 cup chopped mushrooms (use mushrooms that will be used in sauce)
  • 2-3 tbsp fresh basil, minced
  • 1 tsp fennel seeds
  • 1 tsp dried oregano
  • 1/2 tsp sea salt
  • 1/4 tsp black pepper
  • 1/4 tsp garlic powder

Sauce:

  • 2 cartons of grape tomatoes or 4 large tomatoes on the vine (or large can of fire roasted tomatoes)
  • 1 tbsp olive oil
  • 1 tbsp balsamic vinegar
  • 1 tbsp oregano
  • 1 8oz can of tomato sauce
  • 8oz sliced mushrooms (1/2 cup used in meatballs)
  • 1/3 cup fresh basil, minced
  • 1 garlic clove
  • salt and pepper to taste

Instructions

Roasted Tomatoes:

  1. Chop tomatoes into pieces and place single layer on a parchment lined cookie sheet
  2. Drizzle with the oil and vinegar. Sprinkle with the oregano and salt and pepper
  3. Roast at 375 for 45-60 minutes

Meatballs:

  1. In a bowl, combine the meat, egg, mushrooms, basil, fennel, oregano, salt, pepper and garlic powder.
  2. Form into one inch meatballs, about 20-25
  3. Place on a parchment lined cookie sheet and bake at 400 for 15-20 minutes or until just browned

Sauce:

  1. While meatballs are cooking, pulse the roasted tomatoes, tomato sauce and garlic clove until desired consistency
  2. Pour mixture into a large saucepan and bring to a simmer over medium low heat.
  3. Add the mushrooms and cook until tender, about 5-8 minutes.
  4. Stir in basil and add salt and pepper or more basil to taste.
  5. If sauce is thicker than you’d like, add a bit of water
  6. Once meatballs have finished cooking, add them to the sauce and toss until coated.
  7. Serve hot over spaghetti squash or enjoy plain topped with mozzarella if you can tolerate dairy
Kate's Healthy Cupboard - Gluten Free Recipes
In Entrees, Recipes Tags Chicken, Low Carb, Meatballs, Mushrooms, Nut-Free, Paleo, Primal
Comment

Breakfast Meatza Pizza

December 3, 2012 Kate
Breakfast Meatza
Breakfast Meatza

I decided to throw this Breakfast Meatza Pizza together for Sunday Brunch over the Thanksgiving Weekend.  Looking at what it has in it, how could you go wrong regardless of what it looked like as a finished product!  I mean bacon, eggs, sausage, avocado, who wouldn't like it!  This breakfast pizza was a hit and who says it can only be eaten for breakfast!  It tastes just as good the next day for leftovers and is the perfect on the go meal!!!

Sausage Recipe inspired by Make It Paleo

Recipe: Breakfast Meatza

Serves: 4

Ingredients

Crust:

  • 1 lb pork sausage*
  • 1 egg
  • 1 tsp garlic powder or two garlic cloves, minced
  • 2 tsp fennel seeds
  • 1 tsp paprika
  • 1/2 tsp sage
  • 1/4 tsp pepper
  • 1/2 tsp sea salt
  • 1/2 tsp red pepper flakes
  • 1/4 tsp cayenne pepper (optional for spicy)

Toppings

  • 4 eggs
  • 2 pieces bacon
  • 1 avocado, sliced
  • 8 oz mushrooms, sliced
  • 1/4 cup onions, diced
  • 1 garlic clove, minced
  • sea salt and pepper

Instructions

  1. In a mixing bowl, combine the crust ingredients and mix well
  2. Press the sausage mixture onto a pizza pan, cast iron pan or on a cookie sheet.
  3. Bake at 425 for 20-25 minutes
  4. Place the bacon in a skillet and cook until just slightly under cooked. Remove from pan and set aside
  5. Place the mushrooms, onions and garlic in the pan with bacon grease and saute over medium heat until tender
  6. Once the crust is done, remove it from the oven and crack the 4 eggs onto it.
  7. Place the mushroom mixture, avocado and bacon pieces onto the pizza and sprinkle with salt and pepper
  8. Return to the oven and bake for 10 minutes longer

Quick notes

The yolks will be slightly under cooked. If you prefer runny yolks, reduce the time or add time if you prefer yolks that are cooked all the way through.

Variations

*This could certainly be made with any other ground meat, the sausage is just the perfect breakfast meat!

If you can tolerate cheese, certainly add some to the toppings!


Get creative, there are so many options for toppings!

Kate's Healthy Cupboard - Gluten Free Recipes
In Breakfasts, Recipes Tags Breakfast, Brunch, Low Carb, Nut-Free, Paleo, Primal, Sausage
6 Comments

Sauteed Shredded Brussels Sprouts

November 16, 2012 Kate
Shredded Brussel Sprouts

Some of you may make the same menu every Thanksgiving, and others like to switch it up a bit.  I am sure we all have our staples of turkey, mashed potatoes and gravy, sweet potatoes and what ever else is a family favorite.  Here is an idea for any of you looking for a new idea for a vegetable to serve.  It includes bacon, so it's sure to make everyone go after a second helping...except those vegetarians out there!!!

I have quite a few recipes to get out before the holiday, so I am going to keep it short and sweet in my upcoming posts.  I have a fantastic muffin recipe coming that is perfect to include in your breakfast on Thanksgiving morning and a pumpkin tart dessert for anyone looking to do something different than a traditional pumpkin pie!!

Sauteed Shredded Brussel Sprouts

Ingredients

  • 2 lbs fresh brussels sprouts (2 bags), cleaned and trimmed
  • 4 slices of bacon (US Wellness Meats is a great place to buy bacon that is pasture raised and sugar free)
  • 2-3 garlic cloves, minced
  • 1/2- 1 cup onions, diced
  • salt and pepper to taste

Instructions

  1. Place the brussels sprouts in a food processor and pulse until they are shredded
  2. In a large skillet, fry the bacon until crispy. Set aside and reserve 2 tbsp of bacon grease in the pan
  3. Add the onion, salt and pepper to the pan and saute until the onions are close to translucent
  4. Add the sprouts and the garlic and continue to saute until completely cooked (about 3-5 minutes)
  5. Tear the bacon into pieces and stir into the sprouts

I found myself going back for more of this...it's that good and such a different way to fix brussels sprouts.  I think this would also be good with cabbage if any of you are not sprouts fans.

Kate's Healthy Cupboard - Gluten Free Recipes
In Side Dishes, Vegetables, Recipes Tags Bacon, Dairy Free, Low Carb, Paleo, Primal, Vegetables
Comment
Older Posts →
download.jpeg

Welcome to Kate's Healthy Cupboard! A place for healthy, grain free recipes, some low carb recipes, safe beauty and products for the home  and more...


>>  CONNECT WITH KATE  <<

pinterest.png
facebook.png
instagram.png

>>  SUBSCRIBE  <<

Success! Now check your email to confirm your subscription.

There was an error submitting your subscription. Please try again.


>>  SEARCH RECIPES  <<


Copyright 2016 Kate's Healthy Cupboard  ||  Website Design