I recently received a sampler pack of goodies from Steve's Paleo Goods. The box was full of grain free granola, cookies, jerky's sauces, dried fruits and more!! The cool thing about this online paleo store, is that 15% of the proceeds go to Steve's Club National Program. This is his 501c3 non-profit that brings fitness, nutrition guidance and mentorship to at-risk youth. He works with CrossFit Affiliates across the country to start Steve’s Club Local Clubs in their own communities. This has always been his passion; and it continues to be the driving force behind Steve's PaleoGoods. You can find these goodies along with nut butters, spice rubs, oils, cracklings and so much more at Whole Foods or online!!
One smell of the two sauces I erceived and I knew I needed to create a savory recipe for you guys! I was lucky enough to receive his Maple Mustard and Ginger Cilantro sauces. These can be used for dressings, marinades, sauces and dips. The best part is that they are made with olive oil and apple cider vinegar, unlike most sauces and dressings that are full of gmo canola oil! I hope you enjoy this recipe as much as we did!! It makes for great leftovers...even cold right out of the fridge!
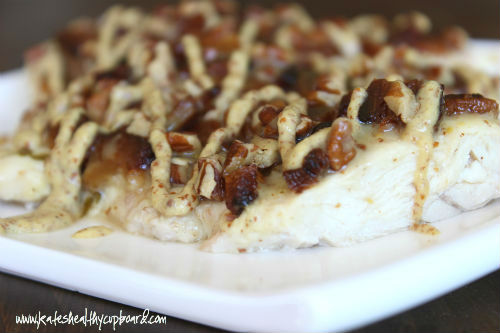
Bacon Pecan Maple Mustard Chicken
Prep time: 10 mins
Cook time: 30 mins
Total time: 40 mins
Serves: 4
Ingredients
- 4 chicken breasts, thinned out
- 1/4 - 1/3 cup Maple Mustard*
- 4-5 strips of bacon, cooked and cut into pieces
- 1/4 cup pecans, chopped into pieces
- Stone ground mustard
Instructions
- Place the chicken breasts in a greased baking dish
- Brush or spoon on about 1 tbsp of Maple Mustard onto the top of each breast to lightly coat. Reserve the rest of the sauce for later
- Sprinkle the bacon and pecan pieces over each breast
- Bake with a loose cover at 350 for 15 minutes. Remove the cover and bake an additional 15 minutes.
- Remove from the oven and drizzle the remaining Maple Mustard over each breast. Finish them off with another drizzle of stone ground mustard
Notes
*Maple Mustard sauce is from Steve's Paleo that can be found online (link in blog) or from Whole Foods.
xo,