• Blog
  • Recipes
  • Lifestyle
  • Safer Skincare
  • About
  • Contact
Menu

Kate's Healthy Cupboard

Street Address
City, State, Zip
Phone Number
Healthy Lifestyle, Healthy Grain Free Recipes

Your Custom Text Here

Kate's Healthy Cupboard

  • Blog
  • Recipes
  • Lifestyle
  • Safer Skincare
  • About
  • Contact

Bacon Pecan Maple Mustard Chicken

September 30, 2015 Kate
Bacon Pecan Maple Mustard Chicken

I recently received a sampler pack of goodies from Steve's Paleo Goods.  The box was full of grain free granola, cookies, jerky's sauces, dried fruits and more!! The cool thing about this online paleo store, is that 15% of the proceeds go to Steve's Club National Program.  This is his 501c3 non-profit that brings fitness, nutrition guidance and mentorship to at-risk youth.  He works with CrossFit Affiliates across the country to start Steve’s Club Local Clubs in their own communities. This has always been his passion; and it continues to be the driving force behind Steve's PaleoGoods.  You can find these goodies along with nut butters, spice rubs, oils, cracklings and so much more at Whole Foods or online!!

 One smell of the two sauces I erceived and I knew I needed to create a savory recipe for you guys!  I was lucky enough to receive his Maple Mustard and Ginger Cilantro sauces.  These can be used for dressings, marinades, sauces and dips.  The best part is that they are made with olive oil and apple cider vinegar, unlike most sauces and dressings that are full of gmo canola oil!  I hope you enjoy this recipe as much as we did!!  It makes for great leftovers...even cold right out of the fridge!

Bacon Pecan Maple Mustard Chicken

Prep time: 10 mins
Cook time: 30 mins
Total time: 40 mins
Serves: 4

Ingredients

  • 4 chicken breasts, thinned out
  • 1/4 - 1/3 cup Maple Mustard*
  • 4-5 strips of bacon, cooked and cut into pieces
  • 1/4 cup pecans, chopped into pieces
  • Stone ground mustard

Instructions

  1. Place the chicken breasts in a greased baking dish
  2. Brush or spoon on about 1 tbsp of Maple Mustard onto the top of each breast to lightly coat. Reserve the rest of the sauce for later
  3. Sprinkle the bacon and pecan pieces over each breast
  4. Bake with a loose cover at 350 for 15 minutes. Remove the cover and bake an additional 15 minutes.
  5. Remove from the oven and drizzle the remaining Maple Mustard over each breast. Finish them off with another drizzle of stone ground mustard

Notes
*Maple Mustard sauce is from Steve's Paleo that can be found online (link in blog) or from Whole Foods.

xo,

In Recipes, Entrees2 Tags Bacon, Chicken, Dairy Free, Low Carb, Paleo
Comment

Coconut Curry Chicken Meatball Soup

December 3, 2013 Kate
Coconut Curry Meatball Soup

It's about to get REALLY cold here in Colorado...and snow a few inches.  I am actually excited for it to feel like winter and like the Holidays.  This soup is perfect for these next few days of below zero nights!

I used a crockpot to make this soup so that I could just throw it in and walk away from it.  I don't see why this wouldn't work in a large sauce pan or a soup pot like this Le Creuset Soup Pot that I would love to have!!

Coconut Curry Chicken Meatball Soup

Serves: 3-4

Ingredients

  • 1 lb ground chicken breast
  • 1 carton of mushrooms, shiitake or button
  • 1 bunch green onions
  • 1/2 pastured egg, beaten (save the other half to add into eggs or add to a smoothie)
  • 1 can full fat coconut milk
  • 1/2 cup chicken broth (preferably homemade)
  • 1 1-2 inch piece of peeled fresh ginger
  • 1 tbsp Coconut Aminos*
  • 1 1/2 tbsp red curry paste
  • 1 tsp salt
  • 1 garlic clove, finely minced

Instructions

  1. Chop the whites off of the onions and set the greens aside for the soup. Finely chop 1/2 cup of the mushrooms and save the rest for the soup
  2. Combine the chicken, egg, chopped whites, chopped mushrooms, minced garlic and sea salt in a bowl
  3. Form the meat into desired size meatballs and place in the bottom of the crockpot
  4. Combine the coconut milk, broth, coconut aminos and curry paste in a mixing bowl
  5. Add the remaining mushrooms and chopped greens from the onions
  6. Pour over the meatballs and place the piece of ginger into the liquid
  7. Cook on high for 2 1/2 to 3 hours, add salt if needed

Quick notes

*You could replace Coconut Aminos with tamari or Bragg’s, but both of those are saltier than the aminos so maybe use a bit less to start

Variations

I imagine this will work in a soup pot or could also be cooked on the low setting of your crockpot for longer if need be.  You could add some additional vegetables such as broccoli, red pepper and snow peas if you wanted to.  It may not be as soupy, but still good!!!  This would also be great served over cauliflower rice or white rice if you tolerate it.

I actually ate this as leftovers cold and loved it just as much!

Kate's Healthy Cupboard - Gluten Free Recipes
In Soups, Recipes Tags Chicken, Coconut Milk, Low Carb, Meatballs
Comment

Roasted Tomato Basil Meatballs

January 6, 2013 Kate
Tomato Basil Chicken Meatballs

Happy New Year to you all!!  Sorry I have been MIA lately.  My boyfriend had knee surgery before the holidays and it's been a bit crazy around here!

I wish I could come out with a bang to start the year off, but to me, baked goods are the way to do that and I am taking a break from those for a bit!  Don't worry, chocolate will be back in my ingredient lists soon, Valentine's Day is right around the corner!!!

This picture doesn't really do this justice, but it's the best I could do with the lighting, dishes and old camera I had.  I recently made this again with ground beef instead of ground chicken that I used in the original recipe.  I really liked both of them, you can't go wrong.

Most meatloaf and meatball recipes use breadcrumbs to hold it together.  I use mushrooms chopped up into little pieces to create the same effect, and they add some flavor.  I love mushrooms and can't believe I wouldn't touch them until a few years ago.  I can eat an entire 8 ounce container myself and always wish I had more!  It's so easy to saute them with butter and garlic and then do a white wine or sake reduction.  YUM!!!

This recipe also called for roasting your own tomatoes for the sauce.  Feel free to buy fire roasted tomatoes in the can if you don't have the time to do this.  I think the oven roasted tomatoes give it more flavor, but either way, this is delicious.  We just eat this plain, we're simple like that, but feel free to serve over spaghetti squash.

Adapted from One Lovely Life's Basil Chicken Meatballs in Roasted Tomato Basil Sauce


Roasted Tomato Basil Meatballs

Ingredients

Meatballs:

  • 1 lb ground meat (I’ve used chicken and beef, both are good!)
  • 1 egg, lightly beaten
  • 1/2 cup chopped mushrooms (use mushrooms that will be used in sauce)
  • 2-3 tbsp fresh basil, minced
  • 1 tsp fennel seeds
  • 1 tsp dried oregano
  • 1/2 tsp sea salt
  • 1/4 tsp black pepper
  • 1/4 tsp garlic powder

Sauce:

  • 2 cartons of grape tomatoes or 4 large tomatoes on the vine (or large can of fire roasted tomatoes)
  • 1 tbsp olive oil
  • 1 tbsp balsamic vinegar
  • 1 tbsp oregano
  • 1 8oz can of tomato sauce
  • 8oz sliced mushrooms (1/2 cup used in meatballs)
  • 1/3 cup fresh basil, minced
  • 1 garlic clove
  • salt and pepper to taste

Instructions

Roasted Tomatoes:

  1. Chop tomatoes into pieces and place single layer on a parchment lined cookie sheet
  2. Drizzle with the oil and vinegar. Sprinkle with the oregano and salt and pepper
  3. Roast at 375 for 45-60 minutes

Meatballs:

  1. In a bowl, combine the meat, egg, mushrooms, basil, fennel, oregano, salt, pepper and garlic powder.
  2. Form into one inch meatballs, about 20-25
  3. Place on a parchment lined cookie sheet and bake at 400 for 15-20 minutes or until just browned

Sauce:

  1. While meatballs are cooking, pulse the roasted tomatoes, tomato sauce and garlic clove until desired consistency
  2. Pour mixture into a large saucepan and bring to a simmer over medium low heat.
  3. Add the mushrooms and cook until tender, about 5-8 minutes.
  4. Stir in basil and add salt and pepper or more basil to taste.
  5. If sauce is thicker than you’d like, add a bit of water
  6. Once meatballs have finished cooking, add them to the sauce and toss until coated.
  7. Serve hot over spaghetti squash or enjoy plain topped with mozzarella if you can tolerate dairy
Kate's Healthy Cupboard - Gluten Free Recipes
In Entrees, Recipes Tags Chicken, Low Carb, Meatballs, Mushrooms, Nut-Free, Paleo, Primal
Comment

Cashew Chicken

October 22, 2012 Kate
Cashew Chicken
Cashew Chicken

I am starting to wonder why it took me so long to start cooking with a crockpot!  It can make meals so quick, easy and ready for you when you arrive home from a long day.  Plus, it's fantastic for making bone broth!  I was inspired to make this cashew chicken by this recipe that I found on Pinterest, but made quite a few changes to remove the sugars, gluten and a few other things.  Speaking of Pinterst, if you are on there and addicted like me, come follow me.  Although this recipe was done in a crock pot, I think you could probably make this on the stove or in the oven as well. Let me know if any of you try this!  I just don't think you can go wrong when cashews are involved!

Recipe: Cashew Chicken

Ingredients

  • 1/2 tsp fresh ginger, grated (A Microplane is my favorite for this and zesting)
  • 1/4-1/2 tsp red pepper flakes
  • 1/2 cup cashews

Instructions

  1. Add the chicken pieces and onion to the crockpot
  2. In a bowl, mix together all of the remaining ingredients except the cashews
  3. Pour the mixture over the chicken and mix so the chicken is coated
  4. Set temperature to low and cook for 3-4 hours
  5. Add in the cashews and serve

Quick notes

Double the sauce if you want some extra to put over vegetables.

The Cauliflower Fried "Rice" or the Cashew Bok Choy would be a great vegetable to have with this chicken dish!

Kate's Healthy Cupboard - Gluten Free Recipes
In Entrees, Recipes Tags Cashews, Chicken, Paleo, Primal
3 Comments

Chicken Noodle Soup

October 19, 2012 Kate
Chicken Noodle Soup
Chicken Noodle Soup

Yes, you are reading that correctly...noodles!!!  I am so excited about this recipe!  Not only does it have grain free noodles in it, but it has homemade broth that is full of numerous health benefits!!  Homemade broth is so easy to make, more on that later, but I wish it was available to buy frozen so more people would consume it!  Boxed broth just doesn't cut it when it comes to all the benefits, but it will work in this recipe if that's what you choose to use.

Enough about broth for now, this soup has noodles!!!!  Before you get too excited, those of you that still eat pasta, rices and breads, these will be enjoyable, but not as enjoyable as they will be to those of you that gave up gluten and rice pasta long ago!!!  I truly felt like I was eating noodles and the best part is, there's only a small amount of starch in this recipe.  My mom's chicken noodle soup was my all time favorite as a kid!  It was my birthday dinner request for years!  I remember going after more noodles than chicken and broth, so really it was her noodles that I loved!  They were thick, dense and delicious...and full of gluten!  This recipe comes pretty darn close and makes me feel like I'm getting the real thing!!

There are a couple of ingredients in this that you may be unfamiliar with.  Arrowroot Flour/Powder is the starch I use to bind and soften the noodles.  It is tasteless and often times used to thicken sauces and gravies (great alternative to cornstarch).  It comes from the rizhome plant and is pure starch, so it contains carbohydrates only.  Don't let that scare those of you that are trying to go low carb.  There is such a small amount of it in this recipe (about 21 grams total, so a little over 5 grams per serving)!  I use Bob's Red Mill Brand that can be found in the baking section of a grocery store or online.

The other ingredient is psyllium husk powder (or whole psyllium husks ground into a powder with a blender or spice grinder).  It acts as a thickener and binder as well.  It's mucilage properties (gels when liquid is added to it) sort of act as the gluten without having to use gluten.  It is a soluble fiber and often found in high amounts of things like Metamucil.  Don't worry, this will not cause intestinal distress!  There is such a small amount of it in this recipe, you won't even know it's there!!!  This is typically found in the supplement section of natural grocery stores or availableto order online.

Chicken Broth
Chicken Broth

I make chicken broth about every two weeks and drink a cup of it everyday.  It is so easy to do and like I said, so beneficial for so many things including healing your gut!!  It provides the body with easily absorbed minerals such as calcium, magnesium, phosphorus and other trace minerals.  In addition to the collagen it provides (Ladies, did you see the word collagen, it improves aging skin!  I hope you are all convinced to make your own broth now!!!), it also contains natural gelatin.

Gelatin was found to be useful in the treatment of a long list of diseases including peptic ulcers, tuberculosis, diabetes, muscle diseases, infectious diseases, jaundice and cancer. Babies had fewer digestive problems when gelatin was added to their milk. The American researcher Francis Pottenger pointed out that as gelatin is a hydrophilic colloid, which means that it attracts and holds liquids, it facilitates digestion by attracting digestive juices to food in the gut. (source: wapf.org)

I use a crockpot since I let it simmer for over 24 hours, but you can certainly use a large stock pot and leave it cooking overnight.  You want to use about 2lbs of bones for every 4 quarts of water.  Make sure your bones are from grass-fed animals (Us Wellness Meats is great source for tons of different bones and grass-fed meats)!  I use chicken feet most of the time and find them in a freezer at Whole Foods.  Ask the butcher if you can't find them.  I just love how much gelatin feet produce.  They are kind of creepy looking, but once you realize how amazing the broth is, you'll get over it!!  Add the bones and water to your pot and also add at least 2 Tbsp of Apple Cider Vinegar (organic and unfiltered) or Coconut Vinegar(vinegar provides acid and draws minerals out of the bones) along with about a tsp of sea salt.  Use more vinegar and salt if you are using more than 4 quarts of water.  I also add some garlic cloves, a carrot, celery stalk and some onion for flavor.    Allow the broth to come to a boil and then turn down the temperature to a simmer and let it simmer for at least 8 hours, the longer the better.  Once it's cooked, turn off the crockpot or remove your pot from heat and allow the broth to cool.  Strain the stock through a fine mesh metal strainer or with a spider and throw away what you skim off.  Place the cooled stock into glass jars for storage in the fridge (for up to a week) or pour into freezer-safe containers (not glass, they will break!) for later use. You can freeze it in ice cube trays and defrost a few at a time!

When the broth is fully cooled, it may have a gelatinous consistency. That means your broth is rich in gelatin!  Sometimes a longer or very hot simmer may break down the gelatin and your broth won’t appear gelatinous.  Don't worry, the minerals are still there. As you can see in my photo, there is a layer of fat on top.  If you like, you can skim off any fat that is now considered “tallow” – and feel free to cook with it! I have also heard its so good for your skin, applied topically!  I just might have to get brave and put it on my feet at night!!

Chicken Noodle Soup

Serves: 2-4

Ingredients

  • 8 cups chicken broth (homemade is best, see recipe in text above)
  • 1/2 – 1 onion, diced
  • 1 large carrot, diced
  • 1 celery stalk, diced
  • 1 clove garlic, minced (optional)
  • sprinkle of parsley for color (optional)
  • salt and pepper to taste
  • 2 chicken breasts

Noodles:

  • 1/4 cup coconut flour
  • 1/2 cup Honeyville almond flour
  • 2 tbsp psyllium husk powder (grind whole husks in blender)
  • 3 tbsp arrowroot flour
  • 2 large eggs*
  • 1/4 tsp salt
  • 1/4 tsp garlic

Instructions

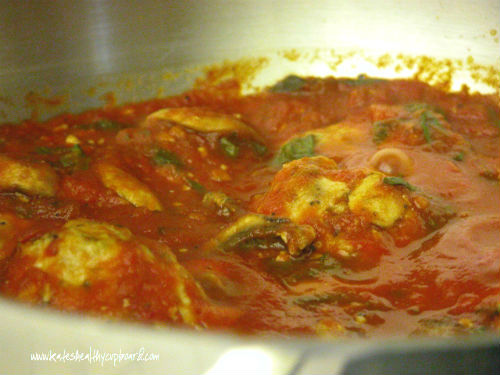
  1. In a large pot, bring the broth to a boil and add the onion, carrot, celery, garlic and salt and pepper.
  2. Turn down to a simmer and add the two chicken breasts
  3. Depending on the thickness of breasts, cook the chicken completely, about 10-15 minutes
  4. Remove the chicken and once it’s cool enough to touch, chop it or shred it and return it to the simmering soup

Noodles:

  1. Whisk the eggs in a mixing bowl
  2. Add the remaining ingredients and stir until dough forms
  3. If it seems too sticky add a tiny bit more almond flour.  It its crumbly, read my comment in Quick Notes below
  4. Place a piece of parchment paper on the counter and spray it with coconut oil spray or lightly brush oil onto the paper and place dough on it
  5. Take another piece of parchment and do the same to one side and place on top of the dough.  this keeps the dough from sticking
  6. Roll out the dough to no less than 1/4 inch thick. If these are to thin, some of noodle will disintegrate. I think a bit over 1/4 inch is best
  7. With a sharp knife or pizza cutter, cut noodles into desired width and length, they will grow a bit wider once cooked
  8. Place the cut noodles in the simmering broth, cover and cook for 3-5 minutes or until desired tenderness
  9. Remove pot from heat and serve

Quick notes

*I use farm fresh eggs that tend to be a bit smaller. If your dough is crumbly after you’ve completely mixed it, you may need to add another egg or half an egg (whisk and pour just half).

Soups On!!!!

Kate's Healthy Cupboard - Gluten Free Recipes
In Entrees, Soups, Recipes Tags Almond flour, Chicken, Coconut Flour, Paleo
7 Comments

Coconut Curry Carrot Soup

October 10, 2012 Kate
Coconut Curry Carrot Soup

It's definitely soup season here in Colorado!!!  I just returned from ten days in Arizona and can't believe how cold it feels here now!  I've decided I prefer the warmth and the idea of never having to scrape ice off my windshield!

While I was in Arizona, I made this soup for Tom's (my boyfriend) grandmother.  She is 93...reminds me of Betty White, love her!!  She hasn't been feeling great and I think dehydration is playing a role in her tiredness.  Old people don't want to drink so they don't have to go potty.  She of course thinks she drinks a ton of fluids.  It's hard to convince her that her coffee with Starbuck's Ice Cream in it in the morning and her Vodka on the rocks at night just doesn't cut it!!!  Needless to say,  I was on a mission to get some fluids in her!  I had her drinking coconut water and kombucha along with some homemade bone broth.  I figured soup would be a great way to secretly increase her fluid intake.  She loooooved this soup and ate it everyday for lunch and raved about it every time I dished it up for her.  Hope you enjoy it as much as sweet Verna May did!!!

Recipe: Coconut Curry Carrot Soup

Ingredients

  • 1 tbsp grass-fed butter or coconut oil
  • 2 heaping cups of thickly sliced carrots (about 4 carrots)
  • 2 thin slices of fresh ginger root
  • 1 medium onion, chopped
  • 5 cups chicken broth (I prefer homemade*)
  • 3/4 cup full fat coconut milk
  • 3/4 tsp red curry paste (add more if you want it spicier)
  • salt and pepper to taste
  • 1 scallion, sliced
  • 1 tbsp chopped cilantro
  • 2 chicken breasts (optional)

Instructions

  1. Heat the butter/oil in a large saucepan and stir in the carrots and ginger
  2. Cook over medium heat until the carrots start to brown, about 6-8 minutes stirring constantly
  3. Add the onions and cook until they are translucent
  4. Stir in the broth, coconut milk and curry paste
  5. Bring to a boil, reduce heat and simmer covered for 25 minutes
  6. If you want to add chicken to this recipe, add it to the simmering soup. Remove chicken once it's fully cooked and set aside
  7. Strain the solids so you can remove the ginger root and discard
  8. Add the solids plus 2 cups of the liquid to a blender and puree
  9. Add the remaining liquid and process until completely pureed
  10. Pour soup back into saucepan to add shredded chicken or pour into soup bowls (Use a fork to shred the chicken once it has cooled enough to touch. Add it to the soup and stir)
  11. Serve with some scallions and cilantro sprinkled on top and additional salt and pepper if needed

Quick notes

*I prefer to use homemade chicken broth for all of the health benefits. Store bought will work, but may be higher in sodium so be careful when you salt the soup. I use this recipe for broth. I also add onion, carrots, celery and garlic cloves to my pot for flavor. I use a large crockpot and let simmer for 24 hours to let all of the gelatin out of the bones.

Kate's Healthy Cupboard - Gluten Free Recipes
In Entrees, Side Dishes, Soups, Vegetables, Recipes, Snacks and Appetizers2 Tags Chicken, Coconut Milk, Nut-Free, Paleo
Comment

Chicken With Mushroom "Cream" Sauce

September 17, 2012 Kate
Chicken with Mushroom Cream Sauce

I can't believe I have shied away from mushrooms my entire life until recently!  I know it's a fungus, but damn they are good and heck, they have medicinal properties as well.  So why not saute some in butter and garlic then finish off with some white wine!! My only complaint is that you think you are making a ton, but by the time they cook up, it's half the amount and you find yourself longing for more!!

I found a recipe similar to this, but unfortunately, it called for heavy cream and my body can not handle that.  Coconut milk was the solution as long as all of the flavors would hide the coconut taste and it would thicken up.  I have to say, this was divine!!  I could have just eaten the entire pan of the mushroom cream sauce and left the chicken for another day!

I pan fried the chicken.  This may be a bit intimidating to some and quite simple for others.  Since chicken is a fairly lower fat meat, it's easy to over cook if not fried just right.  You could simply bake the chicken and then smother it in the mushroom sauce.  The only draw back to this is that you miss out on all the sucs, as the french call it, or solids from the meat left over in the pan that add flavor to the sauce.  When liquids are added to these solids, its creates a great base for gravies and sauces.

A couple of things to remember when pan frying.  I would recommend using a stainless steel pan.  Make sure the pan is hot before you add the oil and that the oil is hot before you add your meat.  The molecules of the pan are collapsing and expanding as it heats up and if you place meat in it before it's hot enough, those molecules will grab a hold of your meat and cause it to stick.  Make sure your meat is patted dry and completely thawed out.  if not, there will be added moisture to the pan resulting in a longer cook time and over done meat.  The goal is to have a crispy golden crust without over cooking the food.  Keep in mind the thickness of the meat, thinner meats should be cooked at higher heat for a shorter time.  Longer cooking times will result in tougher dry meat.  The heat can vary on stoves, but one way to make sure the pan is at the right temp is to listen to the sizzling.  You want a gentle sizzling sound, turn the heat down if the sizzling is too intense and turn it up if it's not sizzling.  If this sounds too hard but you want a crispy outside to your chicken, you could simply pan fry each side until they are browned, then throw the meat in the oven to finish cooking.

Recipe: Chicken With Mushroom Cream Sauce

Ingredients

  • 3 tbsp grass-fed butter
  • 1 tbsp coconut oil
  • salt and pepper

Instructions

  1. Heat a large, stainless- steel pan over medium high heat
  2. Pat the breasts dry and season with salt and pepper
  3. Once the pan has reached the proper temperature, add the oil and 2 tbsp butter
  4. Place the chicken breasts in the pan and cook until golden brown. You may need to turn your heat down to medium if it's sizzling too much.
  5. Flip and continue to cook until just done. Alternatively, you could just sear the chicken and then finish in the oven at 350.
  6. Once the chicken is cooked, remove from the pan and set aside. Place a tented piece of foil loosely over the plate
  7. Do not remove any of the solids or oil/ butter from the pan. Add the shallots and cook until translucent
  8. Add the remaining tablespoon of butter and the mushrooms
  9. Once the mushrooms have browned and their moisture has evaporated, deglaze the pan with the white wine
  10. Add the chicken broth and let the sauce reduce by two-thirds then add the coconut milk
  11. Let the sauce simmer and reduce until it's a sauce like consistency
  12. Add additional salt and pepper if needed then pour it over your chicken

Let me know if I have created more mushroom lovers!

Kate's Healthy Cupboard - Gluten Free Recipes
In Entrees, Recipes Tags Chicken, Coconut Milk, Egg-Free, Low Carb, Nut-Free, Paleo, Primal
2 Comments

Better Butter Chicken (From Sarah Fragoso)

August 27, 2012 Kate
Better Butter Chicken

I shared this recipe link on Kate's Healthy Cupboard Facebook Page recently.  I know not everyone uses Facebook so I wanted to share it on here too.  It is such an easy recipe and one that just about everyone will enjoy! It is not my recipe, just one I tried and fell in love with!

I made this for the second time in a matter of a few weeks because it is that tasty!!  We enjoyed it plain, but I think this would be great over spaghetti squash or pasta if gluten is something you still choose to pollute your body with (sorry, I just hate the stuff and wish everyone would realize it's negative effects on the body!).  I make it a bit more saucy by reducing the amount of chicken (I use 1 1/2 lbs instead of 2 1/2) in the recipe and suggest doing that if you do plan to serve it over pasta, rice, squash or spiraled vegetable noodles.  I also use chicken breasts, not thighs, but feel free to use either one.  The recipe calls for fenugreek powder, I used fenugreek seeds and it worked just fine.  Whole Foods sells bulk seasonings if you can't find it in a bottle or if you just want to buy enough for this recipe.  My suggestion is to use grass-fed butter where it is called for instead of the coconut oil option.  I think butter makes it creamier and let's be honest, butter makes all things better!!!

You can find the recipe here from Sarah Fragoso of Everyday Paleo.  This works well to freeze and pull out as leftovers later!!

Hope you enjoy it as much as we did!

Kate's Healthy Cupboard - Gluten Free Recipes
In Entrees, Recipes Tags Chicken, Coconut Milk, Egg-Free, Low Carb, Nut-Free, Paleo
Comment

Roasted Red Pepper & Basil Turkey Burgers

April 26, 2012 Kate
Roasted Red Pepper Turkey Burger

Ground turkey can be tricky to fix for the serious meat eater.  It tends to be a bit boring for them!  I think it may be due to the fact that it can be a drier meat if overcooked and doesn't have a ton of flavor to someone that is used to eating ground red meats.

When purchased from the meat counter, you will almost always get the very lean breast.  Since it is so lean, it tends to dry out very easily.  I personally prefer the taste of the lean over the 85% lean that you can typically find prepackaged.  Either one will work for this recipe or you can go with ground turkey thigh if you prefer.

Recipe: Roasted Red Pepper & Basil Turkey Burger
Ingredients
  • 1 lb ground turkey
  • 1 egg
  • 1 tbsp olive oil
  • 1/4 - 1/2 cup onions, diced
  • 1/3 cup roasted red peppers
  • 3 - 4 garlic cloves, minced
  • 2 tbsp fresh basil, chopped
  • 2 tbsp fresh parsley, chopped
  • 1 tsp sea salt
Instructions
  1. Whisk the egg in a bowl
  2. Add the turkey, onions, oil, peppers, spices and herbs into a bowl and pour the egg into the mixture
  3. Combine all of the ingredients with hands
  4. Form into patties (may seem a bit wet but should stay together)
  5. Heat an oiled skillet over medium heat
  6. Once the skillet is hot, add the patties and cover
  7. Bake for 5-7 minutes. Flip the burgers and bake another 3-4 minutes or until done

Serves: 4

Serve plain, wrapped in lettuce or topped with avocado!

Kate's Healthy Cupboard - Gluten Free Recipes
In Entrees, Recipes Tags Chicken, Low Carb, Nut-Free, Paleo, Turkey
Comment

Asian Chicken Meatballs

March 27, 2012 Kate
Asian Chicken Meatballs

I am on an Asian kick!  I have been without soy sauce for so long that everything Asian is sounding so good now that I discovered Coconut Aminos!  It is a great gluten free alternative to soy sauce and has less sodium as well.  I am hooked!

This recipe can be used with regular soy sauce or tamari, but it will have a bit stronger taste I imagine.  Coconut Aminos is a bit sweeter tasting.  The higher sodium content in regular soy sauce will definitely affect the taste as well so proceed with caution!  I suggest dumping the soy sauce for many reason and treating yourself and your family to Coconut Aminos from now on!!

Recipe: Asian Chicken Meatballs
Ingredients

Meatballs:

  • 1 lb ground chicken breast
  • 1 egg
  • 2 tbsp coconut flour
  • 1 tbsp fresh ginger minced
  • 1 clove garlic, minced
  • 1/2 tsp sea salt
  • 1/3 cup green onions, about 1 bunch (save the greens for the sauce)
  • 1 tbsp Coconut Aminos
  • 2 tsp toasted sesame oil

Sauce:

  • 4 tbsp Coconut Aminos
  • 1 tbsp toasted sesame oil
  • 1/8 - 1/4 cup scallions, chopped
  • 1 1/2 tsp toasted sesame seeds
  • 1-2 tsp red pepper flakes
Instructions

Meatballs:

  1. Combine all of the ingredients for the meatballs in a bowl and mush together
  2. Roll the meat into balls and place on a parchment lined cookie sheet (about 15 balls)
  3. Bake at 400 for 18-20 minutes

Sauce:

  1. Toast the sesame seeds in a dry skillet
  2. Combine the Coconut Aminos, scallions, oil, red pepper flakes and sesame seeds in a bowl
  3. Drizzle the sauce over the meatballs as soon as they come out of the oven
Quick notes

The meat may seem a bit sticky but the meatballs will set up perfectly once baked.  You may be able to substitute almond flour for the coconut flour.  Coconut flour absorbs more liquid so you may have to play with the amount.

Coconut Aminos are available online or at Whole Foods or Vitamin Cottage in the Asian sections.

Serve with steamed asparagus, broccoli or sauteed greens.  There should be enough sauce running off the meatballs to enjoy with the vegetables.

Visit Allergy Free Wednesday for additional allergy free recipes!

Kate's Healthy Cupboard - Gluten Free Recipes
In Entrees, Recipes Tags Chicken, Coconut Flour, Meatballs, Paleo, Primal
3 Comments

Artichoke and Sundried Tomato Stuffed Chicken

March 20, 2012 Kate
Artichoke and Sundried Tomato Stuffed and Crusted Chicken

A delicious way to spice up chicken!  I think chicken is something people tend to get burnt out on.  I know as a kid I felt like that was all we ever ate for dinner.  I have been trying to figure out something to stuff chicken with that did not include cheese.  I know for many of you, cheese makes all things better.  Cheese could certainly be added to this recipe, but I think it's perfect just the way it is!!

This recipe calls for artichoke hearts and sun-dried tomatoes (obviously) and I chose to use non-marinated artichoke hearts and dehydrated sun-dried tomatoes.  You can certainly use jarred hearts that have been marinated and tomatoes that are packed in oil.  They will lend to a bit of a different flavor and will add additional oil to the stuffing.  I opt for adding my own oils and seasonings in recipes so I tend to go for the plain ingredients and doctor it up myself.

Recipe: Artichoke and Sun-Dried Tomato Stuffed Chicken
Ingredients
  • 4 chicken breasts or cutlets
  • 1 1/2 cups artichoke hearts, drained
  • 1 cup dehydrated sun-dried tomatoes
  • 1/2 cup extra virgin olive oil
  • 4 garlic cloves
  • 3/4 cup fresh basil leaves
  • 1/2 tsp sea salt (may vary depending on which artichokes or tomatoes you use)
Instructions
  1. In a small sauce pan, bring about 2 cups of water to a simmer. Add the tomatoes, cover and remove from heat. (only for dried tomatoes, not jarred)
  2. Pound out the chicken breasts or cutlets so they are about 1/4 inch think, set aside
  3. In a food processor, combine the artichokes*, re-hydrated tomatoes, basil, garlic, oil and sea salt, pulse until chunky
  4. Spread the mixture onto the entire side of each breast. Roll the chicken tight and place a toothpick at both ends to hold it together.
  5. There should be some of the mixture left to spread on the top of each breast
  6. Place each one on a greased or a parchment lined sheet
  7. Bake at 350 for 25-30 minutes
Quick notes

*Don't forget to drain these! I also rinse them well to remove the extra salt that has been added to the liquid. I prefer to add my own sea salt.

Variations

Kalamata olives would be good in this mixture as well!

These are great as leftovers!!  I enjoyed one cold today and loved it!

Kate's Healthy Cupboard - Gluten Free Recipes
In Entrees, Recipes Tags Chicken, Egg-Free, Low Carb, Nut-Free, Paleo, Primal
Comment

Italian Chicken Nut Rolls

January 31, 2012 Kate
Italian Chicken Nut Rolls

Super easy and super good!!!  Some of us get sick of chicken breasts and need new ideas to change things up.  I personally like chicken and am excited to create new recipes so it's possible to eat it often and not get bored with it.  I remember as a kid asking what was for dinner and 9 times out of 10, the answer was chicken.  It amazed me how many different ways my mom could fix it or cover it in sauces to make us think it wasn't chicken.

I was known amongst my family for liking over cooked meat.  Well times have changed and the dry chicken that gets caught in your throat does not appeal to me!  These chicken rolls are so moist, full of flavor and won't get stuck in your throat.  This grain free recipe is similar to something my mom use to make us and I loved.  She used bread crumbs and butter while I opt for no grains and refined coconut oil instead.

Recipe: Italian Chicken Nut Rolls
Ingredients
  • 4 chicken breasts
  • 1 cup raw almonds, finely chopped
  • 1 cup raw pecans, finely chopped
  • 1 tsp garlic powder
  • 3 Tbsp Italian seasoning
  • 1 tsp sea salt
  • 1/4 cup refined coconut oil or grass-fed butter
  • Additional 2 tbsp grass-fed butter (optional)
Instructions
  1. Pound out the chicken to about 1/4 inch thick and cut in half lengthwise
  2. Place nuts in a food processor and grind until they become more like a meal, very small chunks
  3. Pour nuts onto a plate and add the garlic, Italian seasoning and salt and mix well
  4. Pour oil onto another plate.  Dip chicken in the oil or brush oil onto both sides of chicken
  5. Place chicken in the nut mixture and coat both sides.  Roll the breast and stick a toothpick in it to hold it together. Place on a greased cookie sheet
  6. Repeat for all the breasts and pour extra nuts over the tops of the chicken
  7. Place a small pat of butter on top of each roll (optional, but makes them brown even more)
  8. Bake at 350 for 25-30 minutes

I always use almonds and pecans, but you can certainly use whatever you'd like.  I will be sharing some additional nut crusted meats and fishes in the future.  Let us know what you come up with!

Kate's Healthy Cupboard - Gluten Free Recipes
In Entrees, Recipes Tags Almonds, Chicken, Dairy Free, Egg-Free, Paleo, Pecans, Primal
1 Comment
download.jpeg

Welcome to Kate's Healthy Cupboard! A place for healthy, grain free recipes, some low carb recipes, safe beauty and products for the home  and more...


>>  CONNECT WITH KATE  <<

pinterest.png
facebook.png
instagram.png

>>  SUBSCRIBE  <<

Success! Now check your email to confirm your subscription.

There was an error submitting your subscription. Please try again.


>>  SEARCH RECIPES  <<


Copyright 2016 Kate's Healthy Cupboard  ||  Website Design