• Blog
  • Recipes
  • Lifestyle
  • Safer Skincare
  • About
  • Contact
Menu

Kate's Healthy Cupboard

Street Address
City, State, Zip
Phone Number
Healthy Lifestyle, Healthy Grain Free Recipes

Your Custom Text Here

Kate's Healthy Cupboard

  • Blog
  • Recipes
  • Lifestyle
  • Safer Skincare
  • About
  • Contact

Grain Free "Wheat" Crackers

January 17, 2012 Kate
Grain Free "Wheat" Crackers

One of the many things I miss going gluten free, are crackers and crispy snack foods.  Here is a basic cracker recipe that would be perfect to spread some nut butter, egg salad, chicken salad or any dip on. Check out my Almond Coconut Spread, so good on these!!!!

Elana's Pantry has numerous cracker recipes and was my inspiration to create my own variety of crackers.  My Spicy Rosemary Cashew Crackers recipe is one of my favorites, a must try if you haven't yet!

Recipe: Grain Free "Wheat" Crackers
Ingredients
  • 1 1/4 cups almond flour (I used Bob's)
  • 1/4 cup raw almonds, finely chopped
  • 1 TBSP ground flax seed
  • 1 egg
  • 1 TBSP macadamia nut oil (or refined coconut oil)
  • 1/2 tsp sea salt
  • Couple pinches of coarse sea salt
Instructions
  1. Combine flour, chopped almonds (use a food processor to pulse into very small pieces), flax and 1/2 tsp sea salt in a bowl
  2. Whisk an egg and add oil, combine into flour mixture
  3. Place dough on a piece of parchment paper and place another piece on top of the dough
  4. Roll out the dough to about 1/8 inch thick
  5. Use a knife or pizza cutter to cut into 1 1/2 inch squares (makes about 24 crackers)
  6. Rub a couple pinches of coarse sea salt on top of dough
  7. Bake at 350 for 12-15 minutes or desired crispiness

Let us know how you like to top your Grain Free "Wheat" Crackers!

Kate's Healthy Cupboard - Gluten Free Recipes
In Snacks and Appetizers, Recipes Tags Crackers, Paleo, Primal
8 Comments

Almond Coconut Spread

January 15, 2012 Kate
Almond Coconut Spread

I am a HUGE fan of Justin's Nut Butters, especially his new Vanilla Almond Butter.  It's like frosting and we all know how much I love frosting!  I was fortunate enough to meet Justin in Boulder where the company is based.  He is such a nice guy so supporting him is easy!

This Almond Coconut Spread reminds me of Justin's products, but is different in terms of ingredients.  I had an idea based off a peanut butter dip recipe my mom makes when she entertains.  I knew it was a success when it became as addicting as Justin's!  When you don't need an apple slice or cracker to spread it on, just a spoon, you have a winner!!

Recipe: Almond Coconut Spread
Ingredients
  • 3/4 cup almond butter (I use the fresh grind from Whole Foods or you could make your own)
  • 1/2 cup full fat coconut milk
  • 1/3- 1/2 cup powdered (run through blender or coffee grinder) Lakanto* or powdered coconut sugar.  You could also use honey, maple syrup or coconut nectar to taste)
  • 2 TBSP Coconut Cream/Butter (could probably use virgin coconut oil)
  • 2 tsp vanilla
  • Dash of sea salt (omit if using jarred almond with added salt)
Instructions
  1. Combine all ingredients in a food processor and blend for a couple minutes
  2. Store in the refrigerator in an airtight container
  3. The spread with thicken up in the frig
Quick notes

*You don't have to powder the Lakanto or Wholesome Sweeteners Zero, but it will result in a bit of grittiness.

Variations

*You could use Wholesome Sweeteners Zero and a little Lo Han (1/4 tsp) in place of Lakanto

This treat could be used in so many different ways!  It is awesome on apples, could do bananas or any other fruit, spread on grain free crepes with strawberries and roll it up.  Spread it on these Grain Free "Wheat" Crackers, use as a frosting or simply eat it out of the jar!  Let us all know what other tasty treats you come up with!!!

Kate's Healthy Cupboard - Gluten Free Recipes
In Desserts, Dips and Spreads, Snacks and Appetizers, Recipes Tags coconut, Dips, Primal
1 Comment

Green Chili Buffalo Jerky

January 12, 2012 Kate
Buffalo Jerky
Buffalo Jerky

My first experiment with the dehydrator...SUCCESS!!!  I made the best jerky!  I love jerky but so many of them are flavored with soy sauce and I obviously can't have that.  I took my favorite green chili's and favorite spice blend from Penzey's, added them to ground buffalo and created this convenient high protein snack!  Using ground meats makes the process so much easier and you'll never know the difference!!  I just recently made it with ground turkey and beef and they are just as good!!!  Turkey has such little fat that it cooks a bit faster so make sure to check on it!

I have only used a dehydrator to make this but, I think the oven would work as well.  I included instructions for that.  If you try the oven method, please report back about how it worked!!!

Recipe: Green Chili Buffalo Jerky
Ingredients
  • 2 lbs. grass-fed ground buffalo (ground turkey breast or gound beef work great too)
  • 1 1/2 cups 505 Flame Roasted Green Chilis*
  • 1 1/2 tsp Penzey's Adobo Spice Blend*
  • 1/2 - 3/4 tsp sea salt
Instructions
  1. In a large bowl combine all the ingredients and mix together well
  2. Place the mixture on jelly roll lined dehydrator trays. Pat down to a little over 1/4 of an inch
  3. Dehydrate at 160 degrees for about 8 1/2 hours (the longer it goes the more leathery and chewy it will become)
  4. After about 6 hours flip the jerky
  5. Once it is dried to your liking, tear into pieces
Oven Method (I have not tried this but I think this should work)
  1. Set temp to 175 degrees
  2. Press mixture onto cookie sheets a little over 1/4 inch thick
  3. Cook for 4 hours and then flip it and cook another 2 hours. Check it periodically to make sure its not getting too dry
  4. Turn off oven and let it sit in there until completely dried out
  5. Once it's dried out, tear into pieces

*Penzey's is sold online or in one of there many locations.  Adobo spice is a blend of garlic, onion, Tellicherry black pepper, Mexican oregano, cumin and cayenne red pepper.   I'm sure you could sprinkle a few of these spices into the mix and make it taste just as good!  If using 505 chilis, that may be enough spice for some *505 Flame Roasted Chili's have way more flavor than canned green chilis.  They have a kick!  They can be found at some Whole Foods, Vitamin Cottage and on Amazon

Kate's Healthy Cupboard - Gluten Free Recipes
In Snacks and Appetizers, Recipes Tags Beef, Dairy Free, Dehydrated, Low Carb, Nut-Free, Paleo, Primal
Comment

Almond Nut Joy Granola

January 7, 2012 Kate
Almond Joy Nut Granola

When I created the VixiBar line over 3 years ago, I had so many flavor ideas.  Once I created and perfected a few flavors, it was so easy to figure out the others.  I think that is how my recipe creating is going to go as well.  I come up with one grain free dough ball cookie recipe and then I have 5 more like it to try.  I come up with a granola recipe, then I have 5 other flavor ideas in mind.  At least I'm giving variety and hopefully appealing to everyone's tastes!  I know not everyone is going to love every thing I create!!

Enjoy as a cereal, snack or topping on home-made dairy free ice cream

Recipe: Grain-Free Almond Nut Joy Granola
Ingredients
  • 2 cups raw almonds
  • 1 cup raw cashews
  • 1/2 cup raw macadamia nuts
  • 1 cup almond flour*
  • 1/2 cup psyllium husk (could replace with almond flour)
  • 1 3/4 cups coconut chips, flakes or shreds
  • 1/2 cup vanilla egg white protein powder*
  • 2/3 cup roasted almond butter
  • 1/2 cup plus a little more virgin coconut oil*
  • 2/3 cup full fat coconut milk
  • 3/4 cup honey* (I used Nature's Hollow)
  • 1 tsp vanilla
  • 1/2 cup dark chocolate crushed into pieces
  • dash celtic sea salt
Instructions
  1. In a food processor or hand chopper, grind nuts down to desired chunkiness. I prefer smaller pieces
  2. In a large bowl, combine the nuts, husk, flour, coconut chips, protein powder and salt
  3. In a small bowl, combine coconut oil, coconut milk, almond butter, vanilla and honey
  4. Pour the coconut mixture over the nut mixture and stir until nut mixture is coated
  5. Place mixture on dehydrator sheets and place in dehydrator at 115 degrees overnight or until desired crunchiness
  6. For oven method, place the mixture in a thin layer on parchment lined baking sheets. Bake at 175 degrees for 4 hours. Turn the oven off and let granola sit for another 4 hours or overnight to help it dry out. Depending on desired crunchiness, you may cook it less or more
  7. Once mixture has cooled just a bit, add the chocolate pieces and mix well.  You want the mixture a bit warm to make chocolate melt stick to the granola.  If it's too hot it will coat the mixture.  Still good this way, just not chunks of chocolate.  You could also add once it's completely cooled if you just want pieces in the mixture.  I use a dehydrator and like to add the chocolate to the mixture before it dehydrates.  The chocolate does melt some, but that's my favorite!!!
Quick notes

*I normally use Honeyville Almond Flour, but used Bob's Red Mill in this and it will work just fine!

*I like Jay Robb's Vanilla Egg White Protein. You can certainly use a vanilla whey in place of. I like the added protein and think it gives a little flavor, but feel free to leave it out.

*I use Nature's Hollow Xylitol Honey but regular honey will work, maybe add a bit less and taste before adding more.  If you cut down on the amount of honey, you may need to add more oil or milk for additional liquid

*I love using Whole Foods or Tropical Traditions Organic Virgin Coconut Oil in recipes when I want the coconut flavor to be present in the recipe

Kate's Healthy Cupboard - Gluten Free Recipes
In Breakfasts, Desserts, Snacks and Appetizers, Recipes Tags Almond flour, Almonds, Breakfast, Chocolate, coconut, Dehydrated, Egg White Protein, Granola, Paleo, Primal
8 Comments

Grain-Free Banana Nut Granola

January 7, 2012 Kate
Banana Nut Granola
Banana Nut Granola

When you think of granola, you think of oats.  It's hard to find recipes without the use of oats.  I know there's gluten free oats, but since going grain-free, those are not an option.  So many recipes for grain-free granola seem more like trail mix to me.  I wanted to create something that was crunchy, but at the same time didn't taste like a pile of nuts and dried fruits.

I came across a recipe from Maria Emmerich that caught my attention.  It had psyllium husk in it and it seemed like that would give it a great texture and hold it all together.  I liked her recipe, but I will be very honest with you about something.  Psyllium husk is fiber and when a recipe calls for 2 cups of it, the result is simply not pretty the next day.  If you suffer from constipation, then feel free to add lots more of it to my recipes!  I like to include it for some texture and added fiber, but certainly not 2 cups!!  I took her idea but completely changed the recipe to my own flavors and liking.  The result...some very addicting, crunchy and tasty treats!!!   I had to hurry up and take these photos before I ate it all!  Hope you enjoy it as much as I do!

Recipe: Grain-Free Banana Nut Granola
Ingredients
  • 2 cups raw almonds
  • 1 1/2 cups raw walnuts
  • 1/2 cup psyllium husk (could replace with more flour)
  • 1 cup almond flour*
  • 1 cup coconut chips, flakes or shreds (optional)
  • 1/2 cup vanilla egg white protein*
  • 1/8 cup roasted almond butter
  • 3/4 cup honey* (I used Nature's Hollow Xylitol Honey)
  • 1 tsp vanilla
  • 3/4 cup over ripe banana, mashed or pureed (about 2 small)
  • dash of sea salt
Instructions
  1. In a food processor or hand chopper, grind nuts down to desired chunkiness. I prefer smaller pieces.
  2. In a large bowl, combine the nuts, husk, flour, coconut chips, protein powder and salt
  3. In a small bowl, combine bananas, almond butter, vanilla and honey
  4. Pour the banana mixture over the nut mixture and stir until nut mixture is coated
  5. Place mixture on dehydrator sheets and place in dehydrator at 115 degrees overnight or until desired crunchiness.
  6. For oven method, place the mixture in a thin layer on parchment lined baking sheets. Bake at 175 degrees for 4 hours. Turn the oven off and let granola sit for another 4 hours or overnight to help it dry out. Depending on desired crunchiness, you may cook it less
Quick notes

*I normally use Honeyville Almond Flour, but used Bob's Red Mill in this and it will work just fine!

*I like Jay Robb's Vanilla Egg White Protein. You can certainly use a vanilla whey in place of. I like the added protein and think it gives a little flavor, but feel free to leave it out.

*I use Nature's Hollow Xylitol Honey but regular honey will work, maybe add a bit less and taste before adding more.

Variations

I do not eat peanuts, but here is an option. Replace some of the nuts for unsalted peanuts and replace the almond butter for peanut butter.

Enjoy as a cereal with unsweetened almond, coconut or hemp milk or just as a crunchy snack!

Kate's Healthy Cupboard - Gluten Free Recipes
In Breakfasts, Snacks and Appetizers, Recipes Tags Almond flour, Almonds, Breakfast, coconut, Dehydrated, Egg White Protein, Granola, Paleo, Primal
7 Comments

Sweet Potato Biscuit Bites

January 3, 2012 Kate
Sweet Potato Biscuit Bites

Working on my photo skills with the oh so old camera I am using.  You can tell that this photo is not that great, but will have to work.  The problem is the lighting needs to be perfect and these tasty treats didn't last much longer than a day so I only had one photo opportunity!

Recipe: Sweet Potato Biscuit Bites
Ingredients
  • 1 cup sweet potatoes (mashed, roughly 1 medium)
  • 1 egg
  • 1 tbsp arrowroot powder
  • 2 3/4 cups almond flour
  • 1/4 tsp baking soda
  • 1/2 tsp sea salt
  • 1/2 tbsp fresh chopped rosemary
  • 1/2 tbsp fresh chopped basil
  • Oil for brushing the tops of biscuits (coconut or macadamia nut)
  • Coarse celtic sea salt
Instructions
  1. Bake the potatoes until soft
  2. Peel them and mash with a ricer or in a mixer until clumps are gone
  3. Whisk the egg and yolk in a bowl and add to the potatoes
  4. Add in the flour, arrowroot, baking soda and seasonings and mix well. I think it's easiest to knead with your hands
  5. Form a ball with the dough. It may be sticky, but do the best you can and leave in the bowl
  6. Refrigerate for a couple hours or over night
  7. Remove half the dough from bowl with oiled hands
  8. Use a cookie scoop or tablespoon to place the dough on a greased cookie sheet
  9. Brush a tiny amount of oil on the tops of each biscuit
  10. Pinch coarse sea salt over them
  11. Bake at 350 for 20-25 minutes
Variations

You can substitute the rosemary and basil for other herbs.

This recipe got my creativity going!  I'm working on some more grain- free, gluten free biscuits bites that will be sweet and savory!

Kate's Healthy Cupboard - Gluten Free Recipes
In Breads and Muffins, Snacks and Appetizers, Recipes Tags Paleo, Primal
2 Comments

Chocolate Hazelnut Dough Ball Cookies

January 3, 2012 Kate
Chocolate Hazelnut Dough Ball Cookies

Another yummy Dough Ball Cookie Recipe with more to come!!!

Recipe: Chocolate Hazelnut Dough Ball Cookies
Ingredients
  • 2 1/2 cups hazelnut flour
  • 1 1/2 tbsp refined coconut oil
  • 1/2 tsp baking soda
  • 1/2 cup maple syrup (I use Nature's Hollow), or honey or coconut nectar
  • 1 tbsp vanilla extract
  • dash of sea salt
  • 1/2 cup dark chocolate chips or chunks
Instructions
  1. Mix all of the dry ingredients in a bowl, set aside
  2. Mix all of the wet ingredients in another bowl
  3. Combine the wet ingredients into the dry ingredients and mix well. It's easiest to use your hands to mix
  4. Roll dough into a bit larger than an inch balls
  5. Bake at 350 for 12-15 minutes on a greased or parchment lined cookie sheet
  6. Watch them to make sure they don't get too brown on top. If you desire a doughier cookie, under cook them by a few minutes
Quick notes

I used Bob's Red Mill Hazelnut Flour/Meal found at Whole Foods, Vitamin Cottage and on Amazon. Any brand will work.  You could certainly make these with almond flour as well.  The hazelnut flour added an additional bit of sweetness and tasted yummy with the chocolate!

Look out, these are addicting!!!  Good thing they are grain-free and gluten free!!  They can be close to sugar free if you use Nature's Hollow Maple Syrup and  higher cacao content chocolate.

If you want to try Swerve or need to order more, use coupon code KATE10 for a 10% discount.  Swerve is my favorite sugar replacement.  It is the only sugar alcohol that will not cause tummy troubles and it does not raise blood glucose levels.

If you are an Amazon shopper, would you be so kind to use my affiliate link to make your purchases.  It is at no cost to you, it does provide a tiny kickback to Kate’s Healthy Cupboard.  This allows me to continue making and testing recipes for free.  Thanks so much!!

I have recently switched all of my skincare and makeup to a company that is free of 1,500 chemicals!!  I am so particular about what goes into my body, I need to be just as picky as to what goes on my body!  Your skin is your largest organ and absorbs chemicals into the bloodstream faster than the gut does!  I am vain when it comes to my skin and was so thrilled to find products that are anti-aging and work!!!  Check out my Beauty Counter link for more info!!  You will love it!!

Kate's Healthy Cupboard - Gluten Free Recipes
In Desserts, Snacks and Appetizers, Recipes Tags Chocolate, Cookies, Egg-Free, hazelnut flour, Primal
1 Comment

Cinnamon Raisin Dough Ball Cookies

January 3, 2012 Kate
Cinnamon Raisins Cookie Balls

I've always loved cookies that were a little undercooked and doughy, crispy cookies were not my thing.  When I saw this recipe inspired by Katie of Nourishing Flourishing, I knew I had to try it!  I changed a few things in the recipe, one being the removal of arrowroot flour.  I love using arrowroot, but wanted to create these with no added starch.

These taste great, but they taste even better fresh and warm out of the oven!  This creation could be turned into so many different cookie flavors.  I will post the Chocolate Hazelnut Dough Ball Cookie later tonight.  I am excited about a few other ideas I have for these super easy and sweet tooth satisfying treats!!!

Recipe: Cinnamon Raisin Dough Ball Cookies
Ingredients
  • 2 1/2 cups Almond Flour
  • 1 1/2 tbsp Refined Coconut Oil (melted)
  • 1/2 tsp baking soda
  • 1/2 cup maple syrup (I used Nature's Hollow), or honey or coconut nectar
  • 1 tbsp vanilla extract
  • 2-3 tbsp cinnamon
  • 1/2 cup raisins
Instructions
  1. Mix all of the dry ingredients in a bowl, set aside
  2. Mix all of the wet ingredients in another bowl
  3. Combine the raisins and wet ingredients into the dry ingredients and mix well. It's easiest to use your hands to mix
  4. Roll dough into a bit larger than an inch balls
  5. Bake at 350 for 12-15 minutes on a greased or parchment lined cookie sheet
  6. Watch them to make sure they don't get too brown on top. If you desire a doughier cookie, under cook them by a few minutes

Enjoy!

Kate's Healthy Cupboard - Gluten Free Recipes
In Desserts, Snacks and Appetizers, Recipes Tags Almond flour, Cookies, Egg-Free, Paleo, Primal
1 Comment

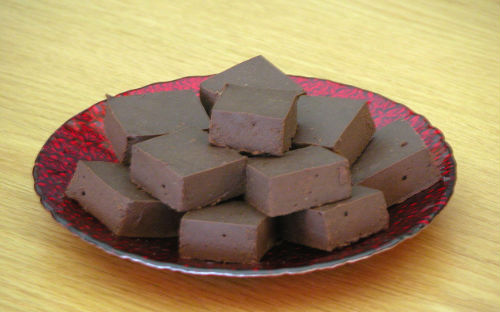
Homemade Marshmallow Creme Fudge

December 13, 2011 Kate
Homemade Marshmallow Creme Fudge

Disaster to Delicious!

I have loved marshmallows and marshmallow creme since I was a kid.  We would  leave the bag open at our house just so they'd get hard, or put them in ice cream for the same effect.  My mom has learned to buy two bags at thanks giving time knowing my sister and I will eat half a bag before she has the chance to top her sweet potato souffle!

When I saw a recipe for homemade marshmallows, I was on it!  Just like most recipes, I had to alter it to get the sugar down.  Well lets just say my alterations didn't work so well the first time and I ending up with really thick (wrap around the beaters and stay there kind of thick) marshmallow creme like stuff.  Couldn't let it go to waste so the options were, eat it or attempt to make fudge.  Fudge it was, and to die for fudge as one of my clients said.  I have to admit, it was to die for!  I guess some of the best recipes come as a result of a disaster!

Recipe: Homemade Marshmallow Creme Fudge .
Ingredients

Fudge:

  • 3/4 cup coconut oil (I used virgin for the coconut flavor)
  • 1 cup full fat coconut milk
  • 3/4 cup Lakanto or erythritol plus 1/4 + 1/8 tsp Lo Han
  • 1 3/4 cup 65% or higher chocolate chips
  • 1 1/2 tsp vanilla

Marshmallow Creme:

  • 1 cup Maple Syrup (I use Nature's Hollow maple syrup made from Xylitol)
  • 1 tbsp real maple syrup or coconut nectar if using Nature's Hollow
  • 1/4 cup water
  • 1 1/2 tbsp gelatin
  • 1/2 tbsp vanilla
  • dash of sea salt
Instructions

Marshmallow Creme:

  1. In large mixing bowl stir the water with gelatin and set aside
  2. In a sauce pan combine all maple syrups and bring to a boil
  3. Once syrup has reached 260-280 degrees, add to the bowl of gelatin.  Add vanilla and salt to the bowl as well. Beat on high for close to 10 minutes until thick creme forms and begins to attach to beaters. It should be really gooey and in a clump for the most part.  This is important or the fudge will not harden all the way.  Set aside

Fudge:

  1. In large sauce pan combine oil, coconut milk, erythritol and monk fruit. Bring to a rolling boil. Once it boils, continue boiling for 5 more minutes, stirring
  2. Remove from heat and add chocolate chips and vanilla. Stir until chocolate is completely melted
  3. Add the chocolate mixture to the bowl of creme and beat on high until well blended. Make sure to get all hard clumps of gelatin incorporated.
  4. Spread in a 9x9 glass pan and place in freezer to set
  5. Can be stored in the refrigerator once it has hardened
Variations

You can certainly use all regular maple syrup but obviously sugar content will go way up and may be too sweet.  I haven't tried this so I am not certain if it will turn out the same. Add a bit more real maple syrup if you don't have monk fruit.

Kate's Healthy Cupboard - Gluten Free Recipes
In Desserts, Recipes Tags Chocolate, Coconut Milk, Gelatin, Holiday, Nut-Free
Comment

Grain Free Spicy Rosemary Cashew Crackers

December 12, 2011 Kate
Spicy Rosemary Cashew Crackers

Gluten and Grain Free Crackers with a kick!

Crunchy crackers and snacks were some of the things I missed most when I had to go grain free.  These crackers solve that problem and disappear fast around here!

Recipe: Spicy Rosemary Cashew Crackers .
Ingredients
  • 2 Heaping Cups Raw Cashews (soaked and dried)
  • 1 Tbsp Macadamia Nut Oil
  • 1 Egg
  • 2 Tbsp Fresh Rosemary, chopped
  • 1/4-1/2 tsp Cayenne Pepper
  • 1 tsp Celtic Sea Salt
Instructions
  1. Place cashews in a food processor and grind to a meal/flour
  2. Combine egg, oil, rosemary, cayenne pepper and salt in a bowl and mix together
  3. Add the cashew flour to the bowl and mix well
  4. Place half the dough on a piece of parchment paper the size of a cookie sheet. Roll the dough out until its between an 1/8 and 1/4 inch thick.
  5. Cut with a sharp knife or pizza cutter into crackers
  6. Place the parchment paper onto a cookie and bake at 350 for 12-15 minutes depending on desired crispness

If you are an Amazon shopper, would you be so kind to use my affiliate link to make your purchases.  It is at no cost to you, it does provide a tiny kickback to Kate’s Healthy Cupboard.  This allows me to continue making and testing recipes for free.  Thanks so much!!

*I have recently switched all of my skincare and makeup to a company that is free of 1,500 chemicals!!  I am so particular about what goes into my body, I need to be just as picky as to what goes on my body!  Your skin is your largest organ and absorbs chemicals into the bloodstream faster than the gut does!  I am vain when it comes to my skin and was so thrilled to find products that are anti-aging and work!!!  Check out BeautyCounter for more info!!  You will love it!!

Kate's Healthy Cupboard - Gluten Free Recipes
In Snacks and Appetizers, Recipes Tags Cashews, Crackers, Paleo, Primal
4 Comments

Chocolate Cherry Bites

December 8, 2011 Kate
Cherry Chocolate Bites

Who doesn't like nuts and chocolate!!  This is a super easy recipe that can be made in so many different varieties!  Choose your nut, choose your dried fruit or flavor extract and melt them into the chocolate and coconut oil...done!

Recipe: Chocolate Cherry Bites
Ingredients
  • 1 cup dark chocolate chips or 8 oz dark chocolate bar
  • 1/2 cup coconut oil
  • 1/2 cup slivered almonds
  • 1/2 cup unsweetened dried cherries
Instructions
  1. Melt the chocolate and oil over a double boiler or a glass or metal bowl over a pot of simmering water
  2. Stir constantly and remove when fully melted
  3. Add in almonds and cherries
  4. Pour mixture into mold, mini cupcake pan, parchment lined cookie sheet for bark, etc.
  5. Set in the freezer until solid.
  6. Store in the freezer or frig

Let us know what creation you come up with for these tasty treats!

If you are an Amazon shopper, would you be so kind to use my affiliate link to make your purchases.  It is at no cost to you, it does provide a tiny kickback to Kate’s Healthy Cupboard.  This allows me to continue making and testing recipes for free.  Thanks so much!!

*I have recently switched all of my skincare and makeup to a company that is free of 1,500 chemicals!!  I am so particular about what goes into my body, I need to be just as picky as to what goes on my body!  Your skin is your largest organ and absorbs chemicals into the bloodstream faster than the gut does!  I am vain when it comes to my skin and was so thrilled to find products that are anti-aging and work!!!  Check out BeautyCounter for more info!!  You will love it!!

Kate's Healthy Cupboard - Gluten Free Recipes
In Desserts, Snacks and Appetizers, Recipes Tags Almonds, Cherries, Chocolate, Holiday, Primal
1 Comment

Dairy-Free Eggnog

December 8, 2011 Kate
Dairy Free Eggnog
Dairy Free Eggnog

Holiday favorite to many, including myself.  I can't imagine downing a glass of the real stuff right now.  My stomach, sinuses and skin would hate me for days!!!  As good as it tastes, it's so not worth it.  I was thrilled to see So Delicious come out with their eggnog this season made from coconut milk.  I was not thrilled to see the amount of sugar in it.  Inspired by a few recipes out there, I decided to take on the challenge of creating my own and liked the result.  It's not as thick and heavy as regular eggnog, but it's better on the belly!

Recipe: Dairy-Free Eggnog
Ingredients
  • 9 egg yolks
  • 4 cups non-dairy milk I used a mixture of vanilla unsweetened coconut milk and almond milk)
  • 1 can full fat coconut milk
  • 1 1/2 tsp nutmeg
  • 30 drops stevia or additional swerve
  • 1 tbsp vanilla extract
  • 2 vanilla beans or 1/4 tsp vanilla bean powder
  • 1/2 cup Swerve or other granulated sugar
Instructions
  1. Separate the yolks into a mixing bowl, whisk and set aside (you can save the whites to make a whipped topping)
  2. In medium size pot, combine everything but the yolks
  3. Cook on medium heat stirring often so milk doesn't burn. Once it reaches a boil, cook for 5 more minutes
  4. Turn heat to low and add half the mixture to bowl of yolks, whisking to combine. Pour that bowl back into pot and cook for 5 more minutes
  5. Chill and serve plain or with booze

Topping:

  1. Whisk egg whites with a bit of maple syrup or coconut sugar until small peaks form
Quick notes

You can also use homemade almond or coconut milk but I think the milks I used added a bit more vanilla flavor to it.  If you don't have vanilla beans, add a little more extract to taste.

Variations

This could be sweetened with maple syrup or coconut sugar as well.

If you want to try Swerve or need to order more, use coupon code KATE10 for a 10% discount.  Swerve is my favorite sugar replacement.  It is the only sugar alcohol that will not cause tummy troubles and it does not raise blood glucose levels.

If you are an Amazon shopper, would you be so kind to use my affiliate link to make your purchases.  It is at no cost to you, it does provide a tiny kickback to Kate’s Healthy Cupboard.  This allows me to continue making and testing recipes for free.  Thanks so much!!

*I have recently switched all of my skincare and makeup to a company that is free of 1,500 chemicals!!  I am so particular about what goes into my body, I need to be just as picky as to what goes on my body!  Your skin is your largest organ and absorbs chemicals into the bloodstream faster than the gut does!  I am vain when it comes to my skin and was so thrilled to find products that are anti-aging and work!!!  Check out BeautyCounter for more info!!  You will love it!!

Cheers!

Kate's Healthy Cupboard - Gluten Free Recipes
In Beverages, Recipes Tags Beverage, Coconut Milk, Dairy Free, Holiday, Primal
4 Comments
← Newer Posts
download.jpeg

Welcome to Kate's Healthy Cupboard! A place for healthy, grain free recipes, some low carb recipes, safe beauty and products for the home  and more...


>>  CONNECT WITH KATE  <<

pinterest.png
facebook.png
instagram.png

>>  SUBSCRIBE  <<

Success! Now check your email to confirm your subscription.

There was an error submitting your subscription. Please try again.


>>  SEARCH RECIPES  <<


Copyright 2016 Kate's Healthy Cupboard  ||  Website Design