• Blog
  • Recipes
  • Lifestyle
  • Safer Skincare
  • About
  • Contact
Menu

Kate's Healthy Cupboard

Street Address
City, State, Zip
Phone Number
Healthy Lifestyle, Healthy Grain Free Recipes

Your Custom Text Here

Kate's Healthy Cupboard

  • Blog
  • Recipes
  • Lifestyle
  • Safer Skincare
  • About
  • Contact

EPIC Bar Giveaway

May 3, 2013 Kate
Epic Bar
Epic Bar

I recently came across these bars and felt that they were way too good not to share!  I have absolutely no affiliation to EPIC Bar, even though I wish I did!  These guys are going to do well!!!!

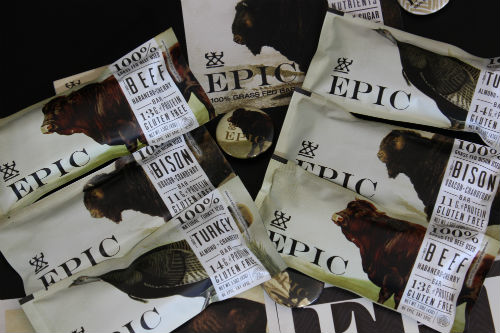
So many people find bars to be an easy and convenient way to eat on the run.  I have never been a big fan of them due to the fact that most are full of cheap protein (often soy) and sweeteners to make them tolerable.  These bars on the other hand, are full of grass-fed goodness from meat, healthy fats from nuts and a bit of sweetness from fruit.  It may sound like a weird combination, but these are delicious and a must try!!!

These are perfect for a grab and go snack or for those of you that need a quick breakfast.  I think these are great for athletes that have chosen to fuel with other sources besides gu's and gels.  Each bar provides between 11 and 14 grams of protein, some healthy fats and a few carbs from the fruit.  I have to say I liked them all and would buy all 3 again, but if I had to pick a favorite, it would be the Bison and Bacon.  Go figure...anything you add bacon to is delicious!  The texture is moist, not dry like jerky.  Also, most jerky's have soy sauce or other questionable seasonings, these are made from simple and natural ingredients that you can feel good about putting in your body!!!

They are unfortunately only available online right now, but will be making their way to Whole Foods later this summer.   I am hoping they will be showing up in many locations here in Colorado where I think they will sell like crazy!  I think they are very reasonably priced and are comparable to many other bars on the market in terms of price point.  Definitely go check out there website and their story of why former vegetarian athletes turned to animal protein to fuel their bodies.

To enter this giveaway (12 bar variety pack and other EPIC Bar swag), you must comment on this post what flavor you think you'd like to try and why.  Also go like EPIC Bar on Facebook and share this post with your friends to increase your chance of winning.  I will be randomly selecting a winner on Friday, May 10th!  Ready, Set, Share!!

Kate's Healthy Cupboard - Gluten Free Recipes
In Uncategorized
76 Comments

Vanilla Bean Macaroons (Egg-Free)

April 29, 2013 Kate
Vanilla Macaroons
Vanilla Macaroons

If you are a coconut person, these bite size treats are the perfect remedy for your sweet tooth.  Most macaroon recipes are made with egg whites and can have a bit of a spongy or eggy texture that I can do without.  I decided to try a different binding agent and make these egg-less.

The secret ingredient, gelatin!  Gelatin can act like a binder (since it gels) in gluten free products and I plan to experiment with this more.  I use Great Lakes Gelatin that is sourced from grass-fed cows (Now Foods is also a great brand of gelatin).  An added bonus is all of the health benefits gelatin provides, this is a big component of bone broth.  Not only is it great for skin, hair and nails, but it is great for your gut and joints.  I actually add a spoonful of this to my cup of broth everyday!  It is flavorless and you will never know it's in these cookies!

Vanilla Macaroons

Ingredients

  • 2 cups unsweetened coconut
  • 1/4 cup virgin coconut oil, melted
  • 2 tbsp full fat coconut milk cream (cream at top of refrigerated can)
  • 1/4 – 1/2 cup granulated sweetener*
  • 3/4 tsp gelatin
  • 1/4 tsp vanilla beans (1-2 beans)
  • 1/8 tsp sea salt

Instructions

  1. Combine all ingredients in a food processor and blend until a dough forms
  2. With a small cookie scoop, form macaroons and place on a parchment lined cookie sheet. You could also roll into balls and slightly press them down on cookie sheet
  3. Bake at 350 for about 8 minutes or until very slightly brown
  4. Let cookies cool to set up, they will fall apart when warm
  5. These can be stored at room temperature or for a harder cookie, store in the refrigerator

Quick notes

*I used Swerve (erythritol) for a low sugar option along with 2 tsp coconut palm sugar. I have not tried this with a liquid sweetener. You would need to reduce the amount to 1/4 cup or less and it may make the dough too runny. If that happens, just add more coconut until the dough is thick enough to form.

These could also be done in a food dehydrator and would turn out just as yummy!!

Kate's Healthy Cupboard - Gluten Free Recipes
In Recipes, Desserts3 Tags coconut, Coconut Milk, Egg-Free, Gelatin, Nut-Free, Paleo, Swerve, Vegan
1 Comment

Balsamic Roasted Asparagus

April 23, 2013 Kate
Basalmic Roasted Asparagus

Happy Earth Day!!!  Asparagus is in season and on sale!!!  I love asparagus simply roasted or sauteed with sea salt.  The one downfall...why does it have to make your pee smell immediately?? Did you know you either have the gene or not that allows you the pleasure ofsmelling it?  I thought the gene determined if the pee actually smelled, but apparently everyone's smells.  Who knew?

Enough about that!!!  Here is a little twist on roasting asparagus if you're looking for a new way to fix it!  I made this about 6 months ago and am just getting around to posting it...I like creating and posting baked goods so much more!

Basalmic Roasted Asparagus

Ingredients

  • 1 bunch asparagus, trimmed
  • 1 tablespoon oil (melted coconut oil, olive oil or toasted sesame oil for a bit of spice)
  • 2 tsp toasted sesame seeds
  • 1 tbsp balsamic vinegar
  • 1 tbsp coconut aminos
  • sprinkle of crushed red pepper flakes

Instructions

  1. Spread oil onto a parchment lined cookie sheet and roll the asparagus in the oil
  2. Place the asparagus in a single layer and sprinkle the sesame seeds over them
  3. Roast in the oven at 425 for about 10 minutes, check frequently to make sure it’s not getting over cooked and too tender
  4. While that is roasting, combine the vinegar, coconut aminos and red pepper flakes in a small bowl
  5. Remove asparagus and drizzle it with mixture and serve
bundle
bundle
Kate's Healthy Cupboard - Gluten Free Recipes
In Vegetables, Recipes Tags Paleo, Primal, Vegan, Vegetables
1 Comment

Chocolate Hazelnut Butter

April 10, 2013 Kate
Chocolate Hazelnut Butter Recipe

I have to admit, I don't think I have ever had Nutella!  It is full of ingredients that I wouldn't want in my body.  I have definitely had Justin's Nut Butter Hazelnut Spread, but it's certainly not cheap...especially when you can finish off a jar in a couple days!!!  So, I created my own version of it and used Swerve to keep the amount of sugar down.

Chocolate Hazelnut Butter

Ingredients

  • 2 cups hazelnuts
  • 1/2 cup dark chocolate chips or chunks
  • 1/2 cup granulated sweetener, powdered* (I used confectioner’sSwerve for low sugar option)
  • 2 squares 100% cacao bar or unsweetened chocolate
  • 1 tbsp coconut oil (I used expellor press from Tropical Traditions so it didn’t have coconut tones)
  • 1/2 tsp vanilla
  • 1/2 tsp sea salt

Directions

  1. Place the hazelnuts on a cookie sheet in a single layer
  2. Roast the nuts at 350 for 15 minutes
  3. While nuts are roasting, using a double broiler, melt the chocolate chips, squares and oil
  4. When nuts are done, place them between paper towels or dish towels and rub to remove skins.  This takes a little bit of work, but they do not need to be perfectly clean!
  5. Place the nuts, melted chocolate, sweetener, vanilla and sea salt in a food processor or blender and process until smooth
  6. Place the nut butter in an airtight container.  Store in the frig for a harder spread or at room temperature for a runnier spread

Quick notes

*Run sweetener of choice thru a blender or coffee grinder to powder it. If you skip this step it will make the butter gritty. I think a liquid sweetener would work fine here, but add a different flavor profile and I would start with less than 1/2 a cup.

Variations

You can use any nut or combination of nuts, but I would roast the nuts to give it more flavor.


I stored this in the frig and ate it with a spoon...and it didn't last very long!!!

Kate's Healthy Cupboard - Gluten Free Recipes
In Dips and Spreads, Recipes, Desserts3 Tags Chocolate, Hazelnuts, Paleo, Swerve
4 Comments

Primal Life Kit Bundle!!

April 2, 2013 Kate
Primal Bundle
Primal Bundle

I don't like to classify myself as Paleo or Primal, but some may say I am since I do not eat grains and legumes and do eat meat and healthy fats.  I like to classify my diet as the "what works best for Kate" diet and challenge you all to find what works best for you as well!

With that said, this is a fantastic bundle for anyone that is interested in going grain free!  $39 for over 30 ebooks that if you purchased each one alone would be $485!  Just the cookbooks alone were enough for me to buy it!  It also includes the Fast Paleo Best Of Cookbook that features some of my recipes.  A few of the other goodies include a 6 week meal plan from Nell Stephenson, (the Paleoista and Ironman Athlete) and a grocery list from Mark Sisson and numerous others!

For more information and to purchase this bundle, click the Buy Now link below.  Offer ends April 9th so get your bundle today!!!!

Buy Now!

On a side note, Honeyville, my favorite almond flour supplier, is offering 20% off your purchase starting April 4th until the 9th as well!  I have never seen it discounted this much!  Buy some now!!!

Kate's Healthy Cupboard - Gluten Free Recipes
In Uncategorized
Comment

Grain Free Lemon Bars

March 26, 2013 Kate
Grain Free Lemon Bars Recipe

Spring is here and it's time for refreshing and fruity desserts...don't worry, I will still include some chocolate! Lemon Bars have been on my never ending list of goodies to try to recreate.  We had a family dinner this past weekend and lemon bars were the birthday girl's favorite dessert, so the time had come!!  Let me add that she is not grain free and absolutely loved these and said they taste like the real thing.  The best part is that I used Swerve, (my favorite natural sugar alternative) so they were very low sugar as well!!!

Grain Free Lemon Bars

Ingredients

Crust:

  • 1 1/2 cups Honeyville almond flour
  • 1/2 cup granulated sweetener (I used Swerve to make it a no sugar treat)
  • 1/2 cup grass-fed butter, softened* (let sit out for a few hours until mushy)
  • 1/4 tsp sea salt

Filling:

  • 3 pastured eggs
  • 1/2 cup granulated sweetener (I used Swerve)
  • 4 tbsp lemon juice (2 small lemons)
  • 1 1/2 tsp lemon zest (1 lemon)
  • 1/2 tsp baking powder

Instructions

Crust:

  1. Combine all of the ingredients in a food processor and pulse until combined. A mixer should work as well.
  2. Press the dough into a greased 8×8 baking dish
  3. Bake at 350 for 15-20 minutes until slightly golden
  4. Remove from heat and let cool quite a bit to set up.

Filling:

  1. Heat the oven back to 350 and make sure it’s ready before you start mixing the ingredients. The baking powder will be affected if you wait to bake these.
  2. Place all ingredients EXCEPT the baking powder in a food processor and combine. A mixer will work, but lemon zest will not be ground down and unnoticeable in bars.
  3. Add in the baking powder and pulse one last time
  4. Pour the filling over the crust and bake at 350 for about 25 minutes until crust is set. It shouldn’t get brown, it will feel stiff to touch.
  5. Sift powdered sweetener over the top.  This is optional and I don’t feel these need it.  I used confectioner Swerve on a few bars only for photo purposes.
  6. Store in the refrigerator until serving.  I prefer these chilled!

Variations:

*Coconut oil that is softened should work fine as a substitution to the butter.  I would use expellor pressed so there is no coconut tones!  I love Tropical Traditions Oil!

Not a lemon person?  Substitute the lemon juice and zest for lime.


Have you been wanting to try Swerve?  It is making its way to Whole FoodsStores, but you can order online and use coupon code KATE10 for a 10% discount!!

Kate's Healthy Cupboard - Gluten Free Recipes
In Recipes, Desserts3 Tags Dairy Free, Paleo, Primal, Swerve
Comment

Grain Free "Cheez-Its" Crackers

March 22, 2013 Kate
Grain Free Dairy Free Cheez-Its Crackers www.kateshealthycupboard.com

Have you seen how many varieties of Cheez-Its there are now?  I'm rarely at any store other than Whole Foods and Natural Grocers, so when I am, I am always in awe at all the new junk food...it really isn't worthy of being called food!  Is anyone else guilty of looking at other people's carts and wondering what they are thinking and how did they miss that soda, boxed fake meals and corn syrup laden goodies are so horrible for you!!!   I realize not everyone is so fortunate to shop at Whole Foods, but come on, make better choices with what is available to you!!!

OK, enough of my rant!  Here is a recipe that uses nutritional yeast for a dairy free cheesy cracker recipe that you can feel good about eating!  I almost didn't get a chance to take a picture of these before they were gone.  Someone was sneaking them off the pile of my setup for the picture...they are that good!!!  These are the perfect cracker to dip or break up into my Bacon Chili Recipe!!!

Grain Free “Cheez-Its”

Ingredients

  • 1 3/4 cup almond flour*
  • 3 tbsp Nutritional Yeast
  • 1/2 tsp sea salt, plus more for sprinkling on top
  • 1 egg
  • 1 tbsp butter or coconut oil, melted
  • 2 tbsp lemon juice

Instructions

  1. Combine the flour, salt and yeast in a bowl
  2. In a small mixing bowl, whisk the egg with the melted butter/oil and lemon juice
  3. Combine the two bowls and stir until dough forms
  4. Place the dough between two sheets of parchment paper and roll out to about 1/8 inch thickness
  5. With a sharp knife or pizza cutter, cut dough into desired cracker size (I use a ruler with a pizza slicer to get them straight and even) and sprinkle the top with more sea salt
  6. Slide the bottom piece of parchment and crackers onto a cookie sheet
  7. Bake at 350 for 15-20 minutes until golden (the crispier they will be in you let them golden)
  8. The outer crackers will brown the fastest, remove those and continue to cook the remaining crackers

Quick notes:  *Honeyville or Bob’s Redmill will work just fine for these crackers.

Variations:  I used melted butter to make these a bit “creamier” tasting, but expellor pressed coconut oil will work for dairy free option.

Enjoy!


In Recipes, Snacks and Appetizers3 Tags Crackers, Dairy Free, Nutritional Yeast, Paleo, Primal, Vegan
29 Comments

Grain Free German Pancake

March 19, 2013 Kate
Grain Free German Pancake Recipe

I recently purchased The Joy of Cooking and am slowly making my way thru this enormous cookbook.  It is an incredible cookbook and should be in every cooks kitchen!  It is full of recipes, tips, tricks and explanations. I have quite a few ideas that were inspired by this book and can't wait to get cooking!

I came across this German Pancake recipe and knew I had to recreate it grain free!  This turned out so darn good and was a huge hit at Sunday brunch.  This would make for a perfect addition to your Easter menu and can be enjoyed with numerous toppings....and it's easy to make!

Grain Free German Pancake

Ingredients

  • 4 large pastured eggs, yolks and whites separated
  • 3 tbsp granulated sweetener (I used Swerve for sugar free option)
  • 1/4 cup non-dairy milk (I used unsweetened vanilla coconut milk)
  • 1/4 cup lukewarm water
  • 1/2 cup arrowroot powder
  • 1/4 tsp vanilla extract
  • 1/8 tsp sea salt
  • 3 tbsp grass-fed butter (coconut oil should work fine for dairy free option)

Instructions

  1. Preheat oven to 400
  2. Combine 4 yolks, sweetener and salt in a bowl and whisk until thick and lemon color (about 1-2 minutes)
  3. Whisk in the milk, water and vanilla. Add in the arrowroot and whisk until smooth
  4. In a separate bowl, beat the egg whites until stiff peaks form, but not dry
  5. Add the whites to the yolk mixture, gently whisk until the whites are incorporated, but not deflated. Light foam is what you want
  6. Melt 3 tbsp of butter in a 10 inch oven safe skillet (I prefer cast iron) over medium heat
  7. Once the bubbles have subsided, pour the batter into the skillet and cook until the bottom is golden (about 2 minutes)
  8. Place the skillet in the oven and bake until it puffs up and the top is golden and feels dry and set (about 5 minutes)
  9. Slide onto a plate and serve hot with grass-fed butter and syrup (we use Xylitol Maple Syrup to make these sugar free), fresh fruit sauce or warm preserves

Quick Notes:

I wanted to take the photo of the pancake in the skillet so I poured syrup on it immediately and it made the bottom carmelize a bit since it ran down the sides to the bottom of the hot pan.  We loved it and will always do that instead of placing it on a plate first

On the same page as this pancake recipe were a Dutch Pancake recipe and Austrian Pancakes recipe.  Austrian pancakes will be my next breakfast recipe this weekend and I will let you all decide which one you prefer.  They both use eggs as their base and use the skillet to oven technique, but do have different ingredients.  Can't wait to try these to see how they compare!!

Kate's Healthy Cupboard - Gluten Free Recipes
In Breakfasts, Recipes Tags Brunch, Dairy Free, Holiday, Nut-Free, Paleo, Primal
7 Comments

Cashew "Alfredo" Sauce (Guest Post)

March 5, 2013 Kate
Alfredo Sauce
Alfredo Sauce

Last weekend I had the opportunity to meet Ann from The Paleo Network.  She and her husband are triathletes that have gone grain and dairy free and are reaping the benefits!  They were featured on our local news  a few weeks back to tell their story.  We had a great time chatting about food, of course we did, we both love to be in the kitchen!

Today I am sharing a recipe with you for her Cashew Alfredo Sauce that she happened to mention to me. I decided I had to make this since it sounded so good!!!  It is such a versatile sauce and could be used in so many ways!  I was craving mushrooms today so I sauteed mushrooms and grass-fed ground beef together and drizzled...ok drenched it with the sauce!  Yum!!!  Ann uses it in a number of ways that she shares with you today!

The only thing I did differently was that I sauteed the garlic in coconut oil (or you could use butter) and then added it to the oil to add to the cashew sauce.  I don't like to use olive oil with high heat is the reason for this.

Paleo Sausage & Veggie Pizza
Lasagna Baked
Lasagna Baked

Hello to all of you! A big thank you to Kate for giving me the opportunity to write this post. A little background on the recipe I’m sharing with you today. I grew up in the Midwest eating creamy casseroles and decadent comfort foods. My favorite Italian dish (and maybe my favorite dish all together) while growing up was Fettuccine Alfredo. Since going Paleo, I no longer eat dairy or grains. What does this Midwest girl do? I learned you could make creamy sauces out of cashews. I knew nutritional yeast added a "cheesy" flavor.  Traditional alfredo sauce typically has garlic in it.  So I threw ingredientstogether into my Vitamix blender and tested it out on some spaghetti squash and zucchini “noodles”. Perfection! Since then, I’ve used it as part of my Paleo Lasagna and on Paleo Pizza (drizzled on top of the meat and veggies). I’ve also mixed it into cauliflower rice, roasted Brussels sprouts and shredded chicken. It also tastes great in omelettes (serves as a glue to hold it together) or atop egg muffins.

Cashew “Alfredo” Sauce

Ingredients

  • 2 cups raw cashews, soaked in water for at least 6 hours
  • 8 garlic cloves, minced
  • ¼ cup olive oil
  • ½ cup nutritional yeast
  • 2 t. sea salt

Instructions

  1. Drain and rinse your raw cashews.
  2. Add the cashews to your blender (I use my Vitamix ) and enough cold water to cover the cashews. Blend until creamy and smooth.
  3. Saute minced garlic in the olive oil in a small frying pan over medium heat for 1-2 minutes, or until slightly golden.
  4. Add oil and garlic to the cashew sauce along with the sea salt and nutritional yeast. Blend again until incorporated and smooth.
  5. Add additional water, if necessary.

Variations

You could probably add a little fresh basil (either to the blender or as a garnish). Roasted red peppers (pureed into the sauce) could also be a nice touch.


Let us know what you drizzle or pour this Alfredo sauce over!!!

Kate's Healthy Cupboard - Gluten Free Recipes
In Dips and Spreads, Entrees, Recipes Tags Cashews, Dairy Free, Nutritional Yeast, Paleo, Primal
3 Comments

Goodbody Cookie Bites Giveaway!

February 28, 2013 Kate
good body
good body

I have another giveaway for this week!!!  My friends at Goodbody Baked Goods are giving one of my lucky followers the chance to win a 3 pack (1 pack of the Vanilla Coconut and 2 packs of your choice) of their yummy grain free cookie bites!  But, more importantly, they have a new flavor and are available in many more stores!!!  The new Vanilla Coconut is awesome!  I love coconut so of course these were a big hit with me.  They almost taste like a caramelized coconut treat and that may be from the coconut nectar they used to sweeten them.

If you missed my original review of their product line, you can read it here.  The gist of the story is that these cookies rock and should all buy some!!!  Goodbody can be found in the freezer section of some local Colorado Whole Foods and Vitamin Cottage stores (click here for all locations).  They can also be purchased online thru Abe's Market Online Store for all of you outside of Colorado.  They are hoping to start working with a national distributor in the future, but these things take time!

To enter to win a 3 pack, you must go like Goodbody Baked Goodson Facebook (they give away treats on there too!) and also comment on this blog post telling us what 2 flavors you would like to win along with the Vanilla Coconut.  As I mentioned in my previous review, they are all delicious, but the Almond Butter Chocolate Chip is still my favorite!  Go figure that a chocolate flavor would be my favorite!!!  One lucky person will be randomly selected on March 7th!!!

***Please note that in my original review Almond Cranberry was included.  It is no longer available, Vanilla Coconut has replaced it.

Kate's Healthy Cupboard - Gluten Free Recipes
In Uncategorized
35 Comments

Coconut Cashew Cookies

February 26, 2013 Kate
Coconut Cashew Cookies

This has to be one of my favorite cookie recipes that I have created!!  They taste so buttery even though there's no butter in them, they are made with virgin coconut oil and melt in your mouth.  I used my favorite virgin coconut oil from Tropical Traditions and they want to give a lucky reader a free 32 ounce jar of their Gold Label Virgin Coconut Oil!

Gold Label Virgin Coconut Oil - 32 oz.

Win 1 quart of Gold Label Virgin Coconut Oil!

Tropical Traditions is America's source for coconut oil. Their Gold Label Virgin Coconut Oil is hand crafted in small batches by family producers, and it is the highest quality coconut oil they offer. You can read more about how virgin coconut oil is different from other coconut oils on their website: What is Virgin Coconut Oil?

You can also watch the video they produced about Gold Label Virgin Coconut Oil:

Tropical Traditions also carries other varieties of affordable high quality coconut oil. Visit their website to check on current sales, to learn about the many uses of coconut oil, and to read about all the advantages of buying coconut oil online. Since the FDA does not want us to discuss the health benefits of coconut oil on a page where it is being sold or given away, here is the best website to read about the health benefits of coconut oil.

To enter to win, you must subscribe to Tropical Traditions newsletter and comment on this blog post with what you would make or do with the coconut oil if you win.   They do not sell any info and this will allow you to receive email updates of all of their sales...they have a lot!  I order so many things from them including their farm fresh soy free eggs, grass-fed ground beef, coconut oil, flour and cream.   The winner will be randomly chosen on March 6th.

Tropical Traditions provided me with a free sample of this product to review, and I was under no obligation to review it if I so chose.  Nor was I under any obligation to write a positive review or sponsor a product giveaway in return for the free product.

Cashew Coconut Cookies

Ingredients

  • 1 1/2 cups raw cashews
  • 1 cup unsweetened shredded coconut
  • 1/3 – 1/2 cup granulated sweetener*
  • 1/4 tsp vanilla beans, about 2 beans
  • 1/4 tsp baking soda
  • 1/4 tsp sea salt, just shy of
  • 1/4 cup virgin coconut oil, melted
  • 2 tbsp full fat coconut milk

Instructions

  1. Place the cashews and coconut in a food processor and pulse until a coarse sand texture is created
  2. Add the sweetener, vanilla beans, salt and soda and pulse until combined
  3. Add in the oil and coconut milk and pulse again to form a dough
  4. Using a cookie scoop or spoon, place balls of dough on a parchment cookie sheet and press down slightly on each dough ball. They will spread more in the oven
  5. Place an additional cookie sheet under the other sheet to prevent the bottoms of the cookies from browning too much
  6. Bake at 350 for 8-10 minutes, until slightly brown
  7. Remove from the oven and let the cookies sit on the cookie sheet for 5 minutes to set then place them on a cooling rack to get crisp
  8. Store in an airtight container

Quick notes

*I used about 1/2 cup of Swerve and a tablespoon of coconut palm sugar to make these low in sugar.

If you want to try Swerve or need to order more, use coupon code KATE10 for a 10% discount.  Swerve is my favorite sugar replacement.  It is the only sugar alcohol that will not cause tummy troubles and it does not raise blood glucose levels.

If you are an Amazon shopper, would you be so kind to use my affiliate link to make your purchases.  It is at no cost to you, it does provide a tiny kickback to Kate’s Healthy Cupboard.  This allows me to continue making and testing recipes for free.  Thanks so much!!

*I have recently switched all of my skincare and makeup to a company that is free of 1,500 chemicals!!  I am so particular about what goes into my body, I need to be just as picky as to what goes on my body!  Your skin is your largest organ and absorbs chemicals into the bloodstream faster than the gut does!  I am vain when it comes to my skin and was so thrilled to find products that are anti-aging and work!!!  Check out BeautyCounter for more info!!  You will love it!!

Kate's Healthy Cupboard - Gluten Free Recipes
In Recipes, Desserts3 Tags Cashews, coconut, Cookies, Dairy Free, Swerve
66 Comments

"Cheesy" Kale Chips

February 21, 2013 Kate
Cheesy Kale Chips
Cheesy Kale Chips

I love Whole Foods, wandering around seeing what new products have been granted self space and what local products are new to market as well.  I spend a lot of time in Scottsdale, Arizona and a lot of time at the Whole foods there.  Every time I go, I have to take some extra time that first trip to the store to see what's new.  Arizona is part of the western region for Whole Foods that includes California, where Colorado is part of the mountain west region, so we get different products.  Arizona gets a lot of products that originate from California and if they sell well, we will be lucky to hopefully see them on the shelves in Colorado and vice versa.

There are a couple things I can't find at my local Whole Foods that I love to get down there.  One item in particular, Quite Cheezy Kale Chips made by Alive & Radiant Foods (my Whole Foods only sells two of the flavors as of late and the Quite Cheesy is not one of them).  The entire line of their products are delicious. I think I seriously bought a bag every trip I made to the store (that is often) and ate the entire bag!  Serving size is 2.2, that's a joke...I eat the whole bag wishing I had more!  After looking at the ingredient list, I knew I could make these at home when I got back to my dehydrator.  This recipe is pretty darn close...close enough for me!

I know not everyone has a dehydrator, but you should (in my opinion), since there are so many great things you can do with them and they are reasonably priced (I have this dehydrator and it works great).  I have not tried this in the oven on the dehydrate setting, but if you do, please leave a comment on how they turned out.  This spread would be awesome as a "cheese" spread for crackers (I have numerous grain-free cracker recipes) or as a dip for vegetables.  So if you don't have a dehydrator, you can still enjoy this recipe!

“Cheesy” Kale Chips

Ingredients

  • 1 cup raw cashews (soaked overnight)
  • 1/3 cup roasted red bell pepper*
  • 2 tablespoons lemon juice
  • 2 tablespoons Nutritional Yeast**
  • 1/2 tsp sea salt
  • 1 bunch kale (I used Dino, but any Kale will work)

Instructions

  1. Wash the kale, pat dry and tear into pieces, about 1 1/2 inches and place in a bowl
  2. Drain the water off of the cashews and place all of the ingredients in a food processor or blender until smooth
  3. Pour the spread into the bowl and massage it into the kale to cover each piece
  4. Place kale on dehydrator trays and dehydrate at 125 for 8-10 hours or until desired crispiness
  5. Store in an airtight container, I prefer glass

Quick notes

*I used roasted peppers for additional flavor. The Alive & Radiant Foods is considered raw, so a red bell pepper is what they used. Either one will work.

**Nutritional Yeast is something a lot of vegetarians use to make things taste cheesy. It is full of B vitamins, some protein and lots of flavor. It can be found in the baking section of a health food store or may be sold in bulk. It looks like yellow flaky fish food to me:)

Variations

To make these a bit spicy, add some cayenne pepper or other seasonings you like.


If you are looking for ways to get more greens in your kids, this recipe will work!

Kate's Healthy Cupboard - Gluten Free Recipes
In Vegetables, Recipes, Snacks and Appetizers3 Tags Cashews, Dairy Free, Dehydrated, Nutritional Yeast, Paleo, Primal, Raw
6 Comments

Chocolate Cherry Blondies

February 13, 2013 Kate
Chocolate Cherry Blondies

Chocolate covered cherries may be a favorite Valentine's treat for some of you, and if so, you will love these.  You don't have to like chocolate covered cherries to like these blondies!  Blondies, what the heck is that really?  Basically they are brownies without the cocoa.  According to wikipedia:

A blondie (also known as a "blond[e] brownie" or "blondie bar") is a rich, sweet dessert bar.  It is made fromflour, brown sugar, butter, eggs, baking powder and vanilla and may also contain walnuts or pecans Chocolate chip blondies may contain white or dark chocolate chips. A blondie may have a taste reminiscent of butterscotch.

Blondies resemble the traditional chocolate brownie, but are based on brown sugar instead of cocoa; they are sometimes referred to as blonde brownies. They are baked in a pan in the oven similar to how traditional brownies are baked, then cut into rectangular shapes for serving.

Like brownies, blondies may include chocolate chips. They may also contain coconut, nuts, toffee, or any other chunky candy for added texture. Blondies aren't usually frosted; the brown sugar flavor tends to be sweet enough.

Technically I think these could be called Chocolate Cherry Cookie Bars as well, but I like blondie for this recipe.  Since brown sugar is an ingredient in blondies, I had to come up with an alternative.  I chose to add a bit of coconut palm sugar to give it that caramel, molasses taste.  Another option would be to add a bit of molasses to granulated sugar since that's basically what brown sugar is.  I used Swerve for my sweetener to keep these low sugar and added just a bit of coconut palm sugar.  They turned out perfect, moist but with a crisp crackly top!

Chocolate Cherry Blondies

Ingredients

  • 2 cups Honeyville Almond Flour
  • 5 tbsp grass-fed butter or coconut oil, softened
  • 1/2 – 3/4 cup granulated sweetener (I used almost 3/4 cupSwerve*and 2 tbsp coconut palm sugar)
  • 1 egg
  • 2 tsp vanilla extract
  • 1/2 tsp baking soda
  • 1/4 tsp sea salt
  • 1/2 cup dark chocolate chips (use Enjoy Life Choclate Chips orEnjoy Life Chocolate Chunks
    to make dairy free)
  • 1/2 – 3/4 cup cherries (cut into fourths)**

Instructions

  1. Place the softened butter/oil and sugar in a mixing bowl and cream with a hand mixer or in a stand up mixer until fluffy
  2. Add the egg and vanilla and continue to blend
  3. In a mixing bowl, combine the flour, soda and salt
  4. Slowly add the flour mixture as you continue to beat until well combined
  5. Fold in the chocolate chips and lastly, fold in the cherries
  6. Bake at 350 for about 25 minutes until slightly brown
  7. Let cool for 30 minutes before cutting into them (I prefer these out of the refrigerator cold)

Quick notes

*If you want to order Swerve, they have given my readers an extra 10% off your online order with code KATE10.

**It is almost impossible to find fresh cherries this time of year, so frozen is what you will use. They tend to be very dark in color and that is why this looks like a blueberry blondie. It is best to keep them frozen until you have added the chocolate chips so they do not melt and bleed into the dough.

As Wikipedia says above, any nut or candy can be used in blondie recipes.  Use this as a base and add what ever nuts, fruits, chocolates you would like!

If you want to try Swerve or need to order more, use coupon code KATE10 for a 10% discount.  Swerve is my favorite sugar replacement.  It is the only sugar alcohol that will not cause tummy troubles and it does not raise blood glucose levels.


If you are an Amazon shopper, would you be so kind to use my affiliate link to make your purchases.  It is at no cost to you, it does provide a tiny kickback to Kate’s Healthy Cupboard.  This allows me to continue making and testing recipes for free.  Thanks so much!!

*I have recently switched all of my skincare and makeup to a company that is free of 1,500 chemicals!!  I am so particular about what goes into my body, I need to be just as picky as to what goes on my body!  Your skin is your largest organ and absorbs chemicals into the bloodstream faster than the gut does!  I am vain when it comes to my skin and was so thrilled to find products that are anti-aging and work!!!  Check out BeautyCounter for more info!!  You will love it!!

Kate's Healthy Cupboard - Gluten Free Recipes
In Recipes, Desserts2 Tags Almond flour, Cherries, Chocolate, Desserts, Holiday, Swerve
Comment

Chocolate Cherry No Bake Cookies

February 6, 2013 Kate
Chocolate Cherry No Bake Cookies

I'm going to keep this short and sweet and to the point.  If you haven't tried the Chocolate Drop Cookies recipe yet, you need to!  You will love them, unless you are not a coconut person and that is why I created a coconut free no bake cookie!  I loooove the coconut chocolate cookies, but these are darn good as well...different good!  And, no bake cookies are so easy and quick!

Chocolate Cherry No Bake Cookies

Ingredients

  • 3 tbsp grass-fed butter or coconut oil* (or combo)
  • 1/8 cup vanilla dairy free milk (I prefer So Delicious no sugar vanilla coconut milk)
  • 1/2 cup granulated sweetener** (I used Swerve for no sugar option)
  • 3/4 cup raw almonds
  • 1/2 – 2/3 cup dried cherries
  • 1/2 cup almond butter
  • 1 generous tbsp cocoa/cacao powder

Instructions

  1. Place the almonds in a food processor and pulse until they are ground into pieces.  Add the cherries and pulse again, set aside
  2. In a saucepan, melt the butter/oil with the milk, sugar and cocoa/cacao powder. Bring to a boil for 1-2 minutes
  3. Remove from heat and add the almond butter, nuts and cherry mixture and stir until combined
  4. Place spoonfuls of the mixture onto a parchment lined plate or small cookie sheet
  5. Place the cookies in the freezer for about 15 minutes to set
  6. Store cookies in the refrigerator or freezer in an airtight container

Quick notes

*Make sure the oil is expeller pressed (Tropical Traditions sells this) or refined coconut oil so you do not have coconut tones in the cookies.

**I have not tried this with a liquid sweetener. I think it will work, but I would start with only a 1/4 cup.

Variations

These can be made with any dried fruit, nut and nut butter. I used sliced almonds to avoid skins in this recipe, but whole almonds will work.

If you want to try Swerve or need to order more, use coupon code KATE10 for a 10% discount.  Swerve is my favorite sugar replacement.  It is the only sugar alcohol that will not cause tummy troubles and it does not raise blood glucose levels.

If you are an Amazon shopper, would you be so kind to use my affiliate link to make your purchases.  It is at no cost to you, it does provide a tiny kickback to Kate’s Healthy Cupboard.  This allows me to continue making and testing recipes for free.  Thanks so much!!

I have recently switched all of my skincare and makeup to a company that is free of 1,500 chemicals!!  I am so particular about what goes into my body, I need to be just as picky as to what goes on my body!  Your skin is your largest organ and absorbs chemicals into the bloodstream faster than the gut does!  I am vain when it comes to my skin and was so thrilled to find products that are anti-aging and work!!!  Check out my Beauty Counter link for more info!!  You will love it!!

Kate's Healthy Cupboard - Gluten Free Recipes
In Recipes, Desserts2 Tags Almonds, Cherries, Cookies, Dairy Free, Flourless, Paleo, Primal
2 Comments

Superbowl!

February 1, 2013 Kate
super bowl 2013 rotator

The big game is almost here and I wanted to give you all some suggestions for grain free snacks, good eats and treats!  You could also visit my Pinterest Page and find numerous other recipes!  Sorry to all of you 49ers fans, but I have to go with the Ravens!  I like Jim Harbaugh so much more and I want to see Ray Lewis go out with a win.  It should be a great game and I hope you all can stay grain free and guilt free!!

Dips, Spreads, Crackers and Chips:

Spicy Rosemary Cashew Crackers

"Wheat" Crackers

Sunflower Seed Herb Crackers

Plantain "Tortilla" Chips

Taro Chips

Kale Chip

Spicy Collard Green Chips

Spinach and Avocado Dip

Almond Coconut Spread

Maple Vanilla Cashew Butter

Beet Sunflower Seed Pesto

Finger Foods:

Bacon Wrapped Scallops

Coconut Shrimp Cakes

BLT Lettuce Wraps

Sushi Lollipops Rolls

Spicy Tuna Sashimi Salad

Avocado Deviled Eggs

Asian Chicken Meatballs

Spicy Sauteed Shrimp

Meatza

Avocado Egg Salad

Treats:

(As you all know, my site is full of treats, but here's a few favorites!)

White Chocolate Macadamia Nut Cookies

Chocolate Peanut Butter Protein Balls

Peanut Butter Banana Cups

Chocolate Strawberry Brownie Cookies

No Bake Chocolate Drop Cookies

Raw Coconut Cookie Bites

Chocolate Hazelnut Dough Ball Cookies

Almond Butter Chocolate Chip Cookies

Ginger Snaps

I also wanted to let you all know about an incredible offer!

The 100 Absolute Best Paleo and Primal Recipes from Paleo Bloggers (including myself) and Enthusiasts Around the Web in One Great eCookbook for only $14.97!

With nearly 2,500 recipes on FastPaleo, it’s pretty tough to pick the absolute best ones. We've taken the time to sort through all of them from 2012. Guess what we found?  We found what we believe to be some of the greatest paleo recipes out there. We made the format nice and pretty, and made them available to you in one easily accessible eCookbook. All of the recipes you'll find in this book and the four mini-eCookbooks (shown below)are top notch, easy to understand and easy to recreate.

They are all made of high-quality ingredients, and of coursethey are all tried and true, not only by their creators, but by many other paleo fans out there.

  • Get 100 of the absolute best paleo and primal recipes of the year
  • Sample fantastically delicious recipes in 10 great categories
  • Learn about new paleo and primal bloggers through blogger links and bios
  • Be able to scan easily for paleo and primal recipes—all primal recipes clearly marked
  • Enjoy a clear, straight-forward, ad-free layout

ORDER YOURS TODAY!

fast paleo
fast paleo
Kate's Healthy Cupboard - Gluten Free Recipes
In Recipes
Comment

Italian Stuffed Spaghetti Squash

January 29, 2013 Kate
Italian Spaghetti Squash

I am all about easy dinner and lunch ideas, simplicity.  I have learned that I do best with simple ingredients and honestly could eat the same thing same over and over again for my meals.  My passion truly lies in baking and sweet treats...as if you haven't noticed!!  I do try to give my readers ideas for dinners that are satisfying and most importantly taste good.  So often I am asked for meal ideas and that is one of the main reasons I created this site.

This Italian Stuffed Spaghetti Squash Recipe is a fairly easy idea full of flavor!  The stuffing is the recipe I use for my lasagne (recipe below) with the addition of ricotta, mozzarella and yellow squash (or rice noodles if you eat rice).   I can't eat dairy, but this is awesome without the cheese and I use thin slices of yellow squash as the noodles.  I added grated parmesan cheese to the top of one squash for the dairy eating crowd and left one cheeseless.

Italian Stuffed Spaghetti Squash

Ingredients

  • 1 large spaghetti squash
  • 1 lb Italian sausage
  • 1/2 lb grass-fed ground beef
  • 1/2 cup onion, chopped
  • 2 cloves garlic, minced
  • 1 tsp sea salt
  • 1 1/2 tsp dried basil
  • 1/2 tsp fennel seeds
  • 1/4 tsp ground pepper
  • 1/8 cup fresh parsley, minced
  • 1 can (28oz) plum tomatoes
  • 3 cans tomato paste
  • 1/2 cup water
  • parmesan or mozzarella cheese (optional)

Instructions

  1. With a fork, poke holes in the spaghetti squash so it can “breath” and bake at 350 for 45-60 minutes depending on the size of squash
  2. While squash is cooking, saute the sausage over medium high heat in a large sauce pan, about 3-4 minutes
  3. Add the beef, onion and garlic until brown. Drain the grease
  4. Add the salt, basil, fennel, pepper and parsley
  5. Place the tomatoes in a bowl and mash.  Add the paste and water to the tomatoes and pour mixture into the meat
  6. Simmer and cover until squash is done cooking
  7. Remove Squash once it is easy to pierce with a fork and cut it into two halves lengthwise
  8. Scrape out the seeds and fill each side with the meat
  9. Top with cheese and place under the broiler for the cheese to melt and brown (optional)
  10. Scrape the squash to form spaghetti and enjoy!!!

Variations

To make lasagne, follow all of the directions above for the sauce and let simmer covered for 1 1/2 hours.  In a small bowl, combine 2 cups ricotta cheese, 3 eggs (beaten) and an additional 1/8 cup of fresh parsley.  Place a layer of noodles or squash on the bottom of a greased 9×13 dish.  Cover with 1 1/2 cups of sauce, half of the ricotta mixture, 1/4 cup parmesan and 1/2 of the mozzarella (half of a 3/4lb bag).  Repeat layering ending with sauce and sprinkle with remaining cheese.  Bake at 350 covered for 25 minutes, remove cover and bake an additional 20 minutes.

Kate's Healthy Cupboard - Gluten Free Recipes
In Entrees, Recipes Tags Beef, Dairy Free, Nut-Free, Paleo, Primal, Sausage
Comment

Chocolate Strawberry Brownie Cookies

January 24, 2013 Kate
Chocolate Strawberry Brownie Cookies

I tried to stay away from chocolate for awhile...it was a short while!  Now it's time for Valentine's Day recipes and it just wouldn't be right to not include chocolate!  The good news is that these are made with cocoa powder and Swerve Sweetener (my favorite natural sweetener than contains no sugar!) and dark chocolate chips, so they are fairly low in sugar.

I debated over using cherries or strawberries in this recipe.  I think both are a part of many Valentine's celebrations with chocolate covered cherries found in most assorted chocolate boxes and chocolate dipped strawberries a favorite of many this time of year.  I chose strawberries since fresh organic berries are available right now and cherries are only found frozen this time of year.  I highly suggest fresh fruit for the lower moisture content.  Frozen fruit lets off more moisture and will make these extra gooey.  These cookies are already gooey and that's why they are named brownie cookies.  These can also be made with no fruit, but I would add an extra tablespoon of coconut milk to create more moisture.  Either way, these are delicious!!!

You will see in the instructions that you melt the butter/oil and add in the cacao/cocoa powder.  I learned that cocoa powder gives a better chocolate flavor to baked goods instead of using unsweetened chocolate.  But...to bring out the flavor of the powder, it must be added to a warm liquid to bring out the flavor molecules.  These turned out very chocolatey and maybe this is why, I only tried it this way.  I certainly don't need to make another batch to test this theory, two batches were enough to consume this week!!!

Swerve is on sale until the end of the month, you receive 40 single serve packs with your order!  Use Coupon Code KATE10 for an additional 10% off!!

Chocolate Strawberry Brownie Cookies

Ingredients

  • 1 1/2 cups Honeyville Almond Flour
  • 1/4 cup cacao or cocoa powder
  • 1/3 cup grass-fed butter or coconut oil
  • 1/2 cup granulated sweetener (I prefer Swerve or erythritol for a sugar free option)
  • 3 tbsp full fat coconut milk
  • 1 tbsp vanilla
  • 1/4 tsp sea salt
  • 1/4 tsp baking soda
  • 3/4 cup dark chocolate chips*
  • 1/2 cup fresh strawberries, chopped**

Instructions

  1. Melt the butter/oil in a saucepan.  Once melted, add the cocoa/cacao powder and 1/4 cup of chocolate chips and remove from heat
  2. Once the chocolate chips have melted, add the coconut milk, sweetener and vanilla and blend with hand mixer
  3. Combine the almond flour, salt and soda in a mixing bowl. Pour the butter mixture into the flour mixture and stir well
  4. Fold in the additional 1/2 cup chocolate chips and strawberries
  5. Bake at 350 on a parchment lined cookie sheet for 11-13 minutes
  6. Let cookies set up on the cookie sheet for at least 5 minutes or they will fall apart
  7. Let cool on a cooling rack to continue to set up
  8. Store in an airtight container

Quick notes

I highly recommend using Honeyville flour or these may turn out very very gooey.

Variations

*To make these dairy free, use Enjoy Life Choclate Chips or Enjoy Life Chocolate Chunks and coconut oil.
**Any fruit would work in these, but please read the text above about fresh versus frozen fruit. If you want to leave the fruit out, read the text above as well for modifications.

These may also work in an 8×8 greased pan to create brownies.  The cooking time will be longer and the inside may not get cooked through.  I have not tried this, but I’d be just fine eating these with a spoon if need be!!!

*To make these dairy free, use Enjoy Life Choclate Chips or Enjoy Life Chocolate Chunks and coconut oil. **Any fruit would work in these, but please read the text above about fresh versus frozen fruit. If you want to leave the fruit out, read the text above as well for modifications.

These may also work in an 8x8 greased pan to create brownies.  The cooking time will be longer and the inside may not get cooked through.  I have not tried this, but I'd be just fine eating these with a spoon if need be!!!

If you want to try Swerve or need to order more, use coupon code KATE10 for a 10% discount.  Swerve is my favorite sugar replacement.  It is the only sugar alcohol that will not cause tummy troubles and it does not raise blood glucose levels.

If you are an Amazon shopper, would you be so kind to use my affiliate link to make your purchases.  It is at no cost to you, it does provide a tiny kickback to Kate’s Healthy Cupboard.  This allows me to continue making and testing recipes for free.  Thanks so much!!

I have recently switched all of my skincare and makeup to a company that is free of 1,500 chemicals!!  I am so particular about what goes into my body, I need to be just as picky as to what goes on my body!  Your skin is your largest organ and absorbs chemicals into the bloodstream faster than the gut does!  I am vain when it comes to my skin and was so thrilled to find products that are anti-aging and work!!!  Check out BeautyCounter for more info!!  You will love it!!  Give the gift of safe skincare this holiday season, gift sets available.

Kate's Healthy Cupboard - Gluten Free Recipes
In Recipes, Desserts2 Tags Almond flour, Coconut Milk, Cookies, Dairy Free, Egg-Free, Holiday
7 Comments

Bacon Chili

January 16, 2013 Kate
Basic Chili
Basic Chili

What!!!  No beans in your chili?  Yep, no beans.  I have chosen to not eat beans and legumes for a couple of reasons.  For one, I don't eat much starch anymore, I have chosen a high fat eating plan.  Second, beans and legumes contain considerable amounts of phytates — anti-nutrients which bind to minerals in the legumes, making them unavailable to our bodies. (This means some of the minerals present in the legumes aren’t able to be accessed by our bodies).  Nuts also have some phytates, but I feel the beneficial fats far exceed any of the nutrients in beans and legumes.  With all of that said, please feel free to add beans to this recipe.

I remember as a kid I never really cared for chili, unless it was canned with meat and beans only.  I think too many chili's have too many tomatoes that over power the taste.  I just don't like biting into a spoonful of mushy tomatoes personally.  I did put tomatoes in this recipes, but next time may make it with even less.  Some of you may want even more and love the mushiness and flavor they add.

Bacon Chili

Ingredients

  • 1 lb grass-fed ground beef
  • 4 slices bacon
  • 1 onion, chopped
  • 1/2 red bell pepper, seeded and cut into 1/2 inch pieces (optional)
  • 3 garlic cloves, minced
  • 1/8 cup chili powder
  • 1/2 tbsp ground cumin
  • 1 tsp ground coriander
  • 1/2 tsp red pepper flakes
  • 1/2 tsp dried oregano
  • 1/4 tsp cayenne pepper
  • 1 (28oz) can diced tomatoes
  • 1/2 tsp sea salt (or more if tomatoes don’t have added salt)

Instructions

  1. Slice the bacon into 1/2 inch pieces and place in a large saucepan over medium heat
  2. Once the bacon is cooked though, pour off all but 2 tablespoons of the bacon grease and return pan to the heat with the bacon in it
  3. Add the onions, peppers, garlic and all of the spices except the salt and cook until the onions get tender and start to brown, about 10 minutes
  4. Increase the heat to medium high and add the beef, breaking it up into pieces with a spoon until no longer pink, about 3-4 minutes
  5. Add the tomatoes and salt and bring to a boil, then reduce heat to a simmer. Cover, stir occasionally and cook for about an hour
  6. Remove lid and let the chili cook for an additional hour to thicken up
  7. Add salt to taste

This is great without, but you could top with cheese if you can tolerate it!!  This is the perfect make ahead meal or double it to freeze for later!

If you are an Amazon shopper, would you be so kind to use my affiliate link to make your purchases.  It is at no cost to you, it does provide a tiny kickback to Kate’s Healthy Cupboard.  This allows me to continue making and testing recipes for free.  Thanks so much!!

*I have recently switched all of my skincare and makeup to a company that is free of 1,500 chemicals!!  I am so particular about what goes into my body, I need to be just as picky as to what goes on my body!  Your skin is your largest organ and absorbs chemicals into the bloodstream faster than the gut does!  I am vain when it comes to my skin and was so thrilled to find products that are anti-aging and work!!!  Check out BeautyCounter for more info!!  You will love it!!  Give the gift of safe skincare this holiday season, gift sets available.

Kate's Healthy Cupboard - Gluten Free Recipes
In Entrees, Soups, Recipes Tags Bacon, Beef, Dairy Free, Egg-Free, Low Carb, Nut-Free, Paleo, Primal
13 Comments

Sausage and Mushroom Frittata

January 14, 2013 Kate
Sausage and Mushroom Frittata

A frittata is an Italian omelet and is often confused for a quiche.  A frittata does not have a crust like most quiches do and it also starts on the stove and ends in the oven.  I find frittatas to be so easy, and like quiches, can be made with so many different ingredient combinations. Here is a basic frittata recipe that certainly has more than just a basic taste!  It will give you an idea of how to create whatever frittata you'd like!

A couple of things to consider as you create your ideal frittata recipe:

Typically you use two eggs per person and the total number of eggs determines the skillet size.  An eight egg frittata will be cooked in an eight in skillet and ten eggs cooked in a ten inch and so on.  If you prefer a thicker frittata, use a smaller skillet than number of eggs.  Make sure the skillet is oven safe, I prefer cast iron for this.

A frittata cooks fairly quickly and most raw ingredients won't have enough time to fully cook.  Saute vegetables and meat before adding the eggs.  This also allows for moisture to be drawn out of the vegetables.  Raw vegetables will release too much moisture and leave your frittata soggy.  This is why tomatoes are not a good option since they have a high water content when raw and cooked.

Add salt to the whisked eggs, not to the vegetables, salt draws out moisture.  Before you salt and pepper the eggs, consider your ingredients and their saltiness.  For instance, sausage, ham and bacon are salty, therefore you will not need as much salt as you would if you are making an all vegetable frittata.

Recipe: Sausage and Mushroom Frittata

Ingredients

  • 8 pastured eggs
  • 1/2 lb breakfast sausage*
  • 8oz sliced mushrooms
  • 1/2 an onion, diced
  • 1 tsp fennel seeds
  • couple dashes of paprika and garlic powder
  • salt and pepper
  • 1/2 - 3/4 cup cheese, grated or diced (optional)

Instructions

  1. Turn oven onto broil and position the racks in the bottom portion of the oven
  2. Whisk the eggs with salt and pepper (add cheese to mixture if desire), set aside
  3. Brown the sausage in an 8 inch skillet(or smaller for thicker frittata) and add in the onions and mushrooms
  4. Continue to saute until most of the moisture is cooked off, turn heat down to medium low
  5. Pour in the egg mixture and scrape the sides as the eggs cook
  6. Continue scraping as egg curds begin to form, you want the frittata to be cooked about half way through
  7. Once it’s cooked half way through, place the skillet under the broiler for about 3-5 minutes until it begins to brown
  8. Remove from heat and serve hot

Quick notes

*I used Whole Foods Ground Breakfast Pork Sausage. If you buy plain pork sausage, you will need to season it more since the one I used is already seasoned. You could certainly do bacon or ham instead.

Let us know what flavor combinations you come up with!!!

Kate's Healthy Cupboard - Gluten Free Recipes
In Breakfasts, Recipes Tags Breakfast, Brunch, Dairy Free, Low Carb, Mushrooms, Nut-Free, Paleo, Primal, Sausage
1 Comment

Creamy Roasted Cauliflower and Mushroom Soup

January 10, 2013 Kate
Creamy Roasted Cauliflower and Mushroom Soup

It seems that most of the west is about to experience a bit of a cold front.  I thought this would be the perfect time to share this recipe!  I'm fortunate enough to still be in Arizona where a cold front means it's going to be in the 50's!  I live in Colorado, so listening to the weather forecast here cracks me up!!  What these people think is cold is definitely a hot winter day at home!

Even if it's not cold where you are, this is a delicious soup recipe to enjoy for lunch or dinner.  I served it with bacon pieces and used the bacon grease for flavor.  If you'd prefer, you can certainly skip the bacon, but who skips bacon?  This would also be good with shredded chicken as well.

Creamy Roasted Cauliflower and Mushroom Soup

Ingredients

  • 1 head of cauliflower, cut into pieces
  • 2 tbsp coconut oil
  • 2-3 pieces of bacon (optional)
  • 2 tbsp bacon grease, butter or coconut oil
  • 1/4-1/2cup white onion, diced
  • 2 garlic cloves, minced
  • 1 tsp fresh thyme or 3 tsp dried
  • 8 oz mushrooms, sliced
  • 1/4 cup white wine
  • 3 cups homemade chicken broth (or canned)
  • 3/4 cup full fat coconut milk
  • 2 tbsp grass-fed butter (optional)
  • sea salt and pepper

Instructions

  1. Place the pieces of cauliflower in a bowl and coat with the 2 tablespoons of coconut oil. Place single layer on a parchment lined cookie sheet and sprinkle with salt and pepper and roast at 400 for 25-30 minutes
  2. Cook the bacon in a skillet, reserve the grease, cut the bacon into pieces and set aside
  3. Place the bacon grease, coconut oil or butter in a large sauce pan with the onion. Saute the onions until slightly browned
  4. Add the garlic, thyme and mushrooms. Saute until the mushrooms are tender, about 5-10 minutes
  5. Add the white wine and de-glaze the pan
  6. Add the chicken broth and cauliflower and bring to a boil. Reduce heat to a simmer for 5 minutes
  7. Place the soup, coconut milk and optional butter in a food processor or blender and combine until desired consistency
  8. Salt and pepper to taste
  9. Sprinkle the bacon pieces on top (optional)

I served this tonight and when I told Tom what I had made, this was his response: "If I saw that on the label ofa soup can, I would not think it sounded very good."  About two bites into it, he kept telling me how awesome it was!  I knew he was going to like it!  Butter, bacon and mushrooms, who wouldn't love this!!

Kate's Healthy Cupboard - Gluten Free Recipes
In Entrees, Side Dishes, Soups, Vegetables, Recipes, Snacks and Appetizers3 Tags Bacon, Coconut Milk, Dairy Free, Egg-Free, Low Carb, Mushrooms, Nut-Free, Paleo, Primal
4 Comments
← Newer Posts Older Posts →
download.jpeg

Welcome to Kate's Healthy Cupboard! A place for healthy, grain free recipes, some low carb recipes, safe beauty and products for the home  and more...


>>  CONNECT WITH KATE  <<

pinterest.png
facebook.png
instagram.png

>>  SUBSCRIBE  <<

Success! Now check your email to confirm your subscription.

There was an error submitting your subscription. Please try again.


>>  SEARCH RECIPES  <<


Copyright 2016 Kate's Healthy Cupboard  ||  Website Design