• Blog
  • Recipes
  • Lifestyle
  • Safer Skincare
  • About
  • Contact
Menu

Kate's Healthy Cupboard

Street Address
City, State, Zip
Phone Number
Healthy Lifestyle, Healthy Grain Free Recipes

Your Custom Text Here

Kate's Healthy Cupboard

  • Blog
  • Recipes
  • Lifestyle
  • Safer Skincare
  • About
  • Contact

Pumpkin Butter Truffles

October 29, 2012 Kate
Pumpkin Butter Truffles

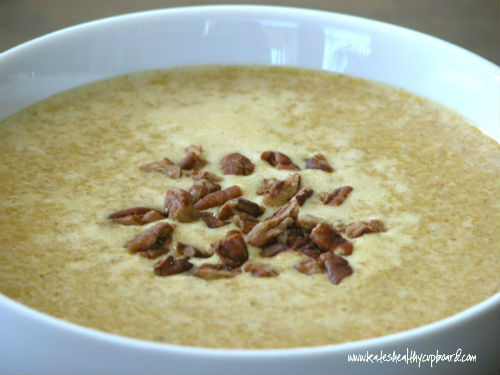
Have you tried my Chocolate Peanut Butter Balls (almond butter option), if you haven't, you really should!!  There is even added protein in the recipe to make them that much better!  This Pumpkin Truffle recipe is similar and perfect for a fall chocolate fix!  I don't think I have ever enjoyed or made a pumpkin recipe with chocolate, but I have to say, I like these two hanging out together!!

The inside, what I am calling the pumpkin butter, was scrumptious on it's own.  Feel free to skip the chocolate altogether and use it as a spread or dip.  Another option, if you want to leave out the chocolate, (I think you're crazy) is to roll the balls in coconut instead of dipping them.  Lots of variations here!!!

Recipe: Pumpkin Butter Truffles

Ingredients

  • 1/2 cup pumpkin
  • 1/2 cup almond butter
  • 2-3 tbsp maple syrup
  • 1/4 cup vanilla protein powder (Optional, add 1/4 cup more flour to replace.  I used Jay Robb's Vanilla Egg White Protein )
  • 1/2 cup almond flour
  • 1 tbsp lucuma powder (optional, adds maple flavor)
  • 3/4-1 tsp pumpkin spice
  • 1/4 tsp cinnamon
  • dash or two of sea salt (omit if using salted nut butter)

Chocolate:

  • 1/3 cup dark chocolate chip
  • 1 tbsp cacao butter or coconut oil

Instructions

  1. Combine the pumpkin, almond butter, syrup and oil in a bowl
  2. In a different mixing bowl, combine the flour, protein powder, lucuma, spices and salt
  3. Add the wet to the dry and mix well
  4. Place the mixture in the freezer for a couple hours until it has hardened a bit and can be formed into balls
  5. Once mixture is hard enough to handle, form inch in diameter size balls and place them on a cookie sheet or plate lined with parchment and place back in the freezer for 30 minutes
  6. While those are in the freezer, add the chocolate chips and cacao butter/oil to a small mixing bowl that has been placed over a small pan of boiling water. This is to get the chocolate to melt without burning it. Once water is boiling, turn down to a simmer
  7. With a spoon or a toothpick, place each ball into the chocolate and coat
  8. Return each truffle back to the parchment paper and put back in the freezer to let the chocolate set, about 15 minutes
  9. Store in the refrigerator or freezer

Quick notes

*Any nut or seed butter would work here. Coconut butter would be an option as well.

*I used a Xylitol Maple Syrup for less sugar, so I added a couple teaspoons of Swerve (my favorite all natural sweetener).

Variations

If you prefer to roll these in shredded coconut, once you form the balls, they should be soft enough and sticky to roll at that time.  I would throw them back in the freezer to set for about 30 minutes.  Store these in the refrigerator or freezer as well.

Let me know what other combinations you guys try!

If you want to try Swerve or need to order more, use coupon code KATE10 for a 10% discount.  Swerve is my favorite sugar replacement.  It is the only sugar alcohol that will not cause tummy troubles and it does not raise blood glucose levels.

If you are an Amazon shopper, would you be so kind to use my affiliate link to make your purchases.  It is at no cost to you, it does provide a tiny kickback to Kate’s Healthy Cupboard.  This allows me to continue making and testing recipes for free.  Thanks so much!!

*I have recently switched all of my skincare and makeup to a company that is free of 1,500 chemicals!!  I am so particular about what goes into my body, I need to be just as picky as to what goes on my body!  Your skin is your largest organ and absorbs chemicals into the bloodstream faster than the gut does!  I am vain when it comes to my skin and was so thrilled to find products that are anti-aging and work!!!  Check out BeautyCounter for more info!!  You will love it!!

Kate's Healthy Cupboard - Gluten Free Recipes
In Desserts, Recipes Tags Almond Butter, Almond flour, Chocolate, Egg White Protein, Holiday, Paleo, Primal, Pumpkin, Thanksgiving
10 Comments

Pumpkin Spice Cream of "Wheat"

October 24, 2012 Kate
Pumpkin Spice Cream of Wheat

One of the most common complaints I hear from clients is, "what can I eat for breakfast now that I can't have cereal, a bagel or pancakes.  I can't eat eggs everyday!"  I can rattle off numerous things other than starchy high carb foods...and something besides eggs.  Too many of us have gotten in the mindset that breakfast has to be a "breakfast" food, and that is not the case.  Get creative and don't hesitate to eat leftovers from the previous nights dinner.  I personally love my protein smoothie that's full of fat and spinach (you wouldn't know it's in there if the shake wasn't green!) that I make every morning and look forward to it everyday...and it doesn't even have fruit in it!!!

I am on a mission to create some low starch breakfast options that will make you think you're getting the carbs you are so used to eating.  The best part is, you won't be hungry an hour later!  There are numerous breakfast recipes on my site that are higher in fat, lower in starch and supply a good amount of protein.  Some of my favorites include:  Coconut Pancakes and Strawberry Syrup, Banana Bread French Toast, Egg Muffins,Banana Pancakes,Grain Free Thin Pancakes, Almond Nut Joy Granola,Grain Free Banana Nut Granola and Pumpkin Spice Granola.  And for all of you cold cereal people, I'm working on a recipe, but the bad news is, it has to be done in a dehydrator.  I tried it in the oven and it just doesn't work.  When it comes to granolas, my cookie bites and some cracker recipes, a dehydrator is so worth it!!!

I recently had the idea of making a hot cereal, but didn't want it to be an entire bowl of mushed nuts.  I somehow wanted to incorporate mashed cauliflower with protein in the form of powder.  About a month ago, I came across this recipe for Faux "Oat" Meal and loved how she used real eggs for the protein!  You would never guess that eggs or cauliflower were in this cream of "wheat" recipe!  I did things a little differently and loved what I came up with!  There are many flavor options for those of you that don't like pumpkin.

Pumpkin Spice Cream of “Wheat”

Serves: 2-3

Ingredients

  • 1 medium head of cauliflower, steamed
  • 4 eggs
  • 1 1/4 cups non-dairy milk (I love So Delicious unsweetened vanilla)
  • 4 tbsp coconut cream (The cream that rises to the top of a can of full fat coconut milk that has been refrigerated)
  • 1/4 cup pumpkin
  • 1/2 tsp maple flavor (vanilla should work too)
  • 1-3 tbsp sweetener (I used 3 tbsp of Swerve which is erythritol.)
  • 1 tsp cinnamon
  • 1/2 tsp ground ginger
  • 1/2 tsp ground cloves
  • 1/2 tsp nutmeg
  • couple dashes of salt
  • grass-fed butter (optional)

Instructions

  1. Place the steamed cauliflower in a food processor and pulse until it’s “riced”
  2. Whisk the 4 eggs in a large mixing bowl and set aside
  3. In a medium sized saucepan, combine the milk, cream, pumpkin and cauliflower and slowly bring to a boil. Reduce heat to a simmer and cook for 1-2 minutes
  4. Remove the pan from heat and add a 1/4 cup at a time to the eggs, whisking the entire time you add the hot mixture. The eggs will start to cook if you aren’t careful. This process makes the eggs safe to eat for those concerned with eating raw eggs
  5. Pour the mixture back in to the food processor, add the maple extract, spices, salt and sweetener and pulse until well combined
  6. Serve hot with a dollop of grassfed butter (optional)

Quick notes

Since all cauliflower heads are different sizes, you may want to add milk if it seems to thick or add some almond flour to thicken it up.

Variations

Serve with nuts, coconut or fresh fruit on top. Another variation would be to replace the pumpkin with applesauce and just use cinnamon for the spice.  You could also add just cocoa powder or simply leave it as a maple nut version.


I still think adding a vanilla protein powder would work just fine in place of the eggs.  Add it at the time you would add in the spices.

Kate's Healthy Cupboard - Gluten Free Recipes
In Breakfasts, Vegetables, Recipes Tags Breakfast, Coconut Milk, Holiday, Nut-Free, Paleo, Pumpkin
7 Comments

Cashew Chicken

October 22, 2012 Kate
Cashew Chicken
Cashew Chicken

I am starting to wonder why it took me so long to start cooking with a crockpot!  It can make meals so quick, easy and ready for you when you arrive home from a long day.  Plus, it's fantastic for making bone broth!  I was inspired to make this cashew chicken by this recipe that I found on Pinterest, but made quite a few changes to remove the sugars, gluten and a few other things.  Speaking of Pinterst, if you are on there and addicted like me, come follow me.  Although this recipe was done in a crock pot, I think you could probably make this on the stove or in the oven as well. Let me know if any of you try this!  I just don't think you can go wrong when cashews are involved!

Recipe: Cashew Chicken

Ingredients

  • 1/2 tsp fresh ginger, grated (A Microplane is my favorite for this and zesting)
  • 1/4-1/2 tsp red pepper flakes
  • 1/2 cup cashews

Instructions

  1. Add the chicken pieces and onion to the crockpot
  2. In a bowl, mix together all of the remaining ingredients except the cashews
  3. Pour the mixture over the chicken and mix so the chicken is coated
  4. Set temperature to low and cook for 3-4 hours
  5. Add in the cashews and serve

Quick notes

Double the sauce if you want some extra to put over vegetables.

The Cauliflower Fried "Rice" or the Cashew Bok Choy would be a great vegetable to have with this chicken dish!

Kate's Healthy Cupboard - Gluten Free Recipes
In Entrees, Recipes Tags Cashews, Chicken, Paleo, Primal
3 Comments

Chicken Noodle Soup

October 19, 2012 Kate
Chicken Noodle Soup
Chicken Noodle Soup

Yes, you are reading that correctly...noodles!!!  I am so excited about this recipe!  Not only does it have grain free noodles in it, but it has homemade broth that is full of numerous health benefits!!  Homemade broth is so easy to make, more on that later, but I wish it was available to buy frozen so more people would consume it!  Boxed broth just doesn't cut it when it comes to all the benefits, but it will work in this recipe if that's what you choose to use.

Enough about broth for now, this soup has noodles!!!!  Before you get too excited, those of you that still eat pasta, rices and breads, these will be enjoyable, but not as enjoyable as they will be to those of you that gave up gluten and rice pasta long ago!!!  I truly felt like I was eating noodles and the best part is, there's only a small amount of starch in this recipe.  My mom's chicken noodle soup was my all time favorite as a kid!  It was my birthday dinner request for years!  I remember going after more noodles than chicken and broth, so really it was her noodles that I loved!  They were thick, dense and delicious...and full of gluten!  This recipe comes pretty darn close and makes me feel like I'm getting the real thing!!

There are a couple of ingredients in this that you may be unfamiliar with.  Arrowroot Flour/Powder is the starch I use to bind and soften the noodles.  It is tasteless and often times used to thicken sauces and gravies (great alternative to cornstarch).  It comes from the rizhome plant and is pure starch, so it contains carbohydrates only.  Don't let that scare those of you that are trying to go low carb.  There is such a small amount of it in this recipe (about 21 grams total, so a little over 5 grams per serving)!  I use Bob's Red Mill Brand that can be found in the baking section of a grocery store or online.

The other ingredient is psyllium husk powder (or whole psyllium husks ground into a powder with a blender or spice grinder).  It acts as a thickener and binder as well.  It's mucilage properties (gels when liquid is added to it) sort of act as the gluten without having to use gluten.  It is a soluble fiber and often found in high amounts of things like Metamucil.  Don't worry, this will not cause intestinal distress!  There is such a small amount of it in this recipe, you won't even know it's there!!!  This is typically found in the supplement section of natural grocery stores or availableto order online.

Chicken Broth
Chicken Broth

I make chicken broth about every two weeks and drink a cup of it everyday.  It is so easy to do and like I said, so beneficial for so many things including healing your gut!!  It provides the body with easily absorbed minerals such as calcium, magnesium, phosphorus and other trace minerals.  In addition to the collagen it provides (Ladies, did you see the word collagen, it improves aging skin!  I hope you are all convinced to make your own broth now!!!), it also contains natural gelatin.

Gelatin was found to be useful in the treatment of a long list of diseases including peptic ulcers, tuberculosis, diabetes, muscle diseases, infectious diseases, jaundice and cancer. Babies had fewer digestive problems when gelatin was added to their milk. The American researcher Francis Pottenger pointed out that as gelatin is a hydrophilic colloid, which means that it attracts and holds liquids, it facilitates digestion by attracting digestive juices to food in the gut. (source: wapf.org)

I use a crockpot since I let it simmer for over 24 hours, but you can certainly use a large stock pot and leave it cooking overnight.  You want to use about 2lbs of bones for every 4 quarts of water.  Make sure your bones are from grass-fed animals (Us Wellness Meats is great source for tons of different bones and grass-fed meats)!  I use chicken feet most of the time and find them in a freezer at Whole Foods.  Ask the butcher if you can't find them.  I just love how much gelatin feet produce.  They are kind of creepy looking, but once you realize how amazing the broth is, you'll get over it!!  Add the bones and water to your pot and also add at least 2 Tbsp of Apple Cider Vinegar (organic and unfiltered) or Coconut Vinegar(vinegar provides acid and draws minerals out of the bones) along with about a tsp of sea salt.  Use more vinegar and salt if you are using more than 4 quarts of water.  I also add some garlic cloves, a carrot, celery stalk and some onion for flavor.    Allow the broth to come to a boil and then turn down the temperature to a simmer and let it simmer for at least 8 hours, the longer the better.  Once it's cooked, turn off the crockpot or remove your pot from heat and allow the broth to cool.  Strain the stock through a fine mesh metal strainer or with a spider and throw away what you skim off.  Place the cooled stock into glass jars for storage in the fridge (for up to a week) or pour into freezer-safe containers (not glass, they will break!) for later use. You can freeze it in ice cube trays and defrost a few at a time!

When the broth is fully cooled, it may have a gelatinous consistency. That means your broth is rich in gelatin!  Sometimes a longer or very hot simmer may break down the gelatin and your broth won’t appear gelatinous.  Don't worry, the minerals are still there. As you can see in my photo, there is a layer of fat on top.  If you like, you can skim off any fat that is now considered “tallow” – and feel free to cook with it! I have also heard its so good for your skin, applied topically!  I just might have to get brave and put it on my feet at night!!

Chicken Noodle Soup

Serves: 2-4

Ingredients

  • 8 cups chicken broth (homemade is best, see recipe in text above)
  • 1/2 – 1 onion, diced
  • 1 large carrot, diced
  • 1 celery stalk, diced
  • 1 clove garlic, minced (optional)
  • sprinkle of parsley for color (optional)
  • salt and pepper to taste
  • 2 chicken breasts

Noodles:

  • 1/4 cup coconut flour
  • 1/2 cup Honeyville almond flour
  • 2 tbsp psyllium husk powder (grind whole husks in blender)
  • 3 tbsp arrowroot flour
  • 2 large eggs*
  • 1/4 tsp salt
  • 1/4 tsp garlic

Instructions

  1. In a large pot, bring the broth to a boil and add the onion, carrot, celery, garlic and salt and pepper.
  2. Turn down to a simmer and add the two chicken breasts
  3. Depending on the thickness of breasts, cook the chicken completely, about 10-15 minutes
  4. Remove the chicken and once it’s cool enough to touch, chop it or shred it and return it to the simmering soup

Noodles:

  1. Whisk the eggs in a mixing bowl
  2. Add the remaining ingredients and stir until dough forms
  3. If it seems too sticky add a tiny bit more almond flour.  It its crumbly, read my comment in Quick Notes below
  4. Place a piece of parchment paper on the counter and spray it with coconut oil spray or lightly brush oil onto the paper and place dough on it
  5. Take another piece of parchment and do the same to one side and place on top of the dough.  this keeps the dough from sticking
  6. Roll out the dough to no less than 1/4 inch thick. If these are to thin, some of noodle will disintegrate. I think a bit over 1/4 inch is best
  7. With a sharp knife or pizza cutter, cut noodles into desired width and length, they will grow a bit wider once cooked
  8. Place the cut noodles in the simmering broth, cover and cook for 3-5 minutes or until desired tenderness
  9. Remove pot from heat and serve

Quick notes

*I use farm fresh eggs that tend to be a bit smaller. If your dough is crumbly after you’ve completely mixed it, you may need to add another egg or half an egg (whisk and pour just half).

Soups On!!!!

Kate's Healthy Cupboard - Gluten Free Recipes
In Entrees, Soups, Recipes Tags Almond flour, Chicken, Coconut Flour, Paleo
7 Comments

Pumpkin Spice Scones

October 15, 2012 Kate
Pumpkin Spice Scones

It's that time of year when people get all excited about Pumpkin Lattes and Pumpkin Scones from Starbucks!  I have to say I have not tried either one, not a coffee person and have been gluten free for years so the scone was never an option.

What is a scone?  They originated in Britain and are thought of as individual light quick breads, made with a small proportion of butter and a high proportion of raising agent. Some may include dried fruit or chocolate chips. Traditionally they were served with butter or cream along side a morning or afternoon tea.  My recipe does not include butter or oil, the pumpkin takes the place of that.  You will also notice that I use 1 tsp of baking soda (rising agent) which is about double what I would use in a typical baked good.

I'm not tying to recreate the Starbuck's Scone, but here is a recipe that I think you will enjoy!  I made a maple almond butter drizzle for the top of mine, but you could simply enjoy these warm with grass-fed butter.

Pumpkin Spice Scones

Ingredients

  • 1 1/2 cups almond flour (I used Honeyville*)
  • 1/2 cup coconut flour
  • 1/3-1/2 cup granulated sweetener (coconut palm sugar)* (I used 1/2 cup erythritol for low sugar option)
  • 2 eggs
  • 1/3 cup canned pumpkin (makes sure it’s not puree or these will be too moist)
  • 1 1/2 tsp cinnamon (measure all spices as heaping)
  • 1/2 tsp nutmeg
  • 1/4 tsp ginger
  • 1/4 tsp cloves
  • 1 tsp soda
  • 1 tsp vanilla
  • 1/4 tsp sea salt
  • 1/4 cup nuts or chocolate chips (optional)

Instructions

  1. With a handheld mixer, beat the eggs, sugar and pumpkin. Stir in the vanilla after.
  2. In a mixing bowl, combine the flours, spices, salt and soda
  3. Combine the two bowls and mix well. Make sure the coconut flour is mixed in, it tends to clump
  4. Fold in the nuts or chocolate chips
  5. Dough should be stiff enough to form into two equal balls. Place on a parchment lined cookie sheet
  6. Form into two round loaves about 3/4 to 1 inch in thickness
  7. Cut each loaf into 4 pieces and separate the pieces so they cook evenly
  8. Bake at 350 for 20 minutes or until browned
  9. Remove from heat and place on a wire cooling rack so they can dry out. Scones should not be real moist

Quick notes

*I suggest using Honeyville, Bob’s may make these too moist.  They’ll still be good but not scone like.

*If you want to use less sugar, increase the almond flour amount by the amount of sugar you leave out.

I have found that baked goods that have coconut flour in them are better once they have been refrigerated. Coconut flour absorbs moisture and needs time to set in recipes. I have heard that the cold will condense some moisture onto the baked good. Whatever it is, I suggest doing it!!! Store baked goods in an airtight container,

Variations

For the glaze, I put almond butter, some maple syrup (I used Xylitol Maple Syrup for low sugar option) and a bit of unsweetened vanilla coconut milk (to thin it out) into a blender. Pour the mixture into a small ziploc bag and cut a very small hole in the corner of the bag. This makes drizzling easy and pretty!

If you are an Amazon shopper, would you be so kind to use my affiliate link to make your purchases.  It is at no cost to you, it does provide a tiny kickback to Kate’s Healthy Cupboard.  This allows me to continue making and testing recipes for free.  Thanks so much!!

*I have recently switched all of my skincare and makeup to a company that is free of 1,500 chemicals!!  I am so particular about what goes into my body, I need to be just as picky as to what goes on my body!  Your skin is your largest organ and absorbs chemicals into the bloodstream faster than the gut does!  I am vain when it comes to my skin and was so thrilled to find products that are anti-aging and work!!!  Check out BeautyCounter for more info!!  You will love it!!

Kate's Healthy Cupboard - Gluten Free Recipes
In Breads and Muffins, Breakfasts, Recipes, Desserts2 Tags Coconut Flour, Holiday, Paleo, Primal, Pumpkin, Thanksgiving
Comment

Coconut Curry Carrot Soup

October 10, 2012 Kate
Coconut Curry Carrot Soup

It's definitely soup season here in Colorado!!!  I just returned from ten days in Arizona and can't believe how cold it feels here now!  I've decided I prefer the warmth and the idea of never having to scrape ice off my windshield!

While I was in Arizona, I made this soup for Tom's (my boyfriend) grandmother.  She is 93...reminds me of Betty White, love her!!  She hasn't been feeling great and I think dehydration is playing a role in her tiredness.  Old people don't want to drink so they don't have to go potty.  She of course thinks she drinks a ton of fluids.  It's hard to convince her that her coffee with Starbuck's Ice Cream in it in the morning and her Vodka on the rocks at night just doesn't cut it!!!  Needless to say,  I was on a mission to get some fluids in her!  I had her drinking coconut water and kombucha along with some homemade bone broth.  I figured soup would be a great way to secretly increase her fluid intake.  She loooooved this soup and ate it everyday for lunch and raved about it every time I dished it up for her.  Hope you enjoy it as much as sweet Verna May did!!!

Recipe: Coconut Curry Carrot Soup

Ingredients

  • 1 tbsp grass-fed butter or coconut oil
  • 2 heaping cups of thickly sliced carrots (about 4 carrots)
  • 2 thin slices of fresh ginger root
  • 1 medium onion, chopped
  • 5 cups chicken broth (I prefer homemade*)
  • 3/4 cup full fat coconut milk
  • 3/4 tsp red curry paste (add more if you want it spicier)
  • salt and pepper to taste
  • 1 scallion, sliced
  • 1 tbsp chopped cilantro
  • 2 chicken breasts (optional)

Instructions

  1. Heat the butter/oil in a large saucepan and stir in the carrots and ginger
  2. Cook over medium heat until the carrots start to brown, about 6-8 minutes stirring constantly
  3. Add the onions and cook until they are translucent
  4. Stir in the broth, coconut milk and curry paste
  5. Bring to a boil, reduce heat and simmer covered for 25 minutes
  6. If you want to add chicken to this recipe, add it to the simmering soup. Remove chicken once it's fully cooked and set aside
  7. Strain the solids so you can remove the ginger root and discard
  8. Add the solids plus 2 cups of the liquid to a blender and puree
  9. Add the remaining liquid and process until completely pureed
  10. Pour soup back into saucepan to add shredded chicken or pour into soup bowls (Use a fork to shred the chicken once it has cooled enough to touch. Add it to the soup and stir)
  11. Serve with some scallions and cilantro sprinkled on top and additional salt and pepper if needed

Quick notes

*I prefer to use homemade chicken broth for all of the health benefits. Store bought will work, but may be higher in sodium so be careful when you salt the soup. I use this recipe for broth. I also add onion, carrots, celery and garlic cloves to my pot for flavor. I use a large crockpot and let simmer for 24 hours to let all of the gelatin out of the bones.

Kate's Healthy Cupboard - Gluten Free Recipes
In Entrees, Side Dishes, Soups, Vegetables, Recipes, Snacks and Appetizers2 Tags Chicken, Coconut Milk, Nut-Free, Paleo
Comment

Cinnamon Maple Coconut Bites

October 5, 2012 Kate
Cinnamon Maple Coconut Bites

Tiss the season for lots of cinnamon...and pumpkin spices!  Here is another easy recipe for a quick sweet treat similar to my Coconut Vanilla Bean Dough Bites Recipe and the Coconut Brownie Bites Recipe.  I used a dehydrator, but it's not necessary.  If you have been thinking of buying one though, I'd bite the bullet and do it, so worth it!!

Cinnamon has some amazing health benefits so why not incorporate it into your day!  A few of those benefits include:  regulates blood sugar, reduces LDL cholesterol levels, has natural anti-infectious compounds, reduces pain linked to arthritis, may reduce the proliferation of cancer cells, serves as a natural food preservative, contains fiber, calcium, iron, and manganese, can be effective for menstrual pain and infertility.  Wow, I might have to make more of these bites or another batch of my Apple Cinnamon Upside Down Cakes!

Cinnamon Maple Coconut Bites

Ingredients

  • 1 1//2 cups unsweetened shredded coconut
  • 1/4 cup vanilla protein powder (I used Jay Robb’s Vanilla Egg White Protein), sub for almond flour if you prefer
  • 1 tbsp coconut oil
  • 3-4 tbsp maple syrup*
  • 1/2 tsp vanilla extract
  • 1 tbsp lucuma powder (optional)
  • 2 tsp cinnamon
  • dash of sea salt

Instructions

  1. Pour the coconut into a food processor and blend until small pieces are produced
  2. Add all of the remaining ingredients and blend well.
  3. Using a small cookie scoop, place each bite onto dehydrator sheets
  4. Dehydrate at 125 for 2-4 hours depending on how soft you want them
  5. Oven option: Set temp to lowest possible setting or use dehydrator setting. Bake for 1-2 hours depending on heat setting

Quick Notes

*I used Xylitol Maple Syrup as a reduced sugar option.

*For more information on Lucuma, read this post

I like to reheat mine each time I treat myself to one or two or maybe three!!  Store in an airtight container.

Kate's Healthy Cupboard - Gluten Free Recipes
In Breakfasts, Recipes, Snacks and Appetizers2 Tags coconut, Dehydrated, Desserts, Egg White Protein, Nut-Free, Paleo, Primal, Vegan
3 Comments

Grain Free Chestnut Flour Pumpkin Bread

October 1, 2012 Kate
Grain Free Chestnut Flour Pumpkin Bread

I know not everyone has chestnut flour on hand and most of you may have never heard of it.  I feel bad posting recipes that include ingredients that can not be purchased at the local health food store, but this flour is great!!  There are a million grain free pumpkin bread recipes out there using almond and coconut flour, so I wanted to give a different option.  My hope is thatone day soon chestnut flour will be available locally for all of us that are eating gluten and grain free.

In case you missed it, I also used chestnut flour in this Grain Free Ginger Cookies Recipe and explain what chestnut flour is.  The best place to buy it is at nuts.com and you can get some fantastic almond flour (comparable to Honeyville Brand)or cashew flour to make the Spicy Rosemary Cashew Crackers.

Grain Free Chestnut Flour Pumpkin Bread

Ingredients

  • 1 3/4 cup chestnut flour
  • 3/4 cup coconut palm sugar or erythritol (I did 1/8 cup palm sugar and erythritol for the remaining)
  • 2 pastured eggs
  • 1 cup pumpkin puree
  • 1/2 cup coconut oil
  • 1/2 tsp baking soda
  • 1 tsp apple cider vinegar
  • 1 1/2 -2 tsp cinnamon
  • 1/2 tsp nutmeg
  • 1/2 tsp cloves
  • 1/2 tsp ginger
  • 1/2 tsp sea salt
  • 1/2 cup chopped nuts, optional

Instructions

  1. Blend the eggs, pumpkin, oil and sugar with a hand mixer
  2. Combine the flour, salt, soda and spices in a different mixing bowl
  3. Make sure your pan is greased and ready to go before this next step. The soda and vinegar is a rising agent and starts acting immediately so you want to get the bread in the oven asap.
  4. Add the vinegar and the dry mixture to the wet and stir well
  5. Pour batter into a greased loaf pan and bake at 350 for 50-55 minutes

Serve warm with some grass-fed butter...mmmmmmm!

Kate's Healthy Cupboard - Gluten Free Recipes
In Breads and Muffins, Recipes Tags Chestnut Flour, Pumpkin
4 Comments

"Notato" Pancakes

September 27, 2012 Kate
Notato Pancakes
Notato Pancakes

Have you ever taken left over mashed potatoes and made potato pancakes the next day?  I loved them, but no more potatoes for me so these "notato" pancakes made with cauliflower will have to do...and they do!  If you eat white potatoes regularly, these may not do it for you and your starch addiction.  Otherwise, give these a try and let me know what you think!  You may also enjoy this Mashed Cauliflower Recipe next time you're craving mashed potatoes!

“Notato” Pancakes

Ingredients

  • 1 large head of cauliflower, chopped and steamed
  • 1-2 tbsp fresh chives, minced
  • 2 eggs
  • 1/2 tsp garlic powder
  • salt and pepper to taste
  • 1-2 tbsp coconut oil for frying

Instructions

  1. Pat dry the steamed cauliflower to remove as much moisture as possible
  2. In a food processor, pulse the cauliflower into tiny pieces. Do not puree it!
  3. In a mixing bowl, whisk the eggs and add the cauliflower, chives, garlic, salt and pepper and stir until combined
  4. Heat a large skillet over medium high heat and add 1 tbsp of oil
  5. Once the oil is hot, spoon the mixture into the pan and press down into a pancake shape
  6. Cook until brown and pancake is holding together enough to flip and brown the other side
  7. You may need to add more oil to the pan for the second batch of pancakes
  8. If your batter seems too running, add a bit of coconut flour if you’d like. I prefer these to be flourless!


Serve nice and hot!

Kate's Healthy Cupboard - Gluten Free Recipes
In Side Dishes, Vegetables, Recipes Tags Low Carb, Nut-Free, Paleo, Primal, Vegetables
10 Comments

Raw Beet and Sunflower Seed Crackers

September 24, 2012 Kate
Raw Beet and Sunflower Seed Crackers

This may sound very similar to a recipe from a few months back, cause it is.  I basically took my recipe for my Raw Beet Sunflower Seed Pesto and made a few changes to create this delicious cracker!  If you are a beet person, this is a must try!  I used my dehydrator, but I believe this should work just fine in the oven.  Many ovens have a dehydrator option or just bake these at the lowest possible setting.

 Raw Beet and Sunflower Seed Crackers

Ingredients

  • 2 large beets, peeled and chopped (about 5 cups)
  • 4 garlic cloves
  • 3/4 – 1 cup fresh basil leaves
  • 1 cup raw sunflower seeds
  • 2 tbsp balsamic vinegar
  • 1 tbsp psyllium husk*
  • 1 tsp sea salt

Instructions

  1. Place the chopped beets into a food processor and blend until pureed
  2. Add in the remaining ingredients excluding the sunflower seeds and blend until well combined
  3. Add the seeds to the mixture and combine. Do not let the seeds get so small they disappear.
  4. Dehydrate at 145 for 2 hours. Reduce the temp to 105 and dehydrate until crisp. Once the top is completely dry, I flip the crackers to finish. this is the best time to cut or score the “dough” into desired cracker size.
  5. Oven Method: Bake on a parchment lined cookie sheet at lowest temperature setting or dehydrator setting until desired crunch. You may want to turn the crackers over part way through to cook evenly. You can try cutting or scoring the crackers at that time as well.

Quick notes

*Psyllium husk powder helps to bind the ingredients, like an egg does or flax meal mixed with liquid does. It can be found at most health food stores in the supplement section. It is a powder that is high in fiber and when consumed in high amounts, it can cause intestinal distress. I promise the one tablespoon of it in this entire recipe will not cause a problem for you!!

Kate's Healthy Cupboard - Gluten Free Recipes
In Recipes, Snacks and Appetizers2 Tags Crackers, Dehydrated, Nut-Free, Paleo, Primal, Raw, Sunflower Seeds, Vegan
1 Comment

Grain Free Pumpkin Spice Granola

September 21, 2012 Kate
Pumpkin Spice Granola

Happy Fall!!  Tomorrow is the first day of fall so bring on the pumpkin!

I think one of the biggest concerns for people going grain free is, "what will I eat for breakfast?" We have been so trained to eat cereals, toast, pancakes and waffles with an occasional egg for breakfast, carbs and more carbs!  If you are missing your morning cereal, here's the solution!  This granola recipe along with my other granola recipes (Banana Nut Granola and Almond Nut Joy Granola) are the perfect high fat and moderate protein breakfast!  Enjoy them with unsweetened almond or coconut milk or on top of greek yogurt, if you tolerate dairy or just plain.

If you would prefer to make soft cookies out of this recipe as opposed to crunchy granola, that is an option.  I personally like the granola best for the crunch, the cookies are soft and I prefer my nuts crunchy.  Dehydration is recommended but certainly not required.  If you have been thinking of getting a dehydrator, the one I have is very reasonable and so worth it!  I have quite a few recipes that I use it for including, beef jerky, cookies and crackers.  So if you have been contemplating, get it!!!

Grain Free Pumpkin Spiced Granola

Ingredients

  • 2 1/2 cups raw nuts, chopped (I used almonds, pecans and walnuts)
  • 1/3 cup pumpkin seeds
  • 3/4 cup coconut chips (optional, replace with nuts or it may be too soupy)
  • 2/3 cup almond flour
  • 1/4 cup vanilla protein powder (optional or add more flour. I usedJay Robb’s Vanilla Egg White Protein)
  • 1 tsp lucuma (optional)
  • 1/2 tsp vanilla
  • 1/4 cup maple syrup, honey or coconut nectar*
  • 1/2 cup pumpkin puree
  • 1/8 cup almond butter
  • 11/2 -2 tsp cinnamon
  • 1/2 tsp ginger
  • 1/2 tsp cloves
  • 1/2 tsp nutmeg
  • couple dashes of sea salt

Instructions

  1. Combine the chopped nuts, seeds, coconut, protein powder, almond flour, lucuma and all the spices and salt in a bowl and mix well
  2. In a separate bowl, combine the pumpkin puree, almond butter, liquid sweetener and vanilla
  3. Combine the two bowls and stir until all the dry ingredients are coated
  4. Place on dehydrator sheets in clumps and dehydrate at 145 for 2 hours, then turn down to 115 until desired crunch is obtained. I left it in there for 24 hrs.
  5. For oven method, place on a parchment lined cookie sheet and bake at 175-200 until desired crunch is obtained. Stir every so often to cook evenly

Quick notes

* I used Xylitol Maple Syrup which is far less sweet than regular syrup and honey. I added 1/4 cup of erythritol as well. If you want it sweeter, make sure to add a granulated sweetener, not more liquid. It will make the granola too soupy.

Variations

If you prefer a soft cookie instead of crunchy granola, spoon out the “dough” onto a parchment lined cookie sheet and bake at 200 for 2 hours

Kate's Healthy Cupboard - Gluten Free Recipes
In Breakfasts, Recipes, Desserts2 Tags Almond Butter, Almond flour, Almonds, Breakfast, Egg White Protein, Paleo, Primal
Comment

Goodbody Baked Goods Review and Giveaway

September 19, 2012 Kate
Goodbody
Goodbody

Doing something a little different today.  I want to introduce you all to Goodbody Baked Goods and give you the chance to win some of these treats!!   I found this local grain free company at my Whole Foods recently.  After visiting their website and reading their story, I knew I wanted to help get the word out about these delicious (hard to not eat the entire bag at once) Cookie Bites and Brownie Bites!  I contacted the company and asked if I could do a review and giveaway to make my readers aware of their great product.  They were nice enough to send me 5 packages (just what I needed), one of each flavor to try and review.  Better yet, they also will be sending one lucky reader a variety box of 5 bags to enjoy as well!!!

You all know how much I love baking, hence all of the recipes for sweets on my site.  Susan, the creator seems to be a lot like me. She states on their website:  "Goodbody Baked Goods grew out of my passion for fitness, love of baking and commitment to making healthy treats for my family.  As a former personal fitness trainer, I’ve long preached the importance of healthy eating. But I also love cookies and brownies as much as anyone else and see no reason that good health and tasty treats should be mutually exclusive."  For those of you that know me or are a client of mine, know that I am the first to admit when I have overindulged on goodies and am real when it comes to that!!  Speaking of real, Susan and Jeff are the real deal as the owners of Goodbody.  I have spoken with them both through email and find myself wanting to go meet them!  When you get a chance, go read their story!  Susan has overcome tremendous adversity and is such an inspiration!!

"All Natural cookies and brownie bites that nourish your body and please your palate."

Gluten-Free • Grain-Free • Dairy-Free • Low Glycemic • All Natural • Vegan Options

Flavors:

Almond Cranberry

Lemon Blueberry Walnut

Almond Butter Chocolate Chip

Chocolate Brownie

Mint Chocolate Chip

I enjoyed every single one of these flavors, some a little too much!!  I have to say the Almond Butter Chocolate Chip and Chocolate Brownie were my favorite, probably because I love chocolate.  You can't ever go wrong when you mix nut butter with chocolate, in my opinion!  The Lemon Blueberry Walnut and the Almond Cranberry have great flavor and great crunch.  The lemon and almond extracts really come through well.  I absolutely enjoyed those, but am not a fruit in my cookies type of gal typically.  If you like fruity cookies, be sure to grab both of these!  Some people do not like walnuts, but don't let that steer you away, I would have never guessed it was walnuts.  It has such a great lemon flavor and I liked the crunch of the nuts in it.  I liked the Mint Chocolate Chip, but I'd prefer to mix those two flavors in something like my Dairy Free Mint Chip Ice Cream.  Better yet, I should try adding these cookies to my ice cream...yum!!!  With that said, I still managed to eat plenty of that flavor as well!  One thing that sticks out to me the most, besides being one of the only grain free goodies on the market, is that they use coconut palm sugar instead of agave like so many other companies.  Palm sugar is full of benefits where as agave is just as processed and bad for us as HFCS.  What I'm trying to convey is that this is a great product all around!

Where can you find them and how can you win them:

They are found in the freezer section at the store and must be kept in the refrigerator or freezer.  I think they are best out of the freezer, my favorite way to eat them!  They are currently available at Whole Foods Belmar, Washington Park, Southglenn, Superior, Baseline, Pearl and Alfalfa's.  Check their website for a couple other smaller markets in the Denver area and for their continued growth.  They are also available online at Abe's Market (shipped with cold packs) for all of you that aren't local.  I have no doubt they will be available at all Whole Foods one day!

To win a variety pack of Goodbody Baked Goods, you must do one of the following things:

  1. Like Goodbody Baked Goods on Facebookand let me know you did in the comments below.
  2. Like Kate's Healthy Cupboard on Facebook or follow on Pinterest and let me know you did in the comments below.
  3. Share this post with friends through email or on FaceBook and let me know you did in the comments below.
  4. Comment on this blog post as to why you would like to try these.

I will randomly select one lucky winner Friday, September 28th.  Good Luck!

Kate's Healthy Cupboard - Gluten Free Recipes
In Uncategorized
50 Comments

Chicken With Mushroom "Cream" Sauce

September 17, 2012 Kate
Chicken with Mushroom Cream Sauce

I can't believe I have shied away from mushrooms my entire life until recently!  I know it's a fungus, but damn they are good and heck, they have medicinal properties as well.  So why not saute some in butter and garlic then finish off with some white wine!! My only complaint is that you think you are making a ton, but by the time they cook up, it's half the amount and you find yourself longing for more!!

I found a recipe similar to this, but unfortunately, it called for heavy cream and my body can not handle that.  Coconut milk was the solution as long as all of the flavors would hide the coconut taste and it would thicken up.  I have to say, this was divine!!  I could have just eaten the entire pan of the mushroom cream sauce and left the chicken for another day!

I pan fried the chicken.  This may be a bit intimidating to some and quite simple for others.  Since chicken is a fairly lower fat meat, it's easy to over cook if not fried just right.  You could simply bake the chicken and then smother it in the mushroom sauce.  The only draw back to this is that you miss out on all the sucs, as the french call it, or solids from the meat left over in the pan that add flavor to the sauce.  When liquids are added to these solids, its creates a great base for gravies and sauces.

A couple of things to remember when pan frying.  I would recommend using a stainless steel pan.  Make sure the pan is hot before you add the oil and that the oil is hot before you add your meat.  The molecules of the pan are collapsing and expanding as it heats up and if you place meat in it before it's hot enough, those molecules will grab a hold of your meat and cause it to stick.  Make sure your meat is patted dry and completely thawed out.  if not, there will be added moisture to the pan resulting in a longer cook time and over done meat.  The goal is to have a crispy golden crust without over cooking the food.  Keep in mind the thickness of the meat, thinner meats should be cooked at higher heat for a shorter time.  Longer cooking times will result in tougher dry meat.  The heat can vary on stoves, but one way to make sure the pan is at the right temp is to listen to the sizzling.  You want a gentle sizzling sound, turn the heat down if the sizzling is too intense and turn it up if it's not sizzling.  If this sounds too hard but you want a crispy outside to your chicken, you could simply pan fry each side until they are browned, then throw the meat in the oven to finish cooking.

Recipe: Chicken With Mushroom Cream Sauce

Ingredients

  • 3 tbsp grass-fed butter
  • 1 tbsp coconut oil
  • salt and pepper

Instructions

  1. Heat a large, stainless- steel pan over medium high heat
  2. Pat the breasts dry and season with salt and pepper
  3. Once the pan has reached the proper temperature, add the oil and 2 tbsp butter
  4. Place the chicken breasts in the pan and cook until golden brown. You may need to turn your heat down to medium if it's sizzling too much.
  5. Flip and continue to cook until just done. Alternatively, you could just sear the chicken and then finish in the oven at 350.
  6. Once the chicken is cooked, remove from the pan and set aside. Place a tented piece of foil loosely over the plate
  7. Do not remove any of the solids or oil/ butter from the pan. Add the shallots and cook until translucent
  8. Add the remaining tablespoon of butter and the mushrooms
  9. Once the mushrooms have browned and their moisture has evaporated, deglaze the pan with the white wine
  10. Add the chicken broth and let the sauce reduce by two-thirds then add the coconut milk
  11. Let the sauce simmer and reduce until it's a sauce like consistency
  12. Add additional salt and pepper if needed then pour it over your chicken

Let me know if I have created more mushroom lovers!

Kate's Healthy Cupboard - Gluten Free Recipes
In Entrees, Recipes Tags Chicken, Coconut Milk, Egg-Free, Low Carb, Nut-Free, Paleo, Primal
2 Comments

Apple Cinnamon Upside Down Cakes

September 12, 2012 Kate
Cinnamon Apple Upside Down Cakes

A few months ago I posted a recipe for Cherry Almond Upside Down Cakes...well it's time for a fall version!  I first thought about trying to do this with pumpkin and pecans, but decided I just can't go wrong with apples and cinnamon.  The recipes are very similar and super easy!!  These have been a huge hit around here and do not last long after they come out of the oven!  I suggest adding a scoop of my Dairy Free Vanilla Bean Ice Cream to the top of them while they are warm...yum!

Apple Cinnamon Upside Down Cakes

Makes 6 large cakes

Ingredients

Cakes:

  • 1 1/4 cups almond flour*
  • 2 eggs
  • 1/4 cup grass-fed butter or coconut oil, melted
  • 1/4 cup honey (I used Xylitol honey for lower sugar, or Swerve would also work)
  • 1 tbsp vanilla extract
  • 1/4 tsp sea salt
  • 1/4 tsp baking soda
  • 1 tsp cinnamon
  • dash of nutmeg

Topping:

  • 3/4 cup apples, skinned and diced (1 apple)
  • 1 tbsp grass-fed butter or coconut oil
  • 1 tsp cinnamon
  • 1 tsp coconut palm sugar or try Swerve

Instructions

  1. Combine diced apples, 1 tbsp butter/oil, 1 tsp cinnamon and 1 tsp coconut palm sugar in a bowl and mix well
  2. In a different bowl, whisk the eggs, melted butter/oil, 1/4 cup honey and the vanilla extract
  3. In another bowl, combine the flour, salt, 1 tsp cinnamon, nutmeg and soda
  4. Add the dry ingredients into the bowl of egg mixture and stir until combined
  5. Pour the apple mixture into the bottom of 6 holes of a greased muffin tin.
  6. Pour the batter over the apple mixture, it will come close to the top
  7. Bake at 350 for 20 minutes or until brown
  8. Remove from the tins with a big spoon.

Quick notes

*I used Honeyville Almond Flour. these are already pretty moist so Bob’s Red Mill may make them REALLY moist but still delicious!


Let me know which one you like better, the apple or the cherry.  I can't decide, they are both pretty darn good!

If you want to try Swerve or need to order more, use coupon code KATE10 for a 10% discount.  Swerve is my favorite sugar replacement.  It is the only sugar alcohol that will not cause tummy troubles and it does not raise blood glucose levels.

If you are an Amazon shopper, would you be so kind to use my affiliate link to make your purchases.  It is at no cost to you, it does provide a tiny kickback to Kate’s Healthy Cupboard.  This allows me to continue making and testing recipes for free.  Thanks so much!!

Kate's Healthy Cupboard - Gluten Free Recipes
In Breads and Muffins, Breakfasts, Recipes, Desserts2 Tags Almond flour, Breakfast, Brunch, Paleo, Primal, Swerve
15 Comments

Grain-Free Ginger Cookies

September 10, 2012 Kate
Grain Free Ginger Cookies

Earlier this year I posted this Gingersnap Cookie Recipe, and today I bring you another one!  Both of these cookies are delicious, but very different.  The original gingersnap cookies are made with almond flour and are soft and chewy like a molasses cookie.  Today's gingersnap recipe is crunchy, spicy and made from chestnut flour.

What is chestnut flour??!  Chestnut flour is a gluten free alternative to regular flour made from ground chestnuts.  Chestnuts have been dried and made into sweet flavored flour in Italy for centuries. In Tuscany, chestnut flour is considered a staple food, and it is commonly called for in recipes such as:  chestnut flour bread, pie crust, crepes, and other baked goods.  Its sweet flavor makes it the perfect fit for recipes involving almonds, chocolate, honey and hazelnuts. I have found it to be awesome in fall recipes that incorporate pumpkin and spice.  Chestnuts do not contain the fat content regular nuts have, and are instead largely composed of carbohydrates.  Chestnut flour does have less carbohydrates than regular white flour but has many of the same baking properties as flour.  I love using almond flour and am not afraid of fat by any means.  I am just enjoying how much fun this flour is to work with, and not to mention how good it is!

Is it actually a nut or a fruit?  According to Wikipedia, it's a fruit.  If you have tree nut allergies, please look into this more, but my understanding is that it's not a nut!!!

Convinced to buy some chestnut flour yet?  You should be because I have a few recipes coming that will use this flour.  It's worth buying a pound or two and seeing what you think!  It can be purchased from Nuts.com and while you are there, they have fine ground almond flour too if you need more.  It's comparable to Honeyville and they also sell other nut flours that could be fun to use instead of almond flour.  I have cashew flour on my list to buy soon to make this awesome Spicy Rosemary Cashew Crackers Recipe!

 Recipe: Grain-Free Ginger Cookies

Ingredients

  • 1 3/4 cup chestnut flour
  • 1/2 cup grass-fed butter or coconut oil, melted
  • 1/4 cup molasses or yacon syrup
  • 3/4 cup granulated sweetener*
  • 1 egg
  • 1/2 tsp vanilla
  • 1/2 tsp soda
  • 1/2 tsp sea salt
  • 1 1/2 tsp cinnamon
  • 3 tsp ground ginger (heaping if you like spicy)
  • 1 1/2 tsp ground cloves
  • 1/2 tsp nutmeg

Instructions

  1. With a handheld mixer, combine the butter/oil, egg, vanilla, sugar and molasses
  2. In another mixing bowl, combine the flour, soda, salt and spices
  3. Combine the two bowls and mix well.  the dough will be thick
  4. Take about 1/3 of the dough and roll it out between 2 pieces of parchment paper to about 1/8-1/4 inch thick
  5. Cut out cookies with a biscuit cutter or round cookie cutter. You could also roll dough into balls and press down flat with the bottom of a greased glass
  6. Place the cookies on a parchment lined cookie sheet and bake at 350 for about 7 minutes
  7. Remove from the oven and place cookies on a wire cooling rack to help them get hard and crunchy
  8. Repeat until the dough is gone

Quick notes

*I used half erythritol and half coconut palm sugar for the sweetener

This makes about 48 thin cookies.  Sounds like a lot, but they will go fast!!  They are so thin that I justified eating 4 at a time thinking it really was equivalent to just 1 regular cookie!

Kate's Healthy Cupboard - Gluten Free Recipes
In Recipes, Desserts2 Tags Chestnut Flour, Cookies, Dairy Free, Nut-Free, Swerve
4 Comments

Dairy Free Pumpkin Ice Cream

September 6, 2012 Kate
Dairy Free Pumpkin Ice Cream

I thought this was the perfect recipe for this time of year as we say good-bye to summer and hello to fall!  I will just forewarn you all that the pumpkin flood gates have opened!!!  It's that ime of year you start to see everything pumpkin on Pinterest and Facebook from food bloggers and I will be contributing to that.  I am sorry if you are not a pumpkin fan, but I will also be working on some apple cinnamon treats as well.

I have told you guys before how much I love my Cuisinart Ice Cream Maker.  It gets used all of the time since this is my go to dessert.  I know many people make ice cream without an actual ice cream maker, but I think it makes a pretty significant difference.  They are reasonably priced and I promise you will become addicted to it as well!!  In the meantime, I would just freeze this in a bread pan to make it easy to scoop out.  Another idea is to make smoothies with this.  I would still freeze it so it becomes your "ice cubes" then add some of it to a blender with some non-dairy milk and a vanilla protein powder!  Yum!!!!

Dairy Free Pumpkin Ice Cream

Ingredients

  • 2 cans full fat coconut milk
  • 4 egg yolks from pastured eggs
  • 1 1/2 cups pumpkin, fresh or canned
  • 1/2 – 3/4 cups sweetener*
  • 2 tsp vanilla extract
  • 1 1/2 tsp cinnamon
  • 1 1/2 tsp nutmeg
  • 1 1/2 tsp ginger
  • 1 tsp cloves
  • 1/4 tsp sea salt
  • 1 tbsp bourbon or vodka (optional, keeps it from getting rock hard)

Instructions

  1. Whisk the egg yolks, any liquid sweetener, vanilla, all spices and salt in a bowl and set aside
  2. Place the coconut milk and any granulated sweetener in a saucepan and bring to a simmer, do not let it boil!
  3. Remove from heat and slowly add the milk a ladle full at a time to the egg yolk mixture, whisking as you go. If the milk is too hot it will cook the eggs*
  4. Once it is all incorporated, transfer mixture to a blender and add in the pumpkin and blend until smooth
  5. Pour mixture back into the bowl and place in the freezer for an hour to cool
  6. Pour the mixture into an ice cream maker and follow the instructions or pour into a bread pan and freeze

Quick notes

*I used a combination of Xylitol Maple Syrup and erythritol to keep the sugar low. These are both not as sweet as regular syrup so add a little sweetener at a time until it’s to your liking

*I buy eggs straight from a farm with pasture raised chickens and feel comfortable eating the yolks raw. I skip the heating the milk part and just throw everything in the blender from the start, then into the ice cream maker.  I keep cans of coconut milk in the frig at all times to it’s already cold and ready to go!!

Variations

I did all of the spices as heaping measurements because I like the spice. You could certainly just use pumpkin pie spice as well.

Kate's Healthy Cupboard - Gluten Free Recipes
In Recipes, Desserts2 Tags Coconut Milk, Dairy Free, Holiday, Ice Cream, Paleo, Primal, Pumpkin
5 Comments

Spicy Sauteed Shrimp

September 4, 2012 Kate
Spicy Sauteed Shrimp

If you like shrimp, a bit of spice and a quick and easy meal, this recipe is for you!!  I am all about simple, but good when it comes to food...I may be too simple for some!  Tom has said numerous times that I'm such a good cook, I laugh every time he says that...after I tell him thank you.  I appreciate him saying that, but I really have a lot to still learn about cooking and technique.  What I am good at is sticking to the basics and learning how to add flavor to dishes.  My point is that YOU can be impressive in the kitchen, just keep it simple and spice it up!!!  As long as he likes my cooking, that's all that really matters, right?

Hope you enjoy this as much as we did!

Spicy Sauteed Shrimp

Ingredients

  • 1 lb raw shrimp, peeled and deveined
  • 2 bunches green onion, diced
  • 1-2 cloves garlic, minced
  • 1/2-1 jalapeno, seeded (unless you like it hot!) and diced
  • 1/4 – 1/2 tsp ground cumin
  • 1/2 – 1 lime, juice
  • 2 tbsp fresh cilantro, chopped
  • 1-2 tbsp coconut oil or butter
  • Red pepper flakes (optional)
  • Salt and pepper

Instructions

  1. Rinse and dry the shrimp, set aside
  2. In a large skillet, saute 1 tbsp of oil/butter with the onions, garlic and jalapeno over medium heat for about a minute.
  3. Add the shrimp, additional oil/butter if needed and cook for about 3-5 minutes until the shrimp are opaque throughout.
  4. Remove from heat, squeeze fresh lime juice over the top, sprinkle with cumin, red pepper flakes, salt and pepper and cilantro.  Stir and serve!
Kate's Healthy Cupboard - Gluten Free Recipes
In Entrees, Recipes Tags Dairy Free, Fish, Nut-Free, Paleo, Primal, Seafood
Comment

Better Butter Chicken (From Sarah Fragoso)

August 27, 2012 Kate
Better Butter Chicken

I shared this recipe link on Kate's Healthy Cupboard Facebook Page recently.  I know not everyone uses Facebook so I wanted to share it on here too.  It is such an easy recipe and one that just about everyone will enjoy! It is not my recipe, just one I tried and fell in love with!

I made this for the second time in a matter of a few weeks because it is that tasty!!  We enjoyed it plain, but I think this would be great over spaghetti squash or pasta if gluten is something you still choose to pollute your body with (sorry, I just hate the stuff and wish everyone would realize it's negative effects on the body!).  I make it a bit more saucy by reducing the amount of chicken (I use 1 1/2 lbs instead of 2 1/2) in the recipe and suggest doing that if you do plan to serve it over pasta, rice, squash or spiraled vegetable noodles.  I also use chicken breasts, not thighs, but feel free to use either one.  The recipe calls for fenugreek powder, I used fenugreek seeds and it worked just fine.  Whole Foods sells bulk seasonings if you can't find it in a bottle or if you just want to buy enough for this recipe.  My suggestion is to use grass-fed butter where it is called for instead of the coconut oil option.  I think butter makes it creamier and let's be honest, butter makes all things better!!!

You can find the recipe here from Sarah Fragoso of Everyday Paleo.  This works well to freeze and pull out as leftovers later!!

Hope you enjoy it as much as we did!

Kate's Healthy Cupboard - Gluten Free Recipes
In Entrees, Recipes Tags Chicken, Coconut Milk, Egg-Free, Low Carb, Nut-Free, Paleo
Comment

Coconut Shrimp Cakes

August 23, 2012 Kate
Coconut Shrimp Cakes

This is my version of fried coconut shrimp done in a completely different form!  These are so easy and so tasty!  I kept it really simple but there are plenty of different flavor options.  I wanted to taste the mild sweetness of the coconut without anything over shadowing that.  Some cayenne pepper would spice it up or some curry could be good as well!

Most coconut shrimp recipes involve flour or cornstarch and they also use sweetened coconut.  I chose to leave out the flour and let the coconut be the binder along with the egg.  I don't think it needs flour, but feel free to play around with almond or coconut flour.  As for the coconut, these are definitely not as sweet as coconut shrimp you find on most menus.  Again, feel free to use sweetened coconut or add a bit of a sweetener.

I enjoyed these plain, that's how I like things!  There are numerous dipping sauce recipes and sauces sold in a bottle that would be great with these.  One that comes to mind is a Mango Habanero Sauce that you can find at Whole Foods that is fantastic on grilled shrimp.  Better yet, make your own!

Coconut Shrimp Cakes

Ingredients

  • 1 1b raw shrimp, shelled and deveined
  • 3/4 – 1 cup unsweetened shredded coconut (use sweetened or add sweetener if you like it sweeter)
  • 2 egg whites
  • 1/2 tsp celtic sea salt
  • 2 tbsp virgin coconut oil for frying (virgin has coconut taste and I think that adds to the flavor here)

Instructions

  1. Cut off tails of the shrimp and place in a food processor.
  2. Pulse the shrimp until they are in tiny pieces, almost like mush.
  3. In a large bowl, whisk the egg whites.
  4. Add the shrimp, coconut and salt to the eggs and combine
  5. Form the batter into 8 patties about 1/2 inch thick
  6. Heat 1 tbsp of oil in a large skillet over medium heat
  7. Add four patties to the skillet and cook about 4-5 minutes per side
  8. Add the other tbsp of oil to the pan and cook the remaining 4 patties

Enjoy!

Kate's Healthy Cupboard - Gluten Free Recipes
In Entrees, Recipes Tags coconut, Fish, Low Carb, Nut-Free, Paleo, Seafood
Comment

Lollipop Rolls

August 20, 2012 Kate
Lollipop Rolls
Lollipop Rolls

For those of you that don't know me, I am a huge sushi fan!  Yes, I love raw fish!  I like cooked salmon, but raw salmon sashimi does not taste fishy at all, and if it does, it's old or bad quality!  I buy sushi grade salmon and tuna from Whole Foods and have never had it be bad.  They have it already portioned out in slices and pack it fresh on a regular basis.  Raw fish does not stay fresh for long, so please buy it to use that day or possibly the next.  So if you are someone that avoids sashimi because you can't stand how fishy cooked salmon is, give it a try, you might be surprised!!

One of my favorite sushi restaurants in Scottsdale that we frequent a lot, has four different lollipop rolls on their menu.  I just love how refreshing they are with the cucumber wrap and they are free of rice for all you grain free friends out there!  The roll I order consists of salmon, yellowfin tuna, crab and avocado wrapped in cucumber and served with a ponzu dipping sauce.  Being gluten and dairy free tends to mean you can not enjoy any sauces at sushi restaurants.  I love these as is with some wasabi on top, but for my lollipops I decided to dip them in my Avocado Vinaigrette.  I love the mixture of avocado and sushi so this is the perfect match!!  The other option is to eat it like a traditional roll and dip it in a mixture of wasabi and some Coconut Aminos (gluten free soy sauce alternative that tastes great!!).

I was so excited to post this recipe that I didn't want to wait any longer as I experimented with a gluten free ponzu sauce.  I will work on one, seems pretty simple.  I am also going to work on a pesto dipping sauce that many places serve with rolls as well.  These may look complicated, but really take no time at all!!!

Lollipop Rolls

Makes 12 rolls

Ingredients

  • 3/4 lb of sushi grade fish (I used salmon and tuna, but crab or shrimp will also work)
  • 1 large cucumber
  • 1/2 of an avocado, sliced into 6 strips
  • 12 bamboo skewers
  • wasabi powder

Instructions

  1. Using a mandoline, slice the cucumber lengthwise into 1/8 inch thick slices
  2. Lay out a slice of cucumber vertically. Place fish slices and a slice of avocado horizontally across the cucumber. Set all of them right next to each other. You may need to trim off and pieces that are hanging over the edge of the cucumber
  3. Roll the cucumber tightly until it overlaps itself.
  4. At the overlap spot, poke a bamboo skewer into each side so you can slice it right down the middle to form two rolls.
  5. Repeat the process until you have 12 finished rolls.
  6. Combine wasabi powder with a bit of water to create desired consistency

Don't like sushi, enjoy these with chicken or beef strips and some raw veggies!  Don't be afraid to get creative!

Kate's Healthy Cupboard - Gluten Free Recipes
In Entrees, Recipes, Snacks and Appetizers2 Tags Fish, Low Carb, Nut-Free, Paleo, Raw, Seafood, Sushi
4 Comments
← Newer Posts Older Posts →
download.jpeg

Welcome to Kate's Healthy Cupboard! A place for healthy, grain free recipes, some low carb recipes, safe beauty and products for the home  and more...


>>  CONNECT WITH KATE  <<

pinterest.png
facebook.png
instagram.png

>>  SUBSCRIBE  <<

Success! Now check your email to confirm your subscription.

There was an error submitting your subscription. Please try again.


>>  SEARCH RECIPES  <<


Copyright 2016 Kate's Healthy Cupboard  ||  Website Design